Best Dual Monitor Setup Guide: What Actually Makes It Work 

You will find plenty of dual-monitor set-up advice that amounts to “put two screens on a stand and you are done.” In our view, that is an incomplete way of looking at it. The quality of a setup is not a matter of spec-sheet figures but of how the panels, mounts, cabling, and window management hold up over a day. Mismatched pixel density and unequal refresh rates create more friction than you might expect, and cables with limited bandwidth only add to the problem. 

The point of this guide is to get at the technical side of what makes for a seamless experience, rather than just having another screen to look at. We will be going over resolution scaling and panel tech, the limits of cable bandwidth, and the sort of ergonomics that do something about neck and eye strain. Then we will examine why manual window management tends to fall apart after a while and which software can put right what is wrong with it. 

What Makes the Best Dual Monitor Setup Work Well 

The mark of a good dual monitor arrangement is one that has been put together with an eye for pixel density, rather than simply going by the screen size or what the resolution says. Then there is the matter of physical geometry; how the pair are positioned in relation to one another and to your line of sight will make a significant difference. Get it right, and the setup is natural, but a poor alignment will have you making small adjustments on a regular basis as the day goes on. 

Match Pixel Density, Not Just Resolution 

Pixel density (PPI) is the diagonal resolution divided by the screen’s diagonal size in inches. Two monitors can share a resolution label and still look mismatched: 

  • A 27-inch 1440p monitor runs about 109 PPI 
  • A 24-inch 1440p monitor runs about 122 PPI 
  • A 24-inch 1080p monitor runs about 92 PPI 
  • A 32-inch 4K monitor runs about 137 PPI 

Why This Matters More at Close Range 

Pixel density differences become more noticeable the closer you sit to your screens. At typical desk viewing distances of 20 to 28 inches, a PPI gap of 15 or more between two monitors is usually visible to most people, especially for text-heavy work like code or spreadsheets. 

Choose a Mount Rated for Your Panel Weight 

There is no point in a careful initial alignment if the arm or stand you have chosen cannot bear the monitor’s weight. It will eventually sag, drift from its position, or lose its height setting. 

VESA Pattern Sizes 

For the most part, monitors are built to one of two standard mounting patterns: 75x75mm on the lighter panels (typically under 24 inches) and 100x100mm for anything 24 inches and up. Do not make assumptions about a generic arm’s compatibility with an ultrawide or large 4K model, as some employ non-standard or dual-pattern mounts; the manual will have the answer. 

Load Rating Checks 

The maximum load rating in kilograms that an arm puts on paper is not something to ignore. A 27-inch 4K can put more than 6kg on it, while a big curved or ultrawide panel may top 9kg. Make sure to verify the arm’s capacity against the true weight of the monitor and any extras such as a light bar or webcam mount before you put it in place. 

Calibrate Brightness and White Point 

Even with the same 0 to 100 brightness scale, two panels may not appear identical. Manufacturers calibrate that scale inconsistently from one model to another, or even between production runs of the very same model, creating a difference in look. 

For instance, place a 250-nit panel next to a 350-nit panel and set both to 50%. On paper the figures are the same, but in practice they will be mismatched; this discrepancy is a frequent source of an uneven appearance in what is supposed to be a matched dual setup. 

To get around it, do not rely on the on-screen percentage for brightness but rather match the nits. As for white point, make sure both screens agree, usually at 6500K for standard applications. If the work demands color accuracy, a hardware colorimeter is the best option, as visual matching can be misleading. And after any driver or firmware update, it is wise to recheck your calibration, as some of these updates have a habit of wiping out custom profiles. 

Picking the Best Monitors for Dual Setup 

Panel technology and connectivity drive most of the real-world differences between monitors that look similar on a spec sheet but behave very differently in daily use. 

Panel Technology: IPS vs. VA 

  • IPS panels deliver roughly 178-degree viewing angles with minimal colour shift, which matters when a second monitor sits at an angle to your line of sight 
  • VA panels offer higher static contrast, often 3000:1 versus IPS’s typical 1000:1, but shift color and brightness noticeably past about 30 degrees off-centre 
  • OLED panels, increasingly common in higher-end monitors, offer near-instant response times and true black levels, but carry a higher risk of static-image burn-in, which matters if you keep a taskbar or sidebar visible for long stretches 

That off-angle shift on VA panels is a real issue in a side-by-side layout, since one monitor is rarely dead-center in your field of view. If your secondary monitor sits at a 20-to-30-degree angle, an IPS panel will hold color consistency better than a VA panel in that same position. 

Connectivity and Bandwidth Limits 

Cable and port standards have a bandwidth ceiling that catches people off guard, especially when reusing older cables from a previous setup. 

DisplayPort vs. HDMI 

  • DisplayPort 1.4 supports up to 4K at 120Hz or 1440p at 165Hz+ with DSC (Display Stream Compression) enabled 
  • DisplayPort 2.1 raises that ceiling further, supporting 4K at 240Hz or higher on newer GPUs and monitors 
  • HDMI 2.0 caps out around 4K at 60Hz 
  • HDMI 2.1 closes much of that gap, supporting 4K at 120Hz, but requires both the monitor and the cable to be rated for it 

If you chain a high refresh rate 1440p monitor through an older HDMI port or an HDMI 1.4 cable pulled from a drawer, you will not get the panel’s rated performance, regardless of what the monitor is capable of on paper. 

USB-C with Power Delivery 

USB-C monitors with DisplayPort Alt Mode can carry video, data, and power delivery, commonly up to 90W or 100W, over a single cable. That’s a genuine reduction in cable clutter, since it replaces three separate cables with one, and it can also charge a laptop while driving the display, which is relevant for anyone docking a laptop daily. 

Cable and Port Checklis

Before buying, confirm: 

  • Your GPU’s output port version matches the monitor’s input spec, not just the port shape 
  • The cable itself is rated for your target resolution and refresh rate, since a DisplayPort cable that looks identical to another may only support a lower bandwidth tier 
  • You have enough ports for future expansion if you plan to add a third display 
  • Your GPU can drive two high-refresh displays simultaneously, since some budget and integrated GPUs share bandwidth across outputs 

Building the Best Dual Monitor Setup for Gaming 
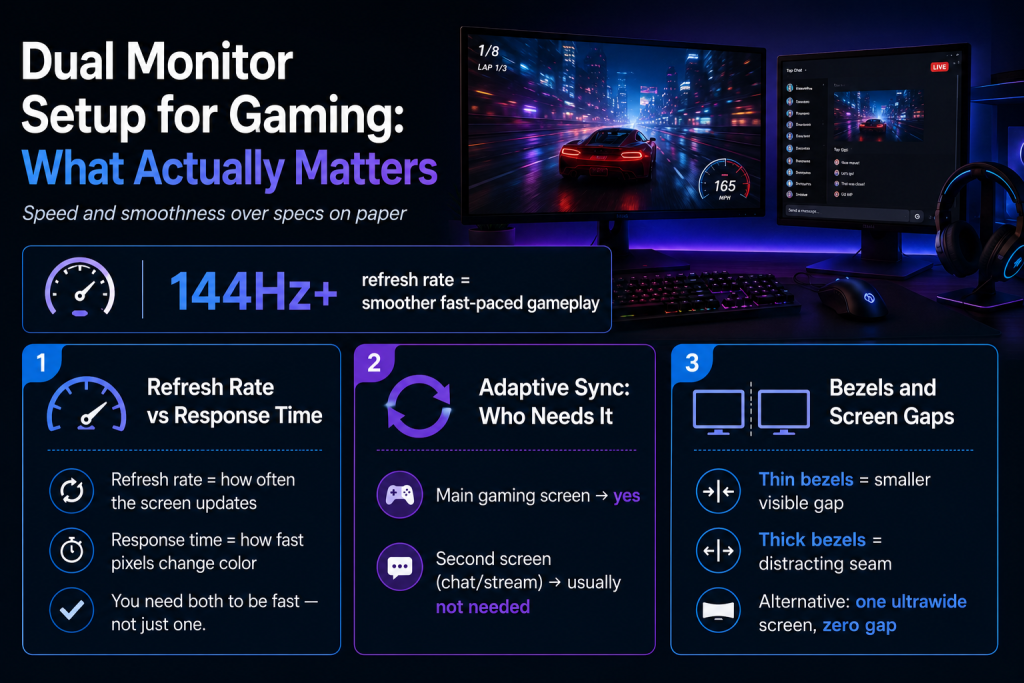
When you set up a dual monitor for gaming, your priorities differ from those for productivity. In this case, it is latency and motion clarity that take precedence over things like color fidelity or viewing angle. 

Refresh Rate vs. Response Time 

One must distinguish between the two. Refresh rate (Hz) tells you how often the panel redraws in each second. Then there is response time (ms), which is the speed of a pixel’s transition from one color to another, typically on a gray-to-gray (GtG) basis. 

Do not be swayed by a high refresh rate alone; a 165Hz panel with an 8ms response time will still have its share of motion blur. It is best to look at both figures. For the most part, competitive shooters are better served by 144Hz or more with a sub-3ms GtG, whereas with less demanding games you will find little advantage in going beyond 120Hz. 

Adaptive Sync: When You Need It 

With adaptive sync, whether FreeSync or G-Sync, you avoid screen tearing because the display refresh rate matches what the GPU is outputting, typically within a 48 to 144 Hz range. This is an advantage your main gaming rig will make use of, particularly when you are into competitive or fast-moving games. There is no point in spending the extra on a secondary screen for a stream overlay or chat window; it does not require such features. Do make sure the monitor you are looking at is compatible with your GPU’s brand of sync standard, however. Some panels will only take one or the other and lack any form of certified crossover. 

Bezel Width and Visual Continuity 

In a dual configuration, the width of the bezel is as much a practical concern as it is a matter of looks. Put a 15mm bezel up against a 5mm one, and the resulting gap between them is quite noticeable; in the middle of a game, that space will be right in your peripheral vision. 

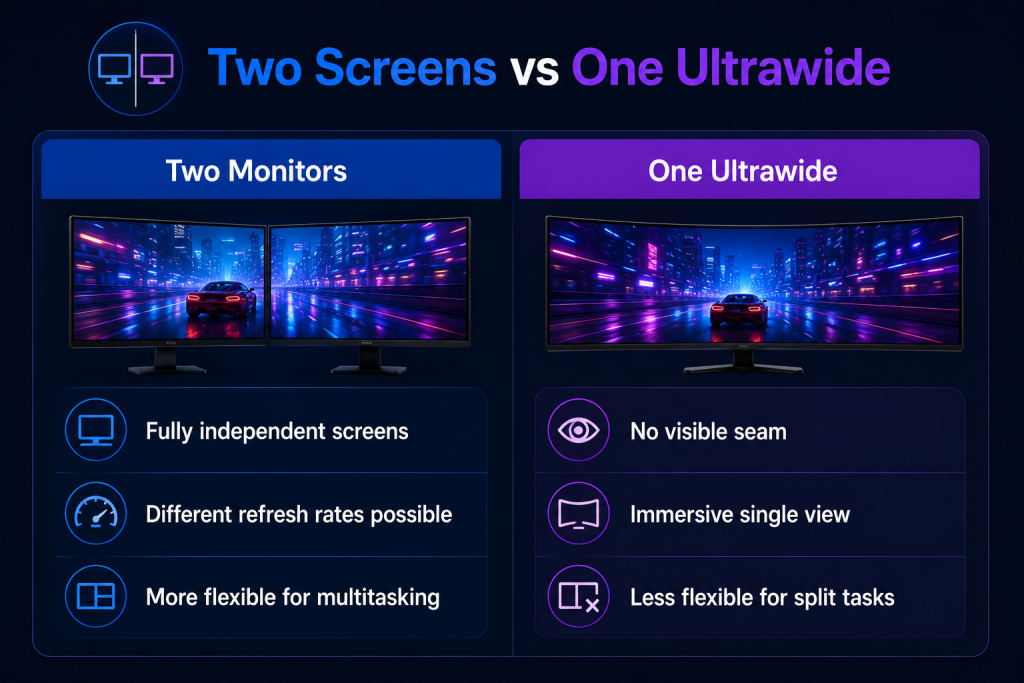
Then there is the question of side-by-side versus an ultrawide. An ultrawide panel is the solution for those who find the seam of a dual setup distracting during fast-paced activities, as it eliminates the gap entirely. The trade-off is that you forgo the flexibility of true independent displays. An ultrawide cannot match what a pair of monitors can do in terms of running separate inputs, refresh rates, and resolutions on their own, unless one resorts to picture-by-picture mode to divide the screen. 
What to Check for the Best Monitors for Dual Monitor Setup Options 

There are a handful of technical points that go beyond what you will find on the spec sheet or in most buying guides. These are the things that separate a setup from one that is an everyday nuisance. 

Stand and Ergonomics 

Don’t settle for just “adjustable” when it comes to the stand; check the height adjustment range in millimeters. If there is any thought of angling a secondary monitor, verify the tilt, swivel, and pivot. A reasonable rule of thumb is to measure your desk depth first: 20 to 28 inches is the proper distance for your eyes from the screen, and bigger panels require that kind of clearance. For those with a deep desk or who want to put screens in closer proximity than the stock stands will permit, take the reach of a monitor arm into account. 

Panel Uniformity and Warranty 

Then there is the matter of panel uniformity. This is more of a manufacturing variable than a design specification. You can have two of the same models and still find color variance or some backlight bleed on the individual unit, which is a common enough occurrence with VA panels at the lower end of the price scale. It is all down to tolerances in the factory that change from one batch to the next. 

Keeping Your Layout Organized Across Multiple Screens 

The hardware is only part of the equation. What remains is the matter of app windows and ensuring they stay where they should be on all your screens, day in and day out. One would rather not have to drag them back into position by hand after a reboot or a driver update has reset the display. 

Why Manual Window Management Breaks Down 

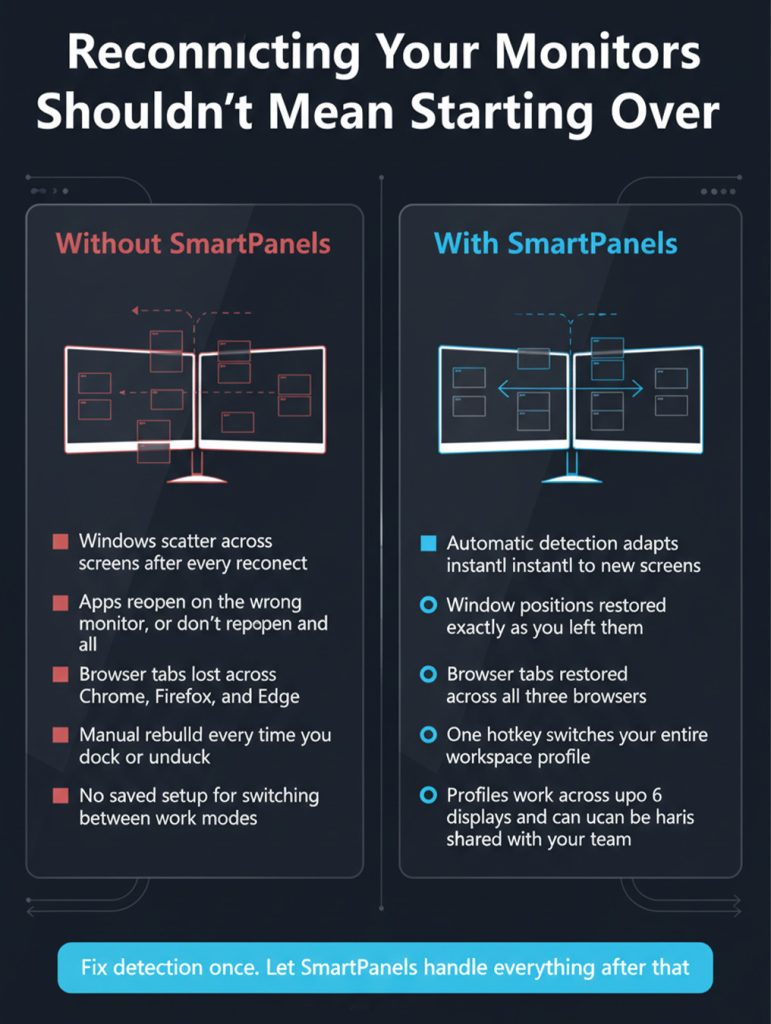
Then there is the issue with Windows’ own Snap Layouts. It recalls a grid but cannot tell which browser tabs or applications belong in each one. After an update or simply undocking the laptop to put it on another monitor, the grid is gone; you must put it back together. If you are moving between a desk with a dock and the laptop itself, that kind of reconstruction is a weekly occurrence. Over the course of a month, it is time well and truly lost. 

What to Look for in Layout Management Software 

If you’re evaluating tools to solve this, look for: 

  • Layout memory that saves exact window position, size, and monitor assignment, not just a grid template 
  • Profile switching for different workflows, such as writing, gaming, or video calls 
  • Automatic detection when your monitor configuration changes, so layouts adjust instead of scattering 
  • Multi-display scaling, since a tool built for two screens may not hold up if you add a third or fourth later 
  • Tab-level memory for browsers, since restoring window position without restoring open tabs still leaves manual cleanup 

SmartPanels is an example of a tool that handles this sort of thing. With a single click, it can restore a profile across up to six displays, remembering everything from window dimensions to open tabs. It is a far more involved process than a grid-snap function, tracking individual applications and tabs instead of merely the screen real estate. 

Frequently Asked Questions About the Best Dual Monitor Setup 

Do both monitors need to be the same brand?  

The brand is less important than matching resolution and pixel density for a more uniform look. 

Is a curved monitor better for a dual screen setup?  

As for curved panels, they are meant to be an ultrawide screen that wraps around your field of view. Put two next to each other, and the curve will work against you at the seam, creating an angle mismatch and a gap. 

How much desk space does a dual monitor setup need?  

When setting up a pair of 27-inch monitors on arms, allow some room for the clamp base and to route the cables; figure on about 48 to 50 inches of desk width to accommodate them. 

Does adaptive sync matter for both monitors, or just one?  

For the most part, FreeSync or G-Sync is only a consideration for the primary display. You typically don’t need it on a secondary monitor that you use for a stream overlay, some notes, or chat. 

Does a dual monitor setup slow down my computer?  

In nearly every instance the answer is no. Any recent GPU can handle dual 4K output without noticeable performance loss, even integrated ones; only demanding rendering tasks might reveal a difference. 

Can I mix a 60Hz monitor with a 144Hz monitor?  

As for running different refresh rates, the GPU is quite capable of driving each display on its own terms. It is best to put your more demanding, fast-moving content on the higher refresh panel, though, to keep things as smooth as possible. 

Do I need the same panel technology on both monitors?  

Not strictly, but mixing IPS and VA panels usually creates a visible contrast and color difference, especially at an angle, which some people find more distracting than a pixel density mismatch. 

Is DisplayPort always better than HDMI for a dual setup?  

In most cases, the answer is yes for higher-end resolutions and refresh rates, as DisplayPort 1.4 and 2.1 have greater bandwidth than HDMI 2.0. That said, if your cable and monitor can handle it, an HDMI 2.1 will reduce that difference significantly. 

How do I know if my monitor arm can hold both my monitors?  

When it comes to the arm, be sure to compare its maximum load rating in kg with the weight of the monitor as listed by the maker, considering any add-ons such as a light bar or webcam. One should bear in mind that a single-arm mount’s rating is typically per unit rather than a combined total. 

Why does my secondary monitor appear dimmer even when both are set to the same brightness level? 

As for brightness, do not rely on the percentage figure since there is no standard from one manufacturer to the next; two screens set to 50% may put out quite different nit levels. For accuracy, it’s better to match them by nits. 

Where Most Setups Actually Fall Short 

best dual monitor setup really comes down to a few simple checks. Match your screen size and resolution. Pick a stand that can actually hold your monitors. Match brightness and color across both screens. Use cables that support the speed you want. 

Most dual-monitor frustration doesn’t come from one big mistake. It comes from small mismatches, like uneven brightness or a cable that limits your refresh rate. These issues rarely show up when comparing spec sheets. 

Once your hardware is sorted, the last step is keeping your layout organized. Good software should remember your setup and restore it automatically, so you’re not rebuilding your workspace every time you sit down. 

How to Connect Dual Monitors to Laptop (Easy Guide) 

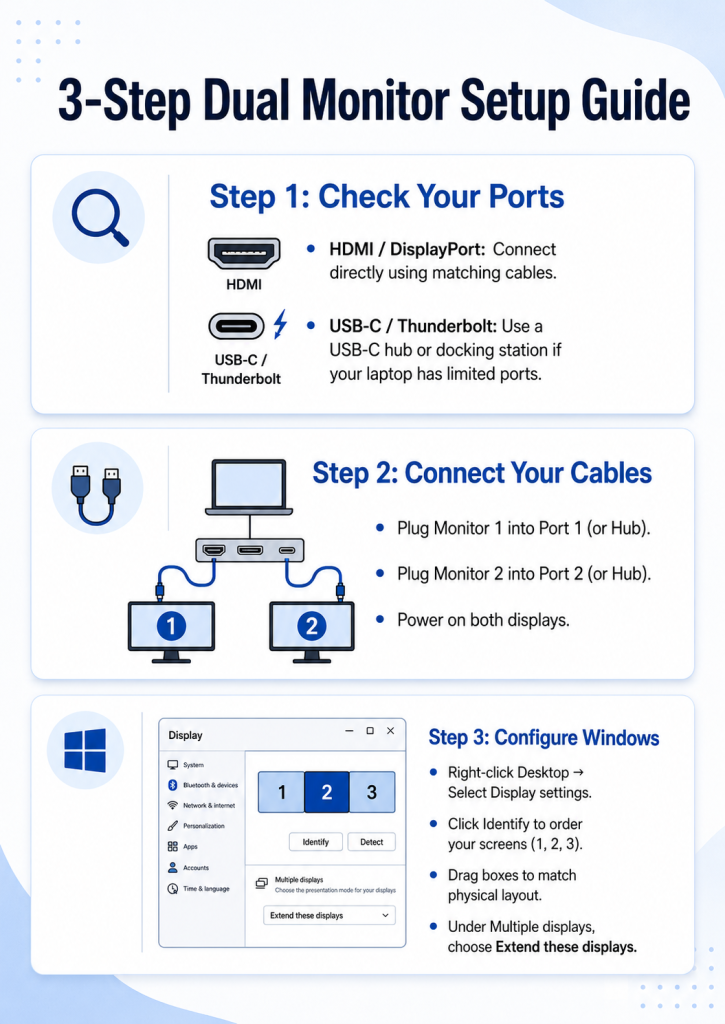
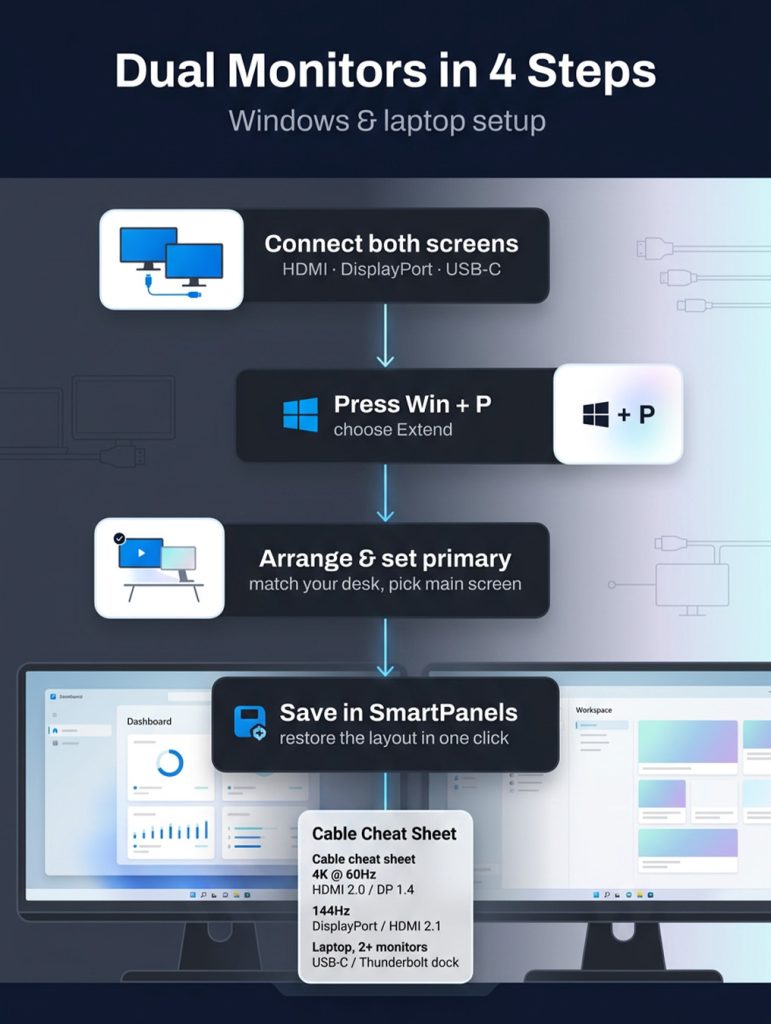
There is a good case for doubling the active screen on your laptop with a dual monitor setup; it will have you working at a much better pace day in and day out. Then there is the question of how to go about connecting them to a laptop without the usual technical headaches, something that crosses the mind of more than one professional. In truth, it is not complicated to put some extra room in your digital workspace. 

The process is straightforward. Start by seeing what physical ports are on hand with your machine, then pick the appropriate video cables or a powered docking station. A little configuration of the Windows display settings is all that follows.  

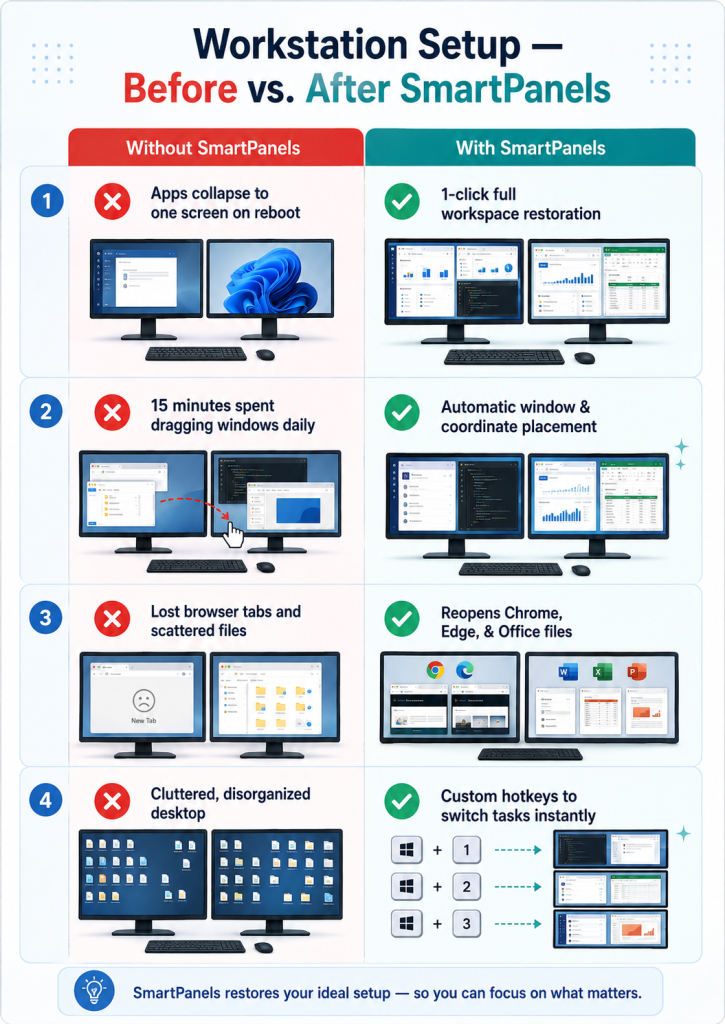
Of course, if you have to be shuffling open application windows around each morning it can get tiresome. SmartPanels takes care of that for you by remembering the precise position of every window on your connected screens so the whole workspace can be put back in place with a click. Read on and put your workstation to work for you. 

Understanding How to Connect Dual Monitors to Laptop Options & Hardware Setup 

A good rule of thumb is to give your laptop hardware a once-over before you start running cables. It takes the stress out of setup when you are familiar with what video port options are at your disposal. 

Video Output Ports Explained 

Start by looking over the side panels of the machine. You will find that most contemporary laptops have a full-size HDMI port for sending video and audio to an external display without issue. An older business model may have VGA or Mini DisplayPort in their stead. Then there are the ultra-slim varieties, which tend to make do with USB-C or Thunderbolt. Be aware though: a USB-C port is not automatically capable of video output unless it has support for DisplayPort Alternate Mode (DP Alt Mode). With an understanding of the ports on hand, connecting dual monitors to a laptop is straightforward. 

Cable Types and Signal Adapter Protocols 

Then look at the video inputs on the pair of external monitors. There you get HDMI, DisplayPort or USB-C ports. The idea is to make a direct connection between those and the outputs on your laptop. Say your machine has an HDMI port as well as a USB-C one; in that case you would need an HDMI cable and a USB-C cable to hand. Should your laptop not have sufficient native ports for the job, there is no need to be concerned. An active display adapter will do the trick. These devices handle the conversion of the video signal within themselves, so you can run more than one display off a single port and still have a clear picture. 

Docking Stations and Multi-Stream Transport (MST) 

There is no better way to put the hardware in a dual monitor configuration to work with your laptop than with a multi-port docking station. It is not uncommon for a portable machine to have but a single video output, but a USB-C or Thunderbolt dock will remedy that in short order. You need to insert the device into the main port of the laptop and run the two monitors directly to the hub.  

In addition, DisplayPort signals can be daisy-chained from one monitor to the next without trouble thanks to Multi-Stream Transport (MST). The net effect is a tidy workspace free of unsightly cables and a laptop that stays always powered up. 

Step-by-Step Software Configuration for How to Connect Dual Monitors to Laptop 

After connecting your cables correctly, you must adjust your operating system software settings. Proper settings ensure both external screens show desktop content cleanly. 

Accessing Windows Display Settings 

To begin, right-click on an open spot of the desktop and select Display settings from the menu that appears. In most cases Windows will have already picked up any new external monitors, but should a screen stay unresponsive, hit the Detect button.  

This brings up a set of numbered rectangles for your displays. If you want to see which is which, press Identify and the corresponding numbers will be shown on the actual screens. Then arrange the rectangles by dragging them into position so they reflect the way your desk is set up. A click on Apply will put those changes in place. 

Choosing Display Modes: Extend vs. Duplicate 

The next step is to determine the way desktop content will be shown. Go to Display settings and find the Multiple displays area further down the page. While one could opt for Duplicate these displays to have a mirror image of the laptop, the more productive approach is to choose Extend these displays.  

In that mode the various screens become a single, expansive canvas, allowing documents, open tabs and other applications to be moved from one to the with ease. Such configuration is a must for anyone looking to make the most of dual monitors on their laptop. 

Adjusting Resolution, Refresh Rates, and High DPI Scaling 

Screen visuals are another matter for fine-tuning. One should verify that every monitor is operating at its native resolution and look at the refresh rates in the advanced display options; a 60Hz setting or better will keep cursor motion smooth.  

It is also worth adjusting the scale percentage on each monitor to have text that is crisp and legible. Good High DPI scaling is the way to avoid any blurriness or the kind of eye strain that comes with long hours at work. 

Dedicated Solution: Automate Your Workspace with SmartPanels 

There is only so much a multi-monitor set-up can do in terms of physical screen space; when it comes to keeping your open apps in order, the task is still one that eats up time. A well-configured smart panels system puts an end to that sort of software hassle on a day-to-day basis. 

How SmartPanels Interacts with Windows API 

For Windows users with several displays, SmartPanels is the workspace application of choice. It is not merely another window-snapping utility. Operating at the Windows API level, this tool will monitor process IDs and application state handles as well as the exact display coordinates on any of six screens for a truly seamless experience. 

Restoring Complete Workspaces, Files, and Browser Tabs 

There is nothing to it when it comes to hooking up your screens, yet having to re-open your apps each morning is an unnecessary drain on time. A case in point is what happens with Windows after a reboot or you have unhooked from the dock; all your open windows are condensed to a single display.  

SmartPanels makes short work of that. With a launch of the program, any open application is put right back where it was on the monitor. It also has the courtesy of automatically bringing back your recent spreadsheets and documents, not to mention active tabs in Edge, Firefox or Chrome. In short, it preserves your workspace layout without any effort on your part. 

Creating Custom Hotkeys and Workspace Sharing 

With SmartPanels it is possible to put together separate workspace profiles to suit the task at hand. One might be set up for coding, another for your communications and a third for research purposes. To move between them in an instant, simply assign the layout of your choosing to a custom hotkey on the keyboard. There is also the option to export and email your workspace setup to colleagues; a handy way to make onboarding remote team members more efficient and orderly. 

Advanced Technical Tips for How to Connect Dual Monitors to Laptop Efficiency 

  • Managing Graphics Processing Unit (GPU) Resources 

Consider that an integrated graphics chip has to make do with the system’s own RAM. If you are putting a strain on the card by running several high-resolution screens and notice some video lag, the remedy is to shut down any resource-intensive applications in the background. With a proper dedicated card, dual 4K monitors are no trouble at all. As for rendering efficiency, be sure to use the manufacturer’s utilities to keep GPU drivers current. 

  • Erasing Desktop Cable Chaos and Power Delivery 

There is value in organizing the cables at your desk; it is good for hardware longevity and helps with concentration. Opt for USB-C with Power Delivery (PD) capability to handle video as well as power. Such a single-cable approach will charge the laptop and put out dual video feeds at the same time. To keep things in order, bundle up the monitor wires behind the desk arms with some velcro ties. In the end, you are left with a tidy workspace that is free of clutter and distraction. 

Troubleshooting Common Issues in How to Connect Dual Monitors to Laptop Setups 

One is bound to run into the odd technical glitch when first installing hardware. The following will have you past any display problems in short order. 

  • Fixing Unrecognized Displays and Resetting Display Drivers 

A “No Signal” on the screen can be alarming, but there is no need for concern. Start by making sure every physical cable is properly seated. Then try hitting Win + Ctrl + Shift + B; that keyboard combination will give your graphics driver an instant reset and leave your work as is. Should the monitor remain unresponsive after that, a simple restart of the laptop with the cables in place should do the trick. 

  • Resolving Mouse Cursor Alignment Problems 

You may find the cursor tending to hang up on screen edges as you move the mouse from one monitor to another. It is a quirk of Windows when the display setup does not correspond with the actual height of your screens. The remedy is to go back into the Windows Display settings and make sure the virtual monitor boxes are in proper order. Take some time to line up the top or bottom edges, and the cursor will have no trouble moving freely between them. 
 
2nd Monitor Not Detected? Learn 10 Main Reasons and How to Fix It 

Frequently Asked Questions (FAQs) 

1. Can I connect two monitors to a laptop with only one HDMI port? 

Connecting a pair of monitors is straightforward. An active USB-to-HDMI adapter with DisplayLink or a USB-C docking station will do the job for any extra displays you wish to run. 

2. What is the difference between DisplayPort Alt Mode and DisplayLink? 

The difference in how they work is worth noting: DisplayPort Alt Mode is a hardware solution that puts native GPU video right through the connection. DisplayLink, on the other hand, relies on software drivers to compress the data and pass it along via conventional USB ports. 

3. Will a dual monitor setup slow down my laptop overall speed? 

For the most part, one will not find that dual monitors put a drag on ordinary office applications. That said, if the work involves 3D rendering of any complexity or top tier gaming on several screens at once, a good graphics card is a must. 

4. How does SmartPanels save time on dual monitor setups? 

Then there is SmartPanels to consider. With it, you can have your full multi-screen setup back in place with one click after a reboot; the program remembers where every window was along with your open files and browser sessions. 

5. Can I use dual monitors with different display resolutions? 

As for Windows, it has no trouble handling a mix of resolutions. Should you want to maintain uniform text sizes, the Display settings allow for individual scaling on each monitor. 

Conclusion: Master How to Connect Dual Monitors to Laptop 

All in all, there is nothing complicated about setting up dual monitors on a laptop. The process is simple: determine which video ports are on your machine and get the proper cables, then head into Windows to set your native resolutions and display layout. Such a hardware setup will give you more visual room in no time. 

But for day-to-day applications, one needs a bit of software ingenuity to keep things in order. That is where SmartPanels comes in; it is an intelligent automation tool that does away with desktop clutter and the effort that goes with it. Once installed, it will handle the placement of your windows and browser tabs on every screen, remembering them for you so you are not left to put everything back in place after a reboot. With the distractions removed, attention can be given to what really matters.  

We recommend following this guide to put together the kind of multi-display workstation you want. Make the upgrade to your workflow and see your productivity improve right away. 

[Fix Your Workflow] 

Windows Boot Manager Explained: How to Fix Startup Errors 

There is not much that can throw you off balance like a PC that won’t load Windows. Hit the power and, instead of your familiar desktop, you see some obscure error message. The culprit is usually the Windows Boot Manager, that unassuming program responsible for getting your operating system up and running. You don’t think about it when everything is working, but if it fails, the machine stops at startup. 

The good news is that there is a straightforward remedy for most of these issues. This guide explains the role of the boot manager, the reasons for its failure, and how to fix it. We also cover how SmartPanels can be used to restore your working environment after the PC is back online. Let us begin with the fundamentals and work our way through to some hands-on repairs. 

What Is the Windows Boot Manager? 

There is a small utility in Windows known as the Windows Boot Manager, or BOOTMGR for short. Microsoft introduced it with Windows Vista, and it has been essential to the OS ever since, from 7 to 11. 

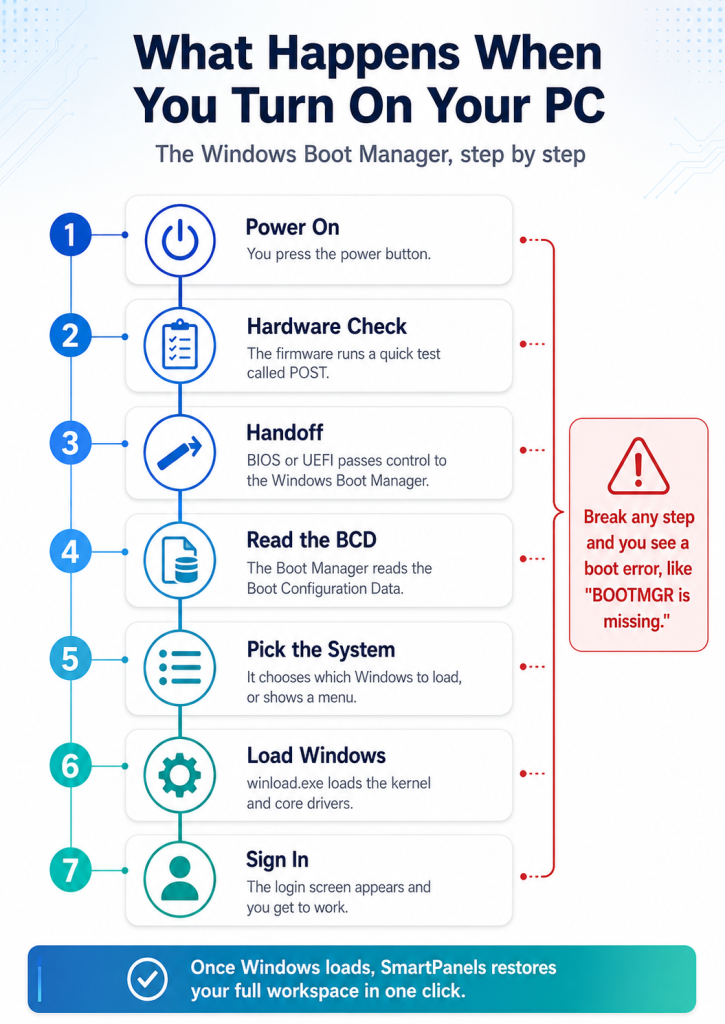
When you power up your PC, it is the first thing to run. The process begins with your firmware, be it BIOS or UEFI, which does an initial check of the hardware before ceding control to the Windows Boot Manager. You can view the latter as a kind of traffic director. It will read a file known as the Boot Configuration Data (BCD) to locate where your Windows files are kept. If there is more than one operating system on the machine, a menu is presented to choose which one to start. 

It is worth distinguishing between the three separate functions at play here to avoid any confusion. The firmware is what rouses the hardware. The Windows boot manager decides which system to put in motion. And lastly, a bootloader called winload.exe is responsible for loading the Windows kernel. Each has its own part to play. 

How the Windows Boot Manager Works 

There is a definite order to the startup process. The startup process begins when you hit the power button, and the firmware then conducts its hardware check, or POST. From there, the Windows boot manager takes over and consults the BCD store to find the operating system. The boot manager then calls up the Windows loader, winload.exe, which in turn is responsible for starting the core drivers and the Windows kernel. 

The whole thing is a matter of seconds, so the process is seldom seen. But if any part of that chain fails, the PC will come to a halt. For that reason, having a working knowledge of the Windows boot manager allows for quicker troubleshooting. 

BIOS Boot vs UEFI Boot

There is a distinction in the process depending on the type of firmware. An older BIOS will have its firmware read the Master Boot Record (MBR) to find the active partition, where it will come across a file called BOOTMGR. 

With UEFI you see a different approach. The firmware goes to the EFI System Partition, that small hidden volume, and loads bootmgfw.efi from there. From the Windows boot manager’s end, the BCD is read in the normal fashion before winload.efi is invoked (or winload.exe in the case of BIOS). Should the PC be coming out of hibernation, winresume is what gets called. It is useful to know which firmware one is dealing with for the time when a repair command is needed. 

Common Windows Boot Manager Errors 

Several error messages point back to the Windows boot manager. Each one sounds scary, but most are fixable. Here are the ones you will likely meet: 

  • BOOTMGR is missing: The boot record or system partition may be damaged. 
  • Operating system not found: The Windows boot manager cannot locate a working copy of Windows. 
  • No bootable device found: Your firmware is not pointing to the correct drive. 
  • Error code 0xc000000f: The Boot Configuration Data file is corrupted or incomplete. 
  • Error code 0xc0000098: The BCD holds no valid entry that points to Windows. 
  • Error code 0xc0000428: Windows cannot verify a boot file’s digital signature. 

What Causes These Boot Errors? 

There is no shortage of what can cause a system to fail at startup. A botched Windows update is one of the more common culprits, as are disk errors or damaged sectors. If you cut off power in the middle of a shutdown, it will corrupt the boot files. Then there is the matter of a cloned drive or an additional operating system thrown into the mix; these can disrupt the boot order. Malware can also damage the boot record. All of them have the potential to prevent the Windows boot manager from doing its job. It is useful to understand the root of the problem to apply the proper remedy. 

How to Fix Windows Boot Manager Startup Errors 

Now, let’s look at the practical steps. The three approaches set out below are effective for fixing the Windows boot manager; we recommend starting with the simplest one. Do make sure to back up any files of consequence while you have the chance and put in a Windows installation USB or recovery drive. Those will be necessary to get at the repair tools. 

Method 1: Run Startup Repair 

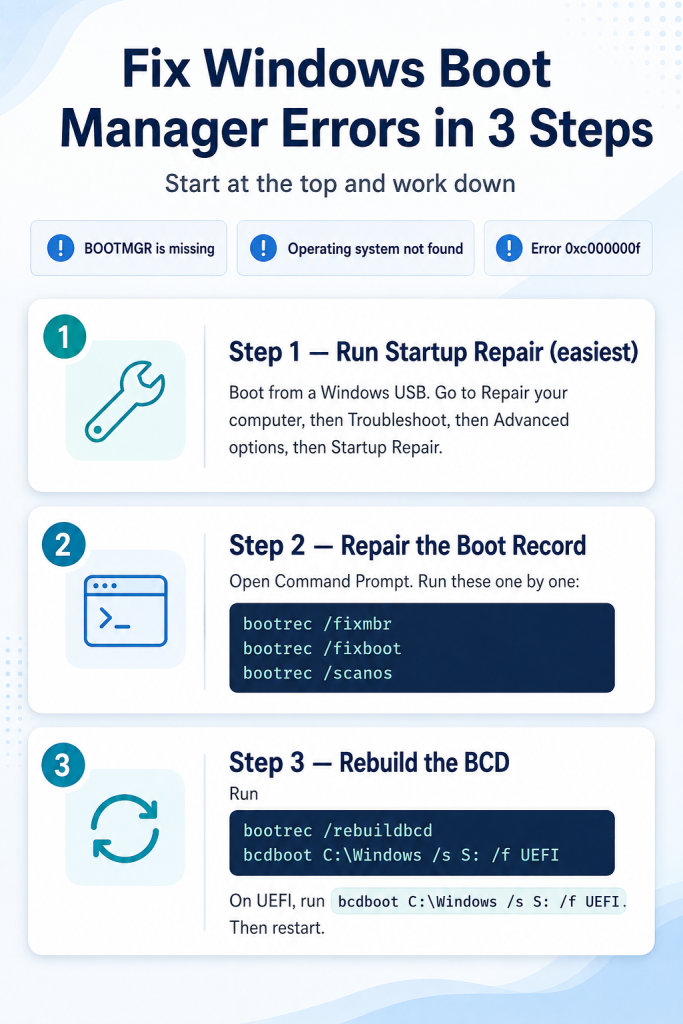
For a less invasive approach, one might opt for Startup Repair. The program can correct many boot faults by scanning the system. To put it to work, start your PC off the installation media and make your way to the “Repair your computer” selection. From there, you will want to go into Troubleshoot and select Advanced options, then choose Startup Repair. Windows will then have a look for any issues and attempt to remedy them; it also generates a log of its actions for your perusal. A restart is in order when the process is done.  

Method 2: Repair the Boot Record With bootrec 

Sometimes Startup Repair reports that it could not fix your PC. In that case, use the command line. From the advanced options screen, open the Command Prompt. Then type these commands, and press Enter after each one: 

  • bootrec /fixmbr writes a fresh master boot record. 
  • bootrec /fixboot writes a new boot sector. 
  • bootrec /scanos finds Windows installations on your drives. 

These commands repair the core parts the Windows boot manager depends on.  

Method 3: Rebuild the BCD Store 

Should the errors persist, it is time to rebuild the boot configuration data. The boot manager will be unable to locate Windows if the BCD has been compromised. Open Command Prompt and issue the command bootrec /rebuildbcd; this will have the tool scan your disks and put in any copies of Windows it comes across. Please confirm the entry when prompted. 

For UEFI machines, you might have to use bcdboot C:\Windows to rebuild the boot files. You can specify the firmware type with the /f switch (for either BIOS or UEFI) and set the system partition with /s. In other words, the complete command would be bcdboot C:\Windows /s S: /f UEFI, though you should substitute the drive letters with those that apply to your configuration. After that, do a restart on the PC. 

If nothing else has worked, the drive may be failing. A chkdsk run will tell you if it finds any disk errors. If not, you would be better off having a technician look at it or putting in a fresh install. 

Get Your Workspace Back Faster After a Boot Fix 

A PC is running once more after you have put the windows boot manager to rights, but do not expect a tidy desktop when you log in. The monitors you had set up are bare, your browser tabs have vanished, and the apps are all shut down. To put things back in order by hand is a time-consuming exercise. 

SmartPanels is designed to take that burden off. As an intelligent Windows manager for your day-to-day work, it will remember your app layout, window placement, and open tabs and put them back with one click. Even with as many as six screens, the restoration is quick. 

It should be noted that SmartPanels has no part in mending the boot process or the boot manager. What it does is safeguard the layout on top of Windows, which the Windows desktop manager normally renders after the system has loaded. We work in concert with that component to return your workspace in a matter of seconds, a welcome change of pace after a taxing repair. For further reading, we have a guide on managing the AppData folder in Windows 10 and 11. 

If a less arduous recovery is what you are after, try out SmartPanels for 14 days at no cost and make sure your workspace is saved. 

Final Thoughts 

There is no need to be unduly concerned over boot issues; while they can be alarming, they seldom mean the demise of a PC. The Windows boot manager’s job is to load Windows at startup and nothing more. Should it fail to do so, there are straightforward tools to put things right. For instance, Startup Repair will take care of most faults by itself, or one can turn to the bootrec commands for a more thorough fix. With some patience, a full reinstall is not usually necessary to get the system back up and running. 

It is wise to have your installation media on hand and to make regular backups of files. Such precautions reduce what might seem like a frightening error to a mere inconvenience. And when the PC is finally booted, you want to return to work without fuss. SmartPanels does just that, putting your whole workspace back in order with a click.  

We suggest repairing with confidence and leaving the rest to SmartPanels. Put your setup on the safe side and give the free 14-day trial a go. 

[Get Started] 

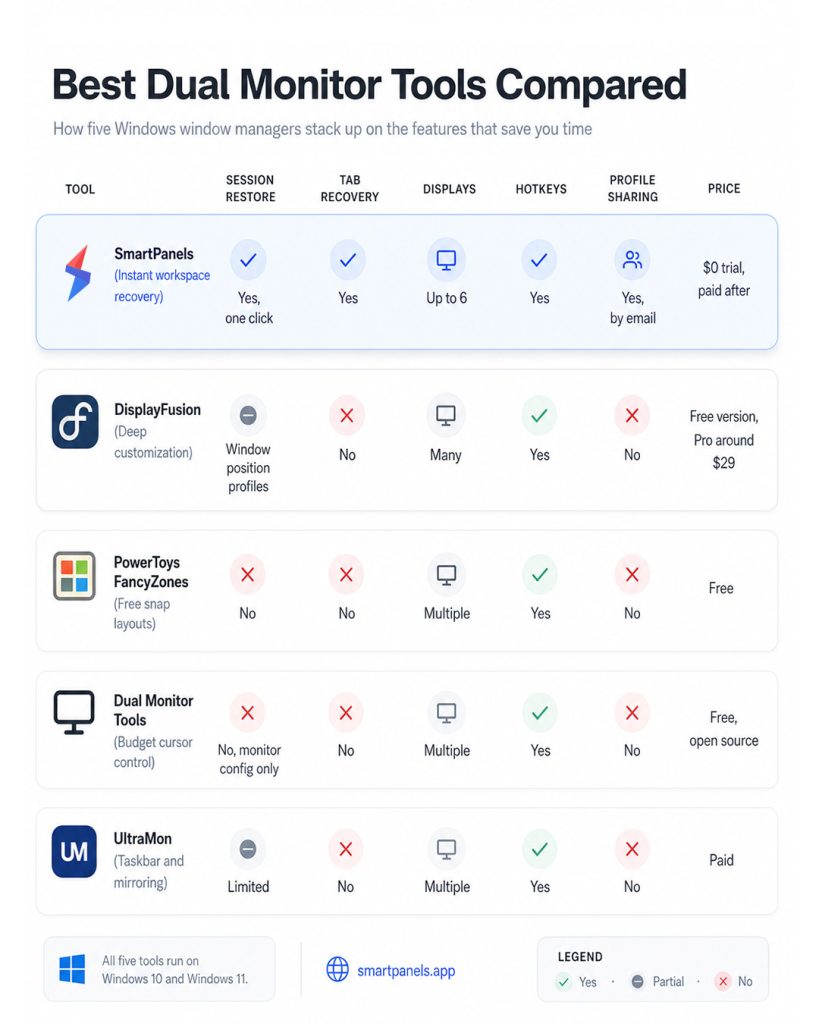
Best Dual Monitor Tools Compared (Which One Is Best?) 

On the surface, using a pair of monitors is no trouble at all. But try undocking or rebooting, and your windows will scatter to the four winds. Repositioning the same applications every morning is a frustrating waste of time and concentration. The good news is that with proper dual-monitor software, you can put an end to such friction. These programs do the work of preserving your layout and putting every window back where it belongs. 

In this guide, we examine the top dual-monitor tools for Windows in 2026 and compare them directly.  

Why Dual Monitor Tools Matter for Daily Productivity 

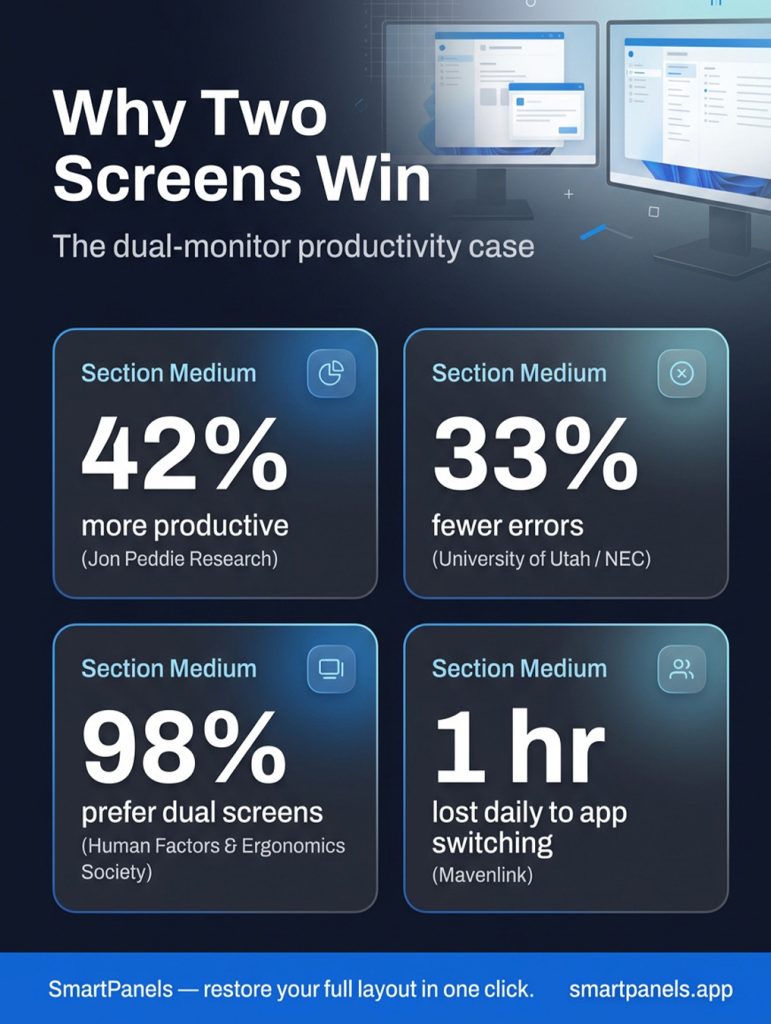
A second screen clearly speeds up most people’s work. The numbers back it up: according to Jon Peddie Research, having multiple displays can boost productivity by an average of 42%. But they do present their set of issues. Windows often forget their positions. Before long, one spends minutes after a restart or dock change putting the apps back in order, and over the course of a week those little delays mount up. 

That is where a quality dual monitor tool comes in to bridge the divide. It will take care of window placement, tab recovery, and layout changes without any input. In effect, it makes for a workflow that is as reliable as it is repeatable. The top tools are unobtrusive; you configure them and let them run in the background while you work. For those who divide their time between a laptop and two externals, the manual side of things can be quite a chore. A well-made tool will manage that daily shuffle for you. 

What to Look for in Dual Monitor Tools 

Not every utility suits every desk. Therefore, focus on a handful of core features first. Your ideal choice depends on how you work each day. 

  • Saved workspaces that restore apps and positions in one click. 
  • Cross-monitor window movement through simple keyboard shortcuts. 
  • Multi-display support, ideally for four or more screens. 
  • Browser tab recovery across Chrome, Firefox, and Edge. 
  • Custom hotkeys that switch layouts in a single tap. 
  • A clean interface that stays out of your way. 

Reliable window management tools should reduce clicks, not add them. Speed matters just as much as a long feature list. Keep that simple test in mind as you compare the picks below. 

The Best Dual Monitor Tools Compared 

Below, we review five popular dual monitor tools for Windows users. Each one targets a slightly different type of person. So, match the tool to your habits, not just its specs. 

SmartPanels 

With SmartPanels, you get an app that concentrates on its task and executes it properly. It is a matter of seconds to have your window positions, app layout, and browser tabs put back exactly where they were after the program has saved them. Whether at the office or in the home, it will handle as many as six displays. Custom hotkeys let you fire off a saved profile on the spot, and for quick team configuration, a profile can be shared via email. Those who use multiple browsers will appreciate the tab recovery function for Edge, Firefox, and Chrome. The app takes care of the daily tedium of putting your workspace back together. Beginners will find the interface uncluttered and easy to work with. You can run it on Windows 10 or 11 without any trouble, and regular updates keep it stable even as the system evolves. And since a 14-day trial is free, there is not much risk in giving it a try. 

DisplayFusion 

For the power user in need of granular control, DisplayFusion is a fine choice. The software provides multi-monitor taskbars and title bar buttons along with hotkeys to one’s liking. There are Window Position Profiles for putting window arrangements back where they were on a whim and monitor splitting to break up a large display into virtual pieces. One can even dim an idle monitor to keep things focused. The free edition covers the basics, but the more you want, the more you’ll need the Pro tier. Scripted functions for repetitive work are supported as well. Those who live on multiple screens will be comfortable with it, though a newcomer might be put off by how dense the settings menu appears at first. 

Microsoft PowerToys (FancyZones) 

There is a certain trust in using PowerToys, not least because it is a free offering from Microsoft. The FancyZones component of the utility is what makes it stand out for tiling on a dual screen setup; it is one of the more unobtrusive layout tools available. With it you can put together your own snap grids and simply drag windows where they belong. It is even possible to have different grids on each of your connected monitors, a degree of flexibility that will appeal to an analyst or coder as much as a writer. That said, do not expect it to be a full workspace recovery solution. It will not restore browser tabs or save entire sessions, but for window snapping it does the job well enough. 

Dual Monitor Tools (Open Source) 

As a free and open-source offering for Windows, Dual Monitor Tools has its appeal. The application provides the likes of a wallpaper changer, hotkey window repositioning, and cursor locking, with a screen capture module on hand for good measure. There is no cost to be had, which will suit those watching their budget, and the open nature of the code means anyone inclined can have a look under the hood. A shortcut to confine the cursor to a single display is a handy feature that makes for more efficient work when one needs to put in some long hours. On the other hand, the interface does not hold up to today’s standards and comes across as somewhat old-fashioned. Nor does it give you the ability to restore a session with a click of a button across all your monitors. 

UltraMon 

With UltraMon, you can use the Windows taskbar on every screen you have connected. The program is at home with per-monitor wallpapers and distinct screensavers as well. Need to span a window over two displays? A single click of the maximize button will do it in short order. For those giving live presentations, the mirroring tool is of considerable assistance, while the smart taskbars ensure each monitor remains in order. 

It is a workhorse that has been putting in reliable service for dual-screen setups year after year. Some aficionados prefer that stability over a more contemporary appearance, even if the design shows it is not exactly new. There is a 30-day trial available should one wish to put it through its paces before making a purchase. 

Second Monitor Not Detected? Learn how to fix it. 

Dual Monitor Tools Comparison Table 

You can see how the various dual monitor tools compare in the table below. It is meant to be a handy reference when making a choice and will tell you all five are compatible with Windows 10 and 11. 

For the most part, these applications do a good job of positioning windows. What you will not find in as many of them is the ability to restore an entire working session, complete with tabs. A distinction that is of some consequence to those who go through the motions of resetting their setup every day. 

Why SmartPanels Ranks Among the Best Dual Monitor Tools 

You will find that the bulk of dual monitor utilities on this list are content with handling taskbars, cursors, and the like. There is not many that will put together an entire working session for you. The SmartPanels app makes its mark by filling that void. With a single click, it has your apps, browser tabs, and window placements back where they belong. It handles six monitors without breaking a sweat and lets you share profiles with your team in short order. 

In contrast to the competition, which tends to be fixated on a single feature, SmartPanels is for those who want consistency and simplicity. For anyone who works in the same layout day in and day out, it adds back some minutes to the day. We hear from teachers, project managers, developers, and researchers that their work goes more smoothly because of it. 

Take a typical morning at work: dock the laptop and get to a client file. SmartPanels will have the necessary screens and tabs up and running. With a hotkey, you can access your reporting profile, completing the entire process in seconds instead of minutes. Other tools do not come close to reestablishing that context with such alacrity.  

That kind of dependable restore is what keeps users coming back. See for yourself on the pricing page with a $0 trial. And if you also need to look after your app settings, there is a guide on managing the AppData folder in Windows. 

Dual Monitor Tools FAQs 

Which dual monitor tools work best for saving and restoring layouts? 

SmartPanels leads here for most users. It saves window positions, apps, and browser tabs, then restores them in seconds. 

Are free dual monitor tools good enough for daily work? 

Free options like PowerToys and Dual Monitor Tools handle basic snapping well. However, they rarely restore full sessions or browser tabs automatically. 

Do dual monitor tools support more than two screens? 

Many of them do. SmartPanels supports up to six displays, which suits busy home offices and larger professional workstations. 

Can these dual monitor tools restore browser tabs? 

Some can. SmartPanels recovers tabs across Chrome, Firefox, and Edge, while several rivals focus only on window placement. 

Are dual monitor tools hard to set up? 

Most install quickly. SmartPanels offers instant setup, custom hotkeys, and a $0 trial, so beginners can start with ease. 

Final Thoughts 

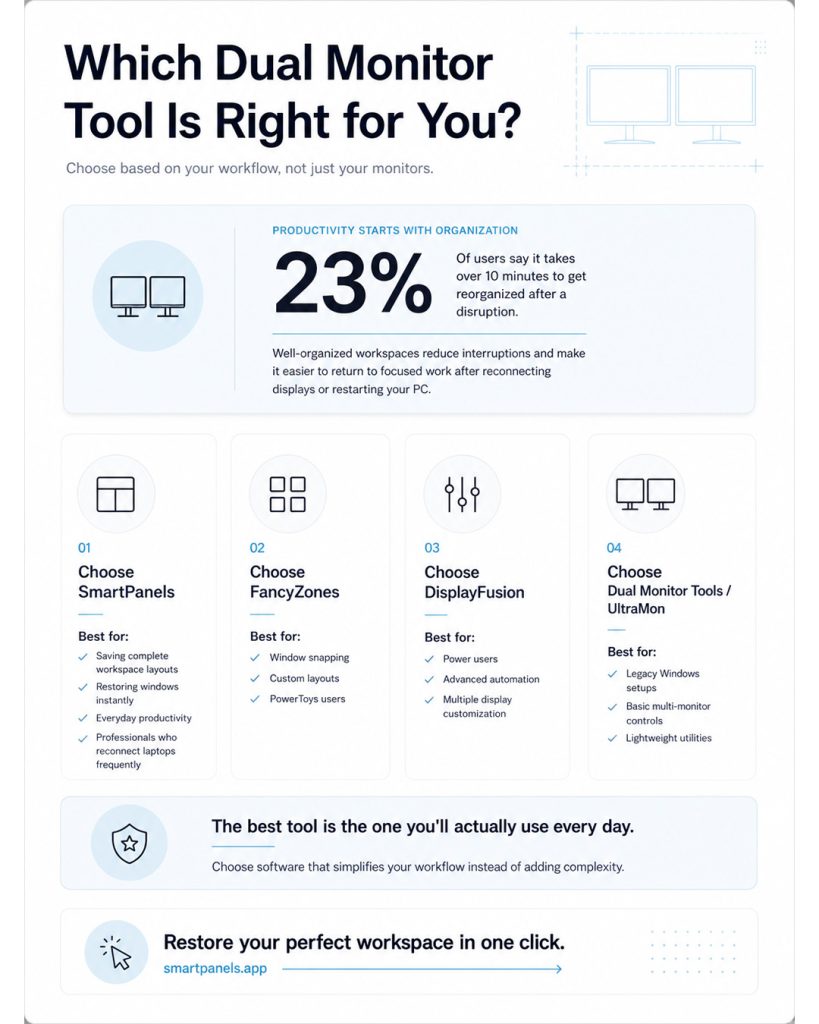
There is no strict rule for choosing one of these dual monitor utilities over another; it depends on how you work. The likes of DisplayFusion and UltraMon are well suited to the power user with an appetite for fine tuning, while PowerToys or the open-source Dual Monitor Tools will appeal to those who like to tinker on a budget. Then there are the professionals who have little patience for fuss and just want their workspace as they left it. In that regard, SmartPanels has a strong claim to being at the top of the list. With a single click, it can put your apps, windows, and browser tabs right back where they belong. It also supports up to six monitors and allows the entire team to share profiles. You end up putting in less effort to set up screens and more time on actual work. For anyone rebuilding the same configuration every morning, the return is immediate. 

Overall, consider what will cause the least amount of friction and go with that. If the idea of getting back some of the minutes lost each day is appealing, put SmartPanels to the test with its free trial and have your workspace restored in no time. 

[Get Started with SmartPanels] 

 Desktop Window Manager (DWM): Fix High GPU and Memory Usage 

When the PC begins to run a little slow, you will likely fire up Task Manager to see what is going on. There you will spot an anomaly: dwm.exe, the desktop window manager, is hogging your resources. It is only natural to have some concerns at that point as to whether the process is safe or if it is hampering performance. In truth, there is no need for alarm. The desktop window manager is a fundamental part of Windows and not a threat. That said, it has been known to act up and put a strain on memory or the graphics card, which in turn makes for stuttering applications and lag in games.  

This guide is here to put those questions to rest with some straightforward solutions, while also covering the reasons behind such spikes. Finally, it shows how a tidy workspace supports smoother desktop window manager performance. Best of all, every fix is safe and reversible. By the end, you will know exactly what to do next. 

What Is the Desktop Window Manager? 

If one were to look in Task Manager, the desktop window manager is listed as dwm.exe and can be seen doing its work unobtrusively in the background. In a sense it is the compositor for Windows; it is responsible for rendering what is on the display, from transparency and animations to taskbar thumbnails and live previews of open windows. The operating system will not have an application paint the screen directly but instead put visuals through the desktop window manager to be blended into a single, seamless picture. 

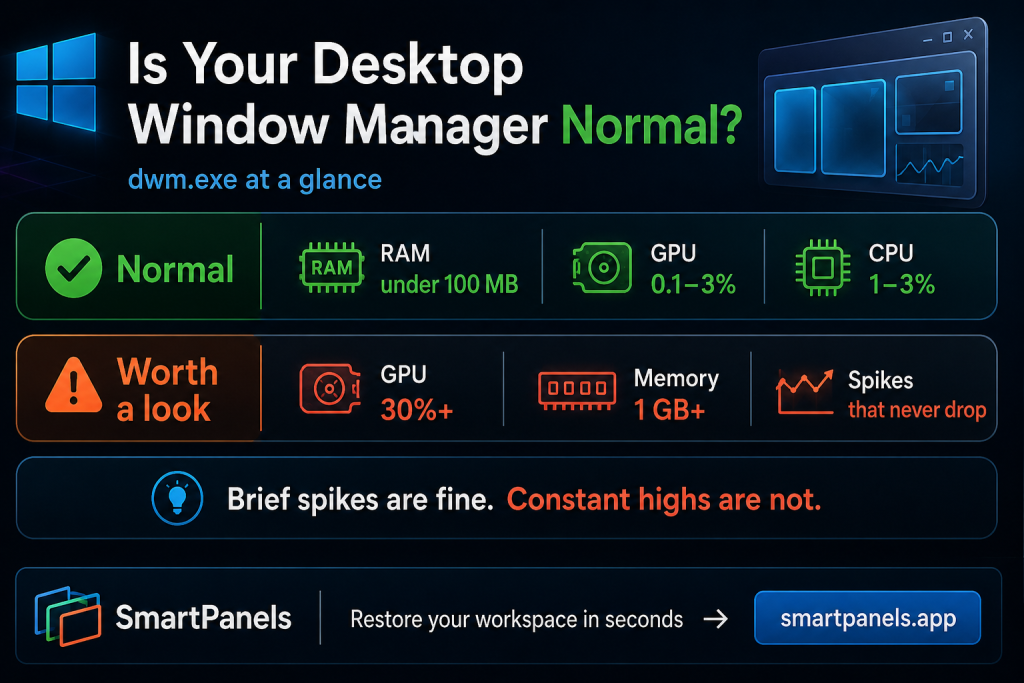
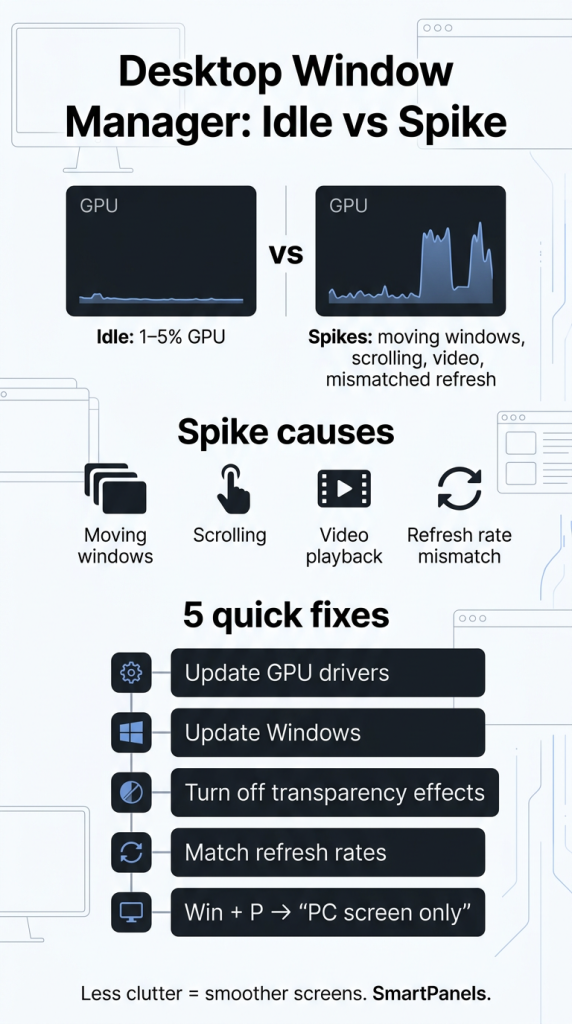
That is why the process makes use of the graphics card. For the most part its footprint is modest, typically consuming less than 100 MB of RAM and between 0.1% and 3% of GPU resources. One would not be surprised to see minor spikes when moving a window about. The whole arrangement is meant to allow for hardware acceleration so that the desktop remains responsive. But should those numbers remain elevated, there is an issue that needs to be addressed. 

Why the Desktop Window Manager Shows High GPU and Memory Usage 

Several factors push the desktop window manager past its normal range. Fortunately, most causes are easy to spot once you know the pattern. 

Common Triggers 

Outdated or faulty graphics drivers rank first. Indeed, driver bugs frequently spike desktop window manager high GPU activity. Then there is the burden of heavy visual effects. Animations and transparency, for instance, will demand that the system be in a state of constant redrawing. One can also run into trouble with HDR or Hardware-Accelerated GPU Scheduling if they are at odds with the drivers in question. The configuration of multiple monitors is another factor; a greater number of displays combined with high resolution and quick refresh rates only serves to increase the workload.  

Meanwhile, a known Intel driver memory leak once caused desktop window manager high memory problems on many machines. Then there is the matter of background applications. An overlay, an RGB lighting utility or a screen recorder will put in extra redraws for example. A user profile that has become corrupted can be the source of some strange conduct too. And one should not overlook the possibility of malware masquerading as dwm.exe; a quick check of the file location will dispel any doubt on that front.  

The best way to isolate the cause is to shut down all your apps and see what the idle usage looks like. From there, go through Task Manager and start them up again in turn. It does not take long for the offending program or setting to show its hand. 

Learn What is Windows Desktop Runtime? 

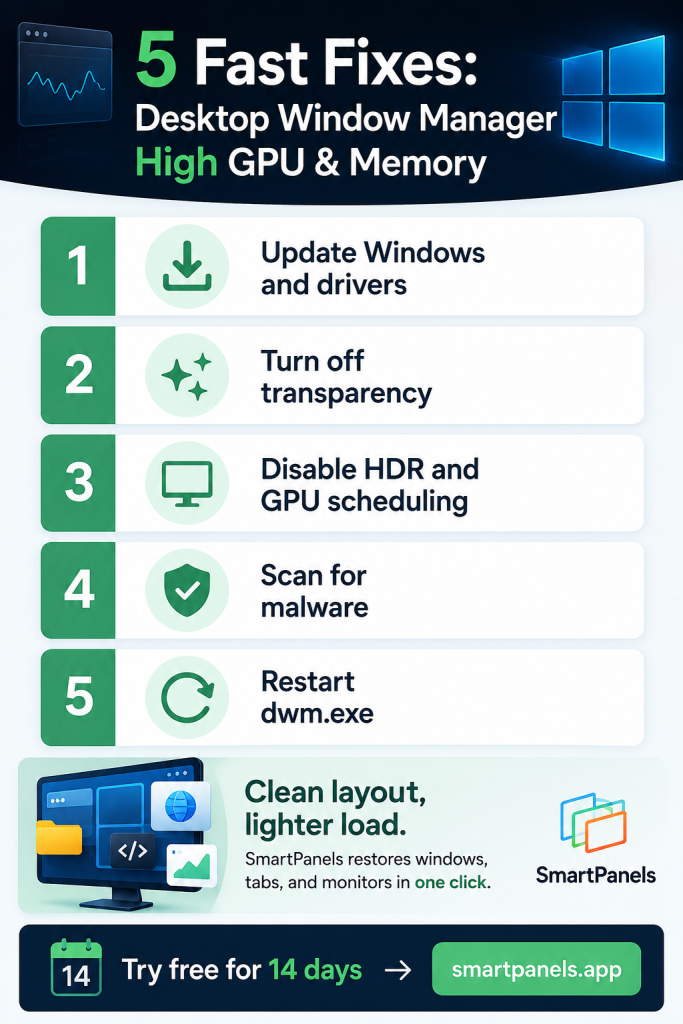
How to Fix Desktop Window Manager High GPU Usage 

Start with simple, safe steps. Then, move to deeper fixes only when the earlier ones fall short. 

Update Windows and Graphics Drivers 

Begin by putting in any Windows updates that are outstanding. Microsoft is in the habit of patching up graphics bugs with these, and they can have an impact on the desktop window manager. Then head to the maker’s website for a fresh GPU driver; a WHQL-certified one is best if you want stability. Should the problem have cropped up in the wake of a recent driver update, it is better to do a rollback. To be sure of a clean slate, use a display driver uninstaller to get rid of the old one before you put the new in place. You will find that alone is enough to quiet things down in most instances. 

Turn Off Transparency and Visual Effects 

There is an appeal to transparency, but it is hard on the graphics card. To remedy that, go into Settings and under Personalization find the Colors option; from there you can turn off the Transparency effects. If one wants to be more thorough with the savings, hit Win + R to launch sysdm.cpl. In the Performance section, make the choice to Adjust for best performance. The desktop window manager will all but give up its hold at once. A look at Task Manager should confirm the numbers have come down; in most cases the effect is instant. 

Adjust HDR and GPU Scheduling 

In some cases, HDR will cause spikes by itself. To remedy this, go into Settings and navigate to System > Display to turn HDR off. You should also put Hardware-Accelerated GPU Scheduling to the test; find it in the Graphics settings, disable it and do a restart on your PC. Once you are back up, have a look at Task Manager to see if the desktop window manager is any more well behaved. Should you notice a decline in gaming performance, there is no harm in re-enabling scheduling later. 

Scan for Malware and Restart the Process 

A full scan with Microsoft Defender is to rule out any malware posing as dwm.exe. At the same time, one should verify that the legitimate file is where it belongs in C:\Windows\System32. Should usage remain elevated, put an end to the process yourself: go into Task Manager and terminate the desktop window manager task. Windows will take care of relaunching it on its own in short order. To be sure, use the SFC and DISM commands to see if any system files need repair. 

How to Fix Desktop Window Manager High Memory Usage 

Memory spikes call for a slightly different approach. Even so, the steps stay simple and safe. Notably, memory problems often build slowly across a long session. So, watch the trend rather than a single reading. 

Update Drivers and Restart the Process 

One should put driver updates at the top of the list. Intel has in the past put out a fix to stem the leak and the attendant memory bloat. In the interim, a quick way to free up that kind of memory is to restart dwm.exe; simply end the process from Task Manager and the desktop window manager will take care of itself. It is also worth looking through Windows Update for any optional drivers, as they are where one will find the most recent patches. 

Disable Fast Startup and Trim Effects 

Over the course of a long session, Fast Startup has been known to get in the way of the desktop window manager. Turning it off will on occasion put an end to that and stabilize memory consumption. To do so, go to Control Panel and select Power Options, from there choose what the power buttons do and uncheck the option for fast startup. One can also set the visual effects for optimal performance as a way to reduce the strain on the system. Should memory usage continue its upward trend, a clean boot is in order to track down the application at fault. Reintroduce the startup items individually until the problem resurfaces. 

Keep Your Workspace Organized for Smoother Performance 

You might think the process is fixed and that is half the battle, but a desktop window manager can still be put to work by a cluttered screen. The more monitors and open windows there are to render, the more it has to deal with. This is the sort of thing SmartPanels is made for. 

With it, there is no need to go through the motions of reopening applications individually; one saves the layout and in seconds the windows, tabs and positions are back where they should be. It handles up to six displays and will work with Chrome, Firefox or Edge, so an intentional setup is rebuilt in short order. A custom hotkey is all it takes to change layouts, and for the sake of the team, a profile can be shared over email to get everyone set up. 

The net effect is a calmer, faster screen with only the necessary windows left open. Good habits with SmartPanels go a long way in cutting down on superfluous on-screen clutter. Put simply, a tidy workspace is good for a lean desktop window manager. We invite you to take control with SmartPanels; the 14-day trial is free of charge. 

Frequently Asked Questions 

Is the desktop window manager a virus? 

No, the desktop window manager is a legitimate Windows process. However, malware can imitate it. To confirm, right-click dwm.exe and open its file location. A genuine file lives in C:\Windows\System32. 

Can I disable the desktop window manager? 

On modern Windows, you cannot safely disable the desktop window manager. In fact, doing so breaks the desktop interface. Instead, reduce its workload by trimming effects, HDR, and overlays. 

How much GPU and memory should dwm.exe use? 

Typically, the desktop window manager uses under 100 MB of RAM. Likewise, GPU usage stays near 0.1 to 3 percent. Brief spikes during window movement are normal. 

Why does multi-monitor use raise dwm.exe usage? 

More displays mean more pixels to composite. Consequently, resolution, refresh rate, and monitor count all increase the desktop window manager load. Organized layouts help keep it manageable. 

Does SmartPanels reduce GPU usage directly? 

Not directly. Still, SmartPanels helps you manage windows and monitors efficiently. In turn, a tidier workspace can ease the rendering burden on the desktop window manager. 

Final Thoughts 

In the end, a desktop window manager that is running hot is seldom cause for alarm. More often than not, it is a sign of something as simple as a driver issue, an odd setting or a screen in need of tidying. The remedies outlined here are meant to address those underlying problems directly. Start by putting Windows and your graphics drivers up to date. From there, you can dial back on transparency and HDR along with any scheduling functions. A malware scan and a process restart will also do the trick. Put them all together and GPU and memory consumption should return to what they ought to be. 

Of course, good habits are what make such improvements stick. An orderly workspace goes a long way in easing the rendering burden on the desktop window manager, which is where SmartPanels has its place. It allows you to put your windows, tabs and layouts back in order on every monitor with a single click, so one is not left spending time to rebuild what was there before. The result is a PC that is both quicker and more composed.  

If you are looking to work smarter under Windows, there is no better time to begin a free trial of SmartPanels. 

[Start Free Trial] 

Best Dual Monitor Setup for Work & Productivity 

You can be sifting through your browser tabs in a cramped space for hours and not even realize how much of your focus you are losing in the process. It is a silent time-waster for most. Put up a second screen, and you’ll solve the problem before you know it. The Jon Peddie Group has put out studies to back it up: tacking on an extra display will put 42% more productivity in your day since you no longer have to chase down windows; you can just take in your work. 

But the hardware is only part of the equation. If you don’t think about where you place and restore your apps each day, you’re just creating more clutter on a larger screen. We get into that with this guide. What follows is a look at putting together a dual monitor setup that is suited to actual work and easy on the body. You’ll also see how SmartPanels can help by saving your layout as a profile so both displays are exactly how you want them when you get to your desk. 

Why the Best Dual Monitor Setup Beats a Single Screen

A single display forces a constant rhythm of minimizing, maximizing, and alt-tabbing. The individual motions are minor, but they add up. In fact, Harvard Business Review looked at some big firms and put a figure on it; the time spent toggling apps and getting your head back into each one runs to about four hours a week for the typical employee. 

Add a second monitor, and you eliminate that. You don’t have to layer windows anymore; you can just lay them out so you can see everything.  

  • A writer has his research on one side and the draft on the other.  
  • A developer will have the code editor on one screen and the debugger or live app on the next.  
  • For a project manager, the main screen is for the hard work while email and chat are left to the secondary display. 

But speed isn’t the only factor. There is a certain ease when your tasks have their place, and you do not waste energy figuring out where to direct your attention.

Choosing the Right Hardware 

You can get great results from sensible gear without having to put your hand in your pocket for the priciest panels. In the end, a handful of practical decisions will serve you better than any spec sheet. 

Match your screen sizes: For everyday office work, two displays in the 24-inch to 27-inch range hit the sweet spot. They give you room to spread out without forcing your head to swing too far. Larger 32-inch panels work well too, though at that size a separate keyboard and mouse become more comfortable. 

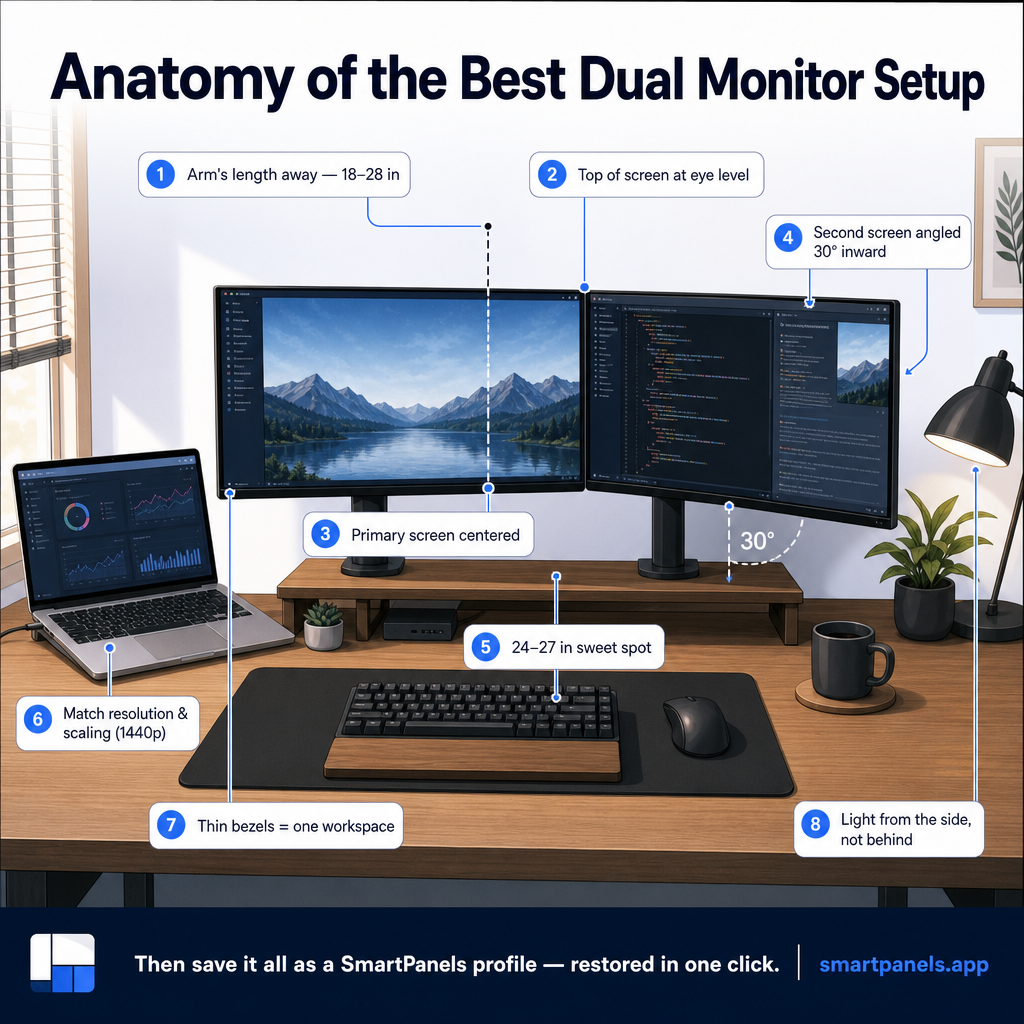
Aim for matching resolution and scaling: Pairing two screens at the same native resolution, ideally 1440p (QHD), keeps text and images consistent as you drag windows across the gap. Mismatched resolutions also force Windows to apply different DPI scaling factors per monitor, which can resize a window the instant it crosses the bezel. Keeping both panels on the same resolution and scaling percentage avoids that jump. 

Favor thin bezels and IPS panels: Slim borders shrink the visual seam between your two monitors, so the pair reads more like one continuous workspace. IPS panels hold color and contrast steady across wide viewing angles, which matters when one screen sits at an angle. 

Setting Up a Dual Monitor Setup with a Laptop 

multi-monitor setup with laptop hardware is one of the most common configurations in home offices, and it is simpler than the technical terms suggest. 

There are three ways a modern laptop will put an image on an external display.  

  1. You can go with a docking station off a USB-C or Thunderbolt port to pick up some extra peripheral connections and video outputs, leaving one cable to work your entire desk.  
  2. Or use a video adapter to translate the output from your laptop to HDMI or DisplayPort for the monitor’s input. Then again, most laptops have a native HDMI or DisplayPort you can plug into directly.  
  3. If your hardware allows, you might even daisy-chain two monitors from a single port using DisplayPort Multi-Stream Transport. 

      Thereafter, the software takes over.  

      1. Go to Settings > System > Display in Windows and let the computer find the new screens.  
      2. Set it to “Extend” so you don’t just see a mirror of what’s on the other side.  
      3. Reposition the on-screen boxes to match your monitors’ actual placement on the desk; this controls how windows move between panels. 

          One detail that confuses many laptop users is deciding what the laptop screen itself should do. Treat it as a genuine third zone for chat or notes, or close the lid and rely on your two external displays. Either way, decide on a purpose so the laptop dual-monitor arrangement stays consistent instead of becoming an afterthought and so the layout you save in SmartPanels maps cleanly onto the same displays every time. 

          Positioning Screens for Comfort and Health 

          The uncomfortable truth about dual setups that look so put together is that they are often ergonomic traps. It is all too simple to put a second monitor in beside the first, flush with the wall, and not realize you are setting yourself up for neck and shoulder trouble. But some simple changes can help prevent that. 

          For one thing, mind your distance. Put the screens in at an arm’s length, say 18 or 28 inches from where you are sitting. And for height, the top of the display should be level with your eyes or just below, so your neck stays neutral and relaxed. 

          Placement depends on how you work, so think about your usage split first: 

          • If one screen is primary, center it directly in front of you and angle the second screen inward at about 30 degrees. This suits most office workers. 
          • If you use both screens equally, position them side by side with their inner edges meeting right in front of your nose, then angle each slightly inward to cut down on head rotation. 

          How SmartPanels Builds a Smart Panels Workspace 

          You may have the right hardware and posture for a solid setup, but there is still the daily annoyance of having to put your layout back together come morning. Before you can get to any actual work, you are reopening the usual apps, shoving them back onto the monitors where they belong, sizing them up, and sorting through your browser tabs. Do that for a week and you’ll find it costs you more time than you think. 

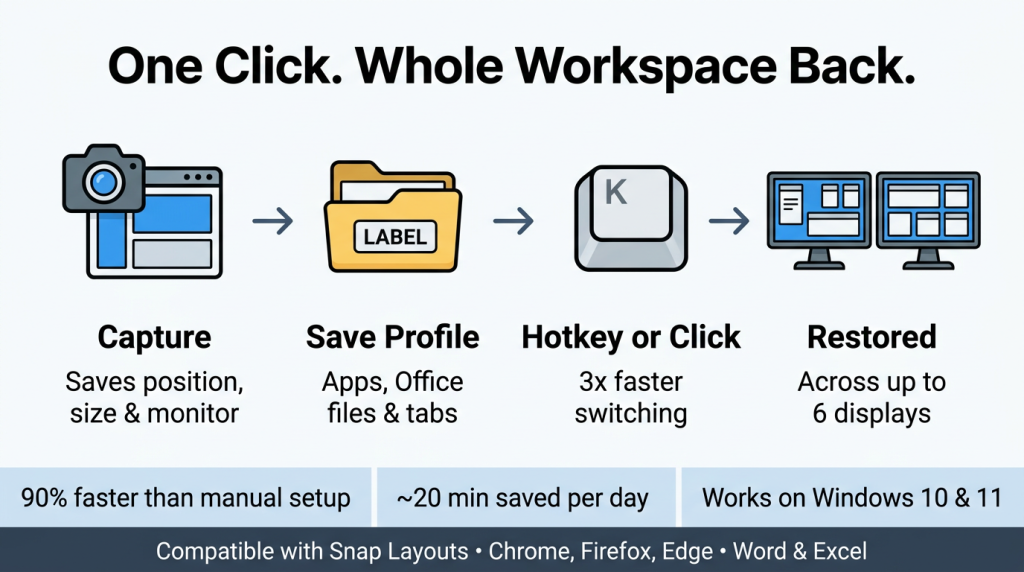
          SmartPanels was designed to put an end to that. The utility is unobtrusive on Windows 10 or 11 and sits in your taskbar. It will take a snapshot of your entire desktop and save it as a profile you can pull up with a single click. We don’t just mean it knows what was open; it logs the X and Y coordinates, the dimensions, the stacking order, and even which monitor a window was on, so nothing is left to chance when you want to restore things. 

          Under the hood, the workflow is straightforward but technical where it counts: 

          • Profile capture: When you click “Create Profile,” SmartPanels auto-detects the apps currently on screen and snapshots their window geometry across every connected display. You arrange your apps the way you want, then click “Save to Profile” to commit that configuration. 
          • Display topology awareness: Because it maps each window to a specific monitor, SmartPanels respects your actual display arrangement. Its automatic detection adapts when monitor configurations change, so a profile built for two screens reflows sensibly rather than dumping every window onto the primary panel. 
          • Snap Layouts integration: SmartPanels works with, not against, native Windows 11 Snap Layouts, so it preserves the snap zones you already use when a profile restores. The company reports full compatibility with Snap Layouts on Windows 11. 
          • Session-level app handling: Restoration reopens not just desktop apps but documents. It brings back MS Office files such as Word and Excel along with their windows and reloads tabs across Chrome, Firefox, and Edge so your reference pages return exactly where you left them. 
          • Profile hygiene: In Settings, you can tell SmartPanels whether to minimize or close apps that are not part of the profile being restored, which keeps a freshly recalled workspace clean instead of cluttered with leftovers. 

          Frequently Asked Questions 

          1. Do I really need two identical monitors for a good setup?  

          No, but matching matters more than people expect. Two screens with the same resolution and DPI scaling keep text and color consistent and prevent windows from resizing as they cross the bezel. If your current monitors differ, you can still build a productive setup and save it in SmartPanels; just assign the sharper or larger screen as your primary display. 

          2. Will a dual monitor setup work with my laptop?  

          Yes. Most laptops connect to two external screens through a docking station, a USB-C or Thunderbolt video adapter, or built-in HDMI and DisplayPort outputs. After connecting, open Windows display settings, choose “Extend,” arrange the screens to match your physical layout, then capture that arrangement as a SmartPanels profile. 

          3. How do I avoid neck and eye strain with two monitors?  

          Keep each screen about an arm’s length away with the top edge at or slightly below eye level. Center your primary screen, angle the second inward around 30 degrees, and position your desk so bright light falls to the side rather than directly on the screens. 

          4. What does SmartPanels do that Windows cannot do alone?  

          Windows lets you snap and extend displays, but it does not save your full session. SmartPanels records each window’s monitor, position, and size, plus your open MS Office files and browser tabs, then restores the entire profile across up to six monitors in one click or with a custom hotkey, so you never rebuild your workspace by hand. 

          5. Can I use different layouts for different types of work?  

          Absolutely. SmartPanels lets you save multiple profiles (up to three on the trial, unlimited on the paid plan), so you can keep one for writing, one for development, and one for meetings. A bound hotkey switches between them instantly, reflowing every window to the correct screen. 

          Final Thoughts 

          You don’t need the most ostentatious screens to put together a top-notch dual monitor arrangement. The key is to remove the small daily frictions. With the proper monitors, you have space to think, and if you position them well, you will be comfortable even after a long session. A workflow that is unambiguous from one screen to the next means your focus stays on task. 

          But then there is the matter of repeatability, which goes by the wayside for most. A layout is pointless if you have to rebuild it from scratch each morning; it should be ready when you arrive.  

          SmartPanels is where you find an unobtrusive edge. It can take a perfectly fine setup and make it dependable with the push of a button or hotkey. The software remembers the size and placement of every window as well as your browser tabs and Office files and puts the whole profile back in order across your two displays. So, you can have your hardware and ergonomics in place but let SmartPanels handle the heavy lifting of organization so you can focus on the work at hand. 

          2nd Monitor Not Detected? 10 Main Reasons and How to Fix It 

          You would expect that when you plug in a second monitor, your GPU and the display will have a brief, unobtrusive handshake, and within a second, your desktop will spread across both.  

          You would think with the other monitor on and a good connection, you wouldn’t have an issue. And yet for some reason, you head to Display Settings and are greeted by nothing but a single screen. It is a thing that can befall anyone, whether you are on a new laptop or a docking station or even a desktop that was running fine as of last week. Then you have no room for spreadsheets and browser tabs when you need them, which is a real irritation. 

          The problem could be anything from a bad cable to a driver issue or some bandwidth limit you were not aware of. This is where SmartPanels can help you. 

          How Windows Detects a Second Monitor 

          You should have some idea of what goes on when you connect a display before you start troubleshooting.  

          EDID: How Your Monitor Introduces Itself 

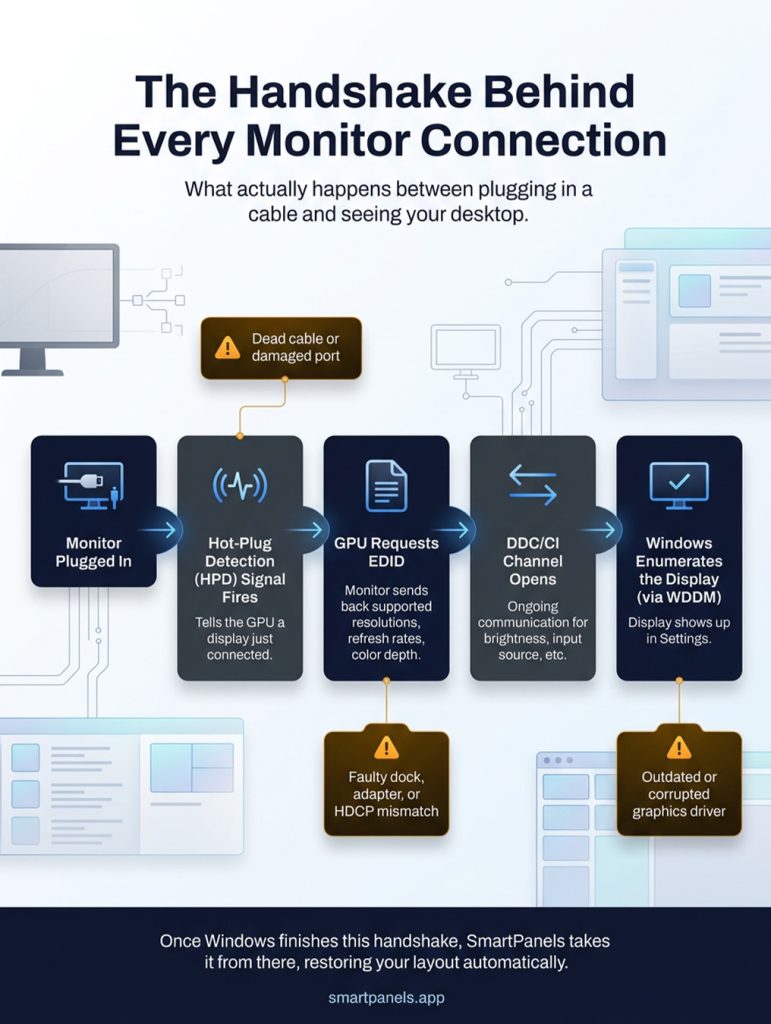
          The monitor has a file on hand for this purpose, the EDID, or Extended Display Identification Data. Your graphics card will read from it to know the color depth, refresh rates, and which resolutions are available. But if your dock, adapter, or cable fails to get that information across, Windows will be none the wiser as to the monitor’s presence, despite the fact the screen is in working order. 

          Hot-Plug Detection and DDC/CI 

          To let the PC know a display has been hooked up, ports send out an HPD signal (Hot-Plug Detection). Then there is the Display Data Channel Command Interface, which gives Windows and the GPU a way to issue running commands to the monitor for things like changing the input or the brightness.  

          But a dodgy pin, underpowered adapter, or cheap cable can interrupt those signals. That is a very common technical explanation for why your 2nd monitor isn’t being detected, even though the connection looks good. 

          10 Main Reasons a 2nd Monitor Is Not Detected 

          • Loose, Damaged, or Wrong-Spec Cables 

          Often, the answer is straightforward: a cable that isn’t properly in place, has a pin out of true, or just doesn’t come up to spec. Take an HDMI 1.4, for instance; you won’t get a 4K signal at 60Hz from it with any reliability. Or if your DisplayPort is anything less than a 1.2, don’t be surprised if it can’t even handle the higher resolutions. 

          • Wrong Input Source 

          It is common for a monitor to have more than one input. But if you have the cable in the DisplayPort or USB-C and the monitor is put on HDMI, either by hand or on its own, you will be left with a black screen, and Windows will think it is not there. 

          • Outdated, Corrupted, or Mismatched Graphics Drivers 

          Then there is the matter of your graphics driver. The Windows Display Driver Model (WDDM) runs your graphics driver and manages communication between Windows and any connected devices. If that WDDM driver is old, damaged, or simply not right for the job, the OS may not enumerate any display other than the primary. 

          • Incorrect Display Mode Configuration 

          You can configure Windows to show a single screen or to extend and duplicate your display. But if you have the mode wrong, it will give you a “second monitor not detected” error despite the hardware being in good working order. 

          • Power Management, Fast Startup, and USB Selective Suspend 

          Then there is Fast Startup. Windows may reload an old display setup when you boot up because it takes a snapshot of your session instead of performing a complete shutdown. And please keep in mind USB Selective Suspend, another of Windows’ power features; it has a habit of putting USB hubs and docks to sleep, which will cut off any monitor that is running on a USB signal. 

          • Docking Station, Hub, and DisplayLink Chipset Limits 

          Capabilities can vary quite a bit from one dock or hub to the next. Some will run natively on DisplayPort Alt Mode over USB-C, for instance, while others rely on a DisplayLink chipset to handle things by compressing and streaming the video in software rather than with a hardwired link. With that kind of setup, you need to install its own driver in addition to your GPU’s. If your second monitor does not appear on the hub, you probably just forgot to install the DisplayLink driver. 

          • GPU Output and Display Pipe Limits 

          A GPU can only make use of a certain number of display pipes, which are the internal hardware paths responsible for rendering what you see on screen. With many integrated graphics chips you will come across, three is about as many active displays as they can handle, physical ports aside. So, if you’ve hit that limit, there’s no point in trying to connect another monitor; it won’t do anything. 

          • Mismatched Resolution, Refresh Rate, or Bandwidth Ceiling 

          A top-notch cable won’t save you if the resolution and refresh rate you are after exceed what its bandwidth can handle. Consider a 4K panel at 144Hz, for instance. You will need to be using an HDMI 2.1 or a DisplayPort 1.4 to make that run smoothly. Try to put in an older cable with those settings, and you won’t see anything on screen. 

          • HDCP Handshake Failures 

          Then there is the matter of “High-bandwidth Digital Content Protection.” You will run into this issue as a type of copy protection. Think of it as a handshake that some monitors, adapters, and dongles must make before they will show you any video; you see it most with streaming apps or when using particular docks. If you have a low-cost adapter that doesn’t support the correct HDCP version, you may run into problems. 

          • Third-Party Software and Driver Conflicts 

          There are a few things that can prevent Windows from properly recognizing your connected screens. You might have some display management utilities or remote desktop software running, or perhaps you have not purged old GPU drivers from a previous upgrade. The problem gets worse when two or more of these programs try to control the displays at the same time. 

          2nd Monitor Not Detected Windows 11: Step-by-Step Fixes

          Once you have a sense of the likely cause, work through these steps in order. 

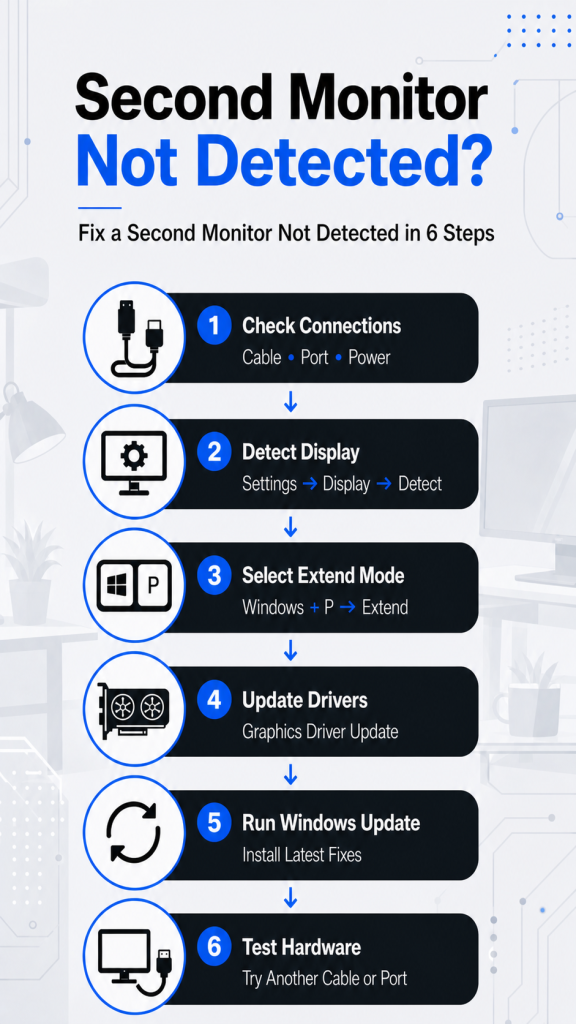
          Step 1: Inspect Cables, Ports, and Bandwidth Rating 

          Start by making sure the cable is firmly seated at either end; you might want to swap in another one for a good measure.  

          Step 2: Force Detection via Windows Key Plus P and Settings 

          On the software side, hit the Windows key and P to bring up the projection menu and put it on Extend. You can also navigate to Settings > System > Display and hit Detect in the Multiple Displays area. 

          Step 3: Update, or Reinstall the Graphics Driver 

          If you are still having trouble, open Device Manager and, under Display Adapters, right-click on your GPU to update the driver. If this problem started with a recent update, rolling back to the old driver should help. For anything more stubborn, do a clean uninstall and then install a fresh driver from the manufacturer’s site. 

          Step 4: Reset the Display Driver 

          You can give the graphics driver a restart without having to reboot the whole machine by holding down Windows, Ctrl, Shift, and B together. Don’t be alarmed if the screen flickers for a moment; this is normal. 

          Step 5: Check Device Manager for Error Codes 

          If you see a yellow warning by your display adapter, here is what it means: a code 43 is generally a sign of a driver crash. Code 12, on the other hand, indicates the system has exhausted its resources for the device, something you might run into with an elaborate multi-monitor configuration. 

          Step 6: Adjust Power Management and Fast Startup 

          To avoid problems, go to Power Options in Control Panel and disable Fast Startup. Also worth doing is checking the USB root hub in Device Manager and unchecking the box that lets the computer power down the device as a way of saving energy. 

          Step 7: Review GPU Control Panel Multi-Display Settings 

          You will find multi-display options in the NVIDIA Control Panel, AMD Software, or Intel Graphics Command Center that are independent of what you see in Windows Settings. Make sure your second monitor is turned on and set up as it should be in the one that corresponds to your GPU. 

          Step 8: Isolate Dock or Hub Issues 

          For those with a DisplayLink dock, ensure that the driver is current and properly installed. You can also rule out the dock as the problem by plugging the monitor straight into the PC and seeing if that makes a difference. 

          Step 9: Test the Monitor on Another Device 

          If you have a spare laptop or desktop, try the monitor with that. It is the only way to be certain where the fault lies: your computer, the cable, or the monitor. 

          Want to learn more about how you can resolve this issue? Read Now! 

          How SmartPanels Prevents Monitor Setup Headaches 

          This is exactly the gap SmartPanels was built to close. Rather than replacing Windows display settings, SmartPanels works alongside them once it detects and runs your monitors. 

          Automatic Detection That Adapts to New Screens 

          SmartPanels supports up to six displays, and its automatic detection adapts to new screens as they connect, so a saved profile adjusts to your current setup instead of forcing you to rebuild your layout by hand every time your display configuration changes. 

          Saving Window Positions and Browser Tabs 

          SmartPanels saves the exact position of every open window, along with your browser tabs across Chrome, Firefox, and Edge, so your workspace returns looking the same way you left it, regardless of how Windows reordered your displays on reconnect. 

          Custom Hotkeys and Profile Sharing 

          With custom hotkeys, you can instantly change any of your full workspace profiles. If a colleague needs the same setup, you can share it with them. That is what makes SmartPanels so well suited to a home office or trading desk, as well as design studios and the like where team workstations are common. 

          Put simply, once you’ve fixed any detection problems and your monitor is back on speaking terms with Windows, SmartPanels will ensure that when you return to your workday, everything from your window placement to your open apps and browser tabs is just as you left it. 

          Final Thoughts 

          When your second monitor won’t show up, the culprit is often something you can put right. It could be a cable that is worn out, an old driver, a power setting that is not quite right, or even a dock that cannot handle your resolution. In most instances you will not need to buy new hardware; running through the EDID, driver, and power checks will do the trick. 

          And once the display is back in play, let SmartPanels handle the rest. It remembers where your windows, apps, and browser tabs were, so you don’t have to rebuild your workspace when you reconnect. Do some troubleshooting and then put in SmartPanels for a setup that is always in order. 

          How to Set Up Dual Monitors on Windows & Laptop (Step-by-Step) 

          You don’t have to look hard to see how quickly one screen fills up. Open a browser here, a chat there, and your work document, and before you know it, you are juggling tabs and have no idea where the important stuff is. A second display is the answer to that kind of clutter.  

          The numbers back it up: according to Jon Peddie Research, putting in a second monitor will put 42% more productivity in your day on average. And for all that, setting up a second monitor is easier than you might think.  

          Windows has what you need to set up dual monitors whether you are on a desktop tower or a laptop. Once your setup is how you like it, SmartPanels will remember your layout, so you don’t have to start over.  

          Why a Dual Monitor Setup Is Worth It (the Numbers) 

          Before getting into cables and settings, it helps to see what the data shows. Decades of independent and vendor-backed studies have well documented the productivity gains. 

          • 9% to 50% improvement. Microsoft Research found that moving to a multi-monitor configuration boosted productivity anywhere from 9% to 50%, depending on the task. 
          • 18% more efficient, 33% fewer errors. A Wichita State University study commissioned by Dell measured an 18% efficiency gain, while a University of Utah study sponsored by NEC recorded a 33% drop in error rates with dual screens. 
          • 98% preference. In one Human Factors and Ergonomics Society study, nearly all participants preferred a dual-monitor configuration over a single screen. 
          • The cost of switching. Workforce data from Mavenlink found that 73% of businesses lose more than an hour a day to app switching, and a 2020 Forrester report noted that 80% of workers believe a larger or multi-monitor display would improve their performance. 

          What You’ll Need Before You Start 

          With the right equipment, you can set up a dual monitor system quickly. But you must consider your hardware and the bandwidth the displays require, as these will dictate your resolution and refresh rate limits. 

          Start by looking at your video outputs. While most today’s desktops and laptops can run two or more screens, the constraint is in the GPU rather than the ports themselves. An integrated graphics chip on a laptop might have plenty of connectors but still put a hard stop at two or three external monitors. Should you want to go beyond that, a discrete card or a DisplayLink dock is called for (we’ll get to the latter in a moment). 

          Match the connection standard to your target resolution. Each interface carries a different amount of data, and that ceiling determines what you can run: 

          • HDMI 2.0 comfortably handles 4K at 60Hz; HDMI 2.1 pushes up to 4K at 120Hz or 8K at 60Hz. 
          • DisplayPort 1.4 supports 4K at 120Hz (and 8K at 60Hz with Display Stream Compression); DisplayPort 2.0/2.1 goes much higher. 
          • USB-C with DisplayPort Alt Mode carries a true DisplayPort signal over the USB-C connector, so it can drive a high-resolution display directly. 
          • Thunderbolt 3 and 4 natively support up to two 4K monitors at 60Hz from a single port, which makes them ideal for clean laptop setups. 

          How to Set Up Dual Monitors on Windows 11 

          This method uses the built-in Windows display settings, so you don’t need any extra software to get started. Follow these steps in order. 

          1. Connect both monitors: Plug each one into your computer using HDMI, DisplayPort, or USB-C, ideally into the dedicated graphics card if your desktop has one rather than the motherboard outputs. Power on both screens and give Windows a moment to detect them. 
          2. Open Display settings: Right-click the desktop and select “Display settings,” or press the Windows key + I and choose “System” > “Display.” 
          3. Detect a missing screen: If only one monitor appears, scroll down and click Detect. When a screen still won’t show, swap the cable, change the input source on the monitor, or try a different port. 
          4. Choose Extend: Press the Windows key + P and select Extend so both screens act as one continuous workspace. 
          5. Arrange the layout: Drag the numbered monitor boxes so they match how your screens physically sit on your desk, including height if one is raised. This fixes the frustrating “mouse moves the wrong way” problem at the screen edge. 
          6. Set your main screen, resolution, and refresh rate: Click the display you want as primary and check Make it my main display. Then set each monitor’s native resolution and open Advanced Display to raise the refresh rate to its maximum. Windows defaults new displays to 60Hz, so a 144Hz panel will run at 60Hz until you change it manually. 
          7. Handle scaling and HDR: If text looks tiny on a high-resolution screen, adjust scale per monitor (125% or 150% is common for 4K). If you have a 4K and a 1080p panel, set scaling separately for each so that text remains the same physical size. Toggle HDR on only if both the monitor and your content support it, since forcing it on an SDR panel washes out color. 

                      Dual Monitor Setup with Laptop 

                      You will find that a dual-monitor arrangement on a laptop is not quite the same as with a desktop; for one thing, the hardware has to make do with an integrated GPU and doesn’t put out as many ports. But don’t let that discourage you; it’s just a matter of configuration once you know what you’re dealing with. 

                      First, be clear on your output limit. One HDMI port is only going to power a single external screen at most. You might be tempted by an HDMI splitter, but that merely puts up a mirror image, not an extended desktop with two distinct screens. If you want to have two proper displays running, you are looking at needing a dock or else some form of multi-stream output in addition to your standard video connections. 

                      Pick the right dock. Two approaches exist, and the difference matters: 

                      • Native (DP Alt Mode / Thunderbolt) docks: Pass the signal straight through your GPU. They deliver full performance and are best for high refresh rates or gaming, but they’re bound by your laptop’s native display limit. 
                      • DisplayLink docks: Compress and send video over USB, effectively bypassing the GPU’s built-in display cap. After installing the DisplayLink driver, even an older laptop with one output can run additional monitors. The trade-off is slightly higher CPU use and reduced suitability for fast-motion gaming. 

                      Use MST where supported: Some monitors and docks support DisplayPort Multi-Stream Transport, which lets you daisy-chain one display into the next. Connect the laptop to monitor one’s DisplayPort In, then run a cable from monitor one’s DisplayPort Out to monitor two and enable MST in each monitor’s on-screen menu. 

                      Connect and configure: Plug the laptop into the dock with USB-C or Thunderbolt, attach both monitors to the dock, and then  

                      • Open System > Display and choose Extend just like on a desktop.  
                      • To work with the lid shut, open Control Panel > Power Options > Choose what closing the lid does and set it to Do nothing.  
                      • You can then close the laptop, slide it aside, and run both external screens as your main workspace, a setup often called clamshell mode. 

                      Keep Your Layout Locked in with SmartPanels 

                      You can put two monitors together, but that is only half of it. The real work is in making sure your windows, tabs, and apps stay put come the next driver update, restart, or when you must unplug a cable. SmartPanels makes that initial setup permanent rather than just a one-off.  

                      Designed for Windows, the program will save your whole display, and you can restore displays back with a click. It will remember the exact size and placement of your applications and even pick up where you left off with tabs in Edge, Chrome, or Firefox, all on as many as six screens. Put a custom hotkey on a profile and you are done; moving from a “design” to a “meetings” configuration is a matter of one keystroke instead of dragging things around a dozen times. 

                      Then there is sharing. An agency or remote team will appreciate being able to email a profile to a new hire so they can mirror your setup without you having to walk them through it.  

                      Consider this your quick guide: set up your dual monitors, save the profile in SmartPanels, and let the app take care of the rest. When you think about how much time a business wastes on app switching over an hour daily, automating the process is what makes a dual-monitor arrangement truly efficient as opposed to just nice.  

                      You can try it out for 14 days with no risk at SmartPanels.App

                      Final Thoughts 

                      You won’t find a better way to improve your day-to-day workflow than with a dual-screen arrangement; the numbers back it up, with some studies showing you can be 42% more productive or better. 

                      Here’s what to do: check your ports and cable ratings, ensure your GPU can handle it, then connect the two monitors. Go into Windows and set the display to “Extend,” positioning them on screen the way they sit on your desk. If you are on a laptop, a USB-C or Thunderbolt dock is the best option for a clean look and for working in clamshell mode. A DisplayLink will get you around any native display restrictions. 

                      Should you run into trouble, it is usually just a matter of verifying your drivers and refresh rates and that you have the right inputs and cables. But the key is not to have your whole setup disintegrate on a reboot. Arrange your windows and tabs in SmartPanels so they return with a click. Set up your workspace once and leave it that way. 

                      When You Run Dual Monitors Does It Slow GPU Down? (A Real Test) 

                      Multi-monitor setups have become a staple for gamers, creators, and busy professionals alike. Yet if you hang around the forums or support boards long enough, you come across the same concern: is your graphics card being put through its paces by that second screen? A valid point to make, particularly when you have seen your frame rate take a hit with some video running in the background. 

                      We decided to put an end to the speculation with some hands-on testing of our own to see what Windows does with additional displays. You might be surprised by what we found; it is not as simple as a yes or no answer. For the most part the effect is negligible in day-to-day use, but then again, there are circumstances where the equation changes entirely.  

                      We’ll let you in on what is going on under the hood and why the desktop window manager is often made the scapegoat. And further down, we show how SmartPanels can be used to maintain an orderly and efficient workspace on all your screens. 

                      When You Run Dual Monitors Does It Slow GPU Down? The Honest Answer 

                      Let’s start with the short version. You can put a second monitor to work with hardly any impact on your graphics. Your GPU has enough in reserve to handle two displays without breaking a sweat, so for an ordinary productivity routine like having email up on one and a document on the other, you won’t see any performance hit. 

                      But then again, it is what you are doing on those screens that counts. An idle second monitor won’t cause any issues. Have it churning out a Twitch stream or an animated dashboard, and the story changes. The card will have to put in the work to decode and render all that, and the shared load may well siphon off resources from your main concern, say a game you are playing. Put simply, the hardware is not the culprit; the demands you put on it are. 

                      What Actually Uses Your GPU With Two Screens 

                      To understand the impact, it helps to know which factors genuinely move the needle. Three stand out. 

                      Resolution is one of them. A modern card will put out 1080p on two displays without breaking a sweat. But if you run both at 4K or even 1440p, your GPU has to work to render all that extra pixel data for every frame. 

                      Then there is the refresh rate. You can overload Windows and your graphics card by pairing a 144Hz panel with a 60Hz one; matching the rates tends to eliminate any hiccups right away. 

                      But the biggest variable is what you are actually putting on the screens. You won’t notice much from a music player or some static text and spreadsheets. Live video, streaming, or a big download are another story. They will be vying for the very same decoding resources that your game or design software is after. 

                      Our Real Test: What We Saw in Task Manager 

                      To see if the theory held up in practice, we ran some tests on a Windows 11 PC equipped with a mid-level GPU and a pair of displays. 

                      We had both monitors hooked up but were just looking at the desktop; as you would expect from a single-screen configuration, the GPU was barely working. We then fired up a game on the main monitor and let the other one sit empty. You could not have told the difference in frame-rate from having only one screen, any loss being so minor as to be unnoticeable. 

                      But change one variable and the result is different. Start playing a video on the second monitor while you are in the game, and the GPU will work harder, and you will see your frames drop. Put the video on pause, and the performance is back where it was. A bit of hasty scrolling through browser tabs on the side display does much the same, causing brief spikes. 

                      It is all very consistent: having two screens is no impediment. It is the active content on that secondary monitor that is responsible for the dips. 

                      Desktop Window Manager and Those GPU Spikes 

                      Chances are you have come across a dwm.exe process at the top of your Task Manager if you have been looking for fixes to high GPU usage with your desktop window manager. That is the Desktop Window Manager, the Windows component responsible for rendering what is on your screen: the windows and taskbar previews, any transparency or animations you have going on, and even multi-monitor setups. It puts it all together in one seamless picture. 

                      When the system is doing nothing much, you can expect the process to be fairly light on your GPU, taking up 1% to 5%. But put some strain on it by scrolling, shuffling windows, or hooking up an extra display, and those numbers will jump. Usually you can blame it on something like old graphics drivers, a Windows update you haven’t installed, visual effects set too high, or some sort of misconfiguration in your NVIDIA or AMD control panel. 

                      Do keep in mind that the real dwm.exe is to be found in C:\Windows\System32 or C:\Windows\System64. Should you see it running from a different location, run a malware scan right away; there are programs out there that like to put on the guise of this legitimate process. 

                      How to Keep Dual Monitors Running Smoothly 

                      You can put your mind at ease: most of these slowdowns are simple to head off. We have put our fixes to the test and these are the ones that proved most effective. 

                      Start by updating your graphics drivers and any pending Windows updates; they will take care of the bugs that make your GPU run wild. Then go into Personalization and disable transparency effects, or opt for a plain background so you don’t put as much strain on the Desktop Window Manager. 

                      Where you can, set the refresh rates on your pair of monitors to be in sync. If you are in the middle of a quick game, hit Windows + P to put you on “PC screen only” and free up all the graphics power you need. For normal use, just leave the heavy, moving content off the secondary display and use it for something static like reference material. 

                      And one last thing: connect your monitors straight to the GPU port. Don’t be tempted by an inexpensive USB adapter; it will only make your CPU do the work. 

                      Where SmartPanels Fits In 

                      Most people miss this, but a good deal of the “slowdown” you experience has nothing to do with your monitors and everything to do with clutter. When you have a dozen windows open, some apps running twice and browser tabs you’ve long since forgotten, they are all sitting in memory and being redrawn on a constant basis, putting more work on your system than is called for. 

                      That is where SmartPanels is helpful. With one click, you can save or restore an entire window setup across as many as six displays. Rather than spending your morning opening and positioning twenty different things by hand, you can put up a clean profile with just what is required for the job. 

                      That kind of focus brings tangible efficiency. Make a gaming profile, and it will bring up your game and a few must-haves while the second screen stays uncluttered. You could also have one for research and another for when you need to concentrate at work. As for how the app performs, don’t worry: we have optimized SmartPanels so it is no burden on system resources.  

                      By keeping each monitor focused on its purpose and closing unnecessary applications, you are giving your graphics card a little extra room to work. It is not a substitute for a driver update, of course, but a well-ordered desktop does make for better multi-monitor performance. 

                      Learn More: How to Use SmartPanels: A Step-By-Step Guide  

                      Frequently Asked Questions 

                      1. Does a second monitor lower my FPS in games?  

                      By itself, almost never. A blank or static second screen has a negligible effect on frame rates. FPS drops usually appear only when you run video, streaming, or other moving content on that second display while gaming, since both tasks share the same GPU resources. 

                      2. Why is Desktop Window Manager using so much of my GPU?  

                      Brief spikes while moving or resizing windows are normal. Sustained high usage often points to outdated drivers, a pending Windows update, heavy transparency effects, or mismatched monitor refresh rates. In most cases, updating your system and reducing visual effects will resolve the issue. 

                      3. Do dual monitors need a more powerful graphics card?  

                      For office work and browsing at 1080p, almost any modern GPU is fine. You’ll want more power only if you run two high-resolution or high-refresh screens, or if you regularly do gaming, video editing, or 3D work across both displays at once. 

                      4. Will SmartPanels slow down my computer?  

                      No. SmartPanels is built to stay lightweight and use minimal system resources. Its job is to save and restore your layouts quickly, and by reducing on-screen clutter, it can actually help your setup feel more responsive. 

                      5. What’s the fastest way to free up GPU power for a single game?  

                      Press Windows + P and choose “PC screen only” to temporarily disable the second monitor. This instantly returns all graphics resources to your main display; no need to unplug a single cable. 

                      Final Thoughts 

                      You may be wondering if putting in a dual monitor setup will put the brakes on your GPU. We’ve tested this and can tell you that, for the most part, the monitors aren’t to blame. There is little cost to running a second screen, and if it is just sitting there as a static display, you will see no impact on your gaming or creative output. 

                      The drag you experience comes from what is being shown on the monitors. A live video feed, endless scrolling, or even a desktop window manager made to stumble over outdated drivers and too many visual effects will cause the kind of slowdowns folks complain about. But those are easy enough to remedy. Make sure your drivers are up-to-date, get your refresh rates in line, and use the extra screen for less demanding work. 

                      Then there is the matter of an orderly workspace. With SmartPanels, you can set up clean profiles for all your displays and enjoy the productivity of multiple monitors without the clutter that can subtly sap performance. Give it a go and you will notice the difference. 

                      Second Monitor Not Detected: Complete Guide to Fix Display Detection Issues 

                      There is no denying that a second monitor puts you in a better position to multitask and keeps your workspace orderly. But the moment that display goes dark, so does your productivity.  

                      It is a familiar frustration for many: after an update to Windows, a driver hiccup or some other hardware tinker, you are left with a “second monitor not detected” error.  

                      You might think it is a complex matter, but in most cases the culprit is easy enough to pin down and put right. 

                      We have put together this guide to cover the usual suspects when a monitor fails to show up and walk you through some tried and true fixes. And once you have things in order, we will show you how SmartPanels can make the most of your setup. 

                      Why Is Your Second Monitor Not Detected? 

                      There are a few common reasons when Windows fails to pick up an external display. The problem is generally one of these: 

                      1. Cables that are loose or in bad shape, breaking the signal to the monitor. 
                      2. A display port that is damaged and won’t let data through. 
                      3. Display settings that have been applied to hide or turn off the second screen. 
                      4. Graphics drivers that are too old to talk to your hardware as they should. 
                      5. Conflicts from a Windows update can get in the way of detection. 
                      6. Some kind of hardware failure within the monitor itself. 
                      7. Or perhaps you have a configuration the system simply can’t support. 

                      How to Fix a Second Monitor Not Detected 

                      1. Check All Physical Connections 

                      The first step is always to inspect your hardware connections. 

                      Make sure: 

                      • The monitor is powered on, and the power indicator light is functioning normally. 
                      • The display cable is securely connected at both the computer and monitor ends. 
                      • The correct input source is selected on the monitor menu. 
                      • There are no visible signs of cable wear, bending, or connector damage. 
                      • The monitor’s power cable is firmly attached and receiving power. 

                      2. Force Windows to Detect the Display 

                      An automatic recognition of a monitor by Windows is not always to be relied on. It can happen after an update, coming out of sleep mode or when you have reconnected some hardware. 

                      If that is the case, you can force a manual detection of the display. Just head into Settings and go to System, then Display. From there, scroll until you see Multiple Displays and Hit Detect.  

                      Windows will do a scan of what is connected and try to bring up any missing displays. In effect, it refreshes the link between the OS and the hardware. Should your monitor be in good working order but not show up on its own, this will put it back on screen right away. 

                      3. Verify Display Projection Settings 

                      Windows includes projection modes that control how displays are used. 

                      Press: 

                      Windows Key + P 

                      You will see options such as: 

                      • PC Screen Only 
                      • Duplicate 
                      • Extend 
                      • Second Screen Only 

                      For most productivity setups, choose: 

                      Extend 

                      With the Extend option, you can have your applications, windows, and workflows span out over more than one display for extra workspace, as opposed to just mirroring what is on screen. 

                      Then there are times when Windows will put you in a different projection mode of its own accord, perhaps because of a keyboard shortcut or some change in the display settings. You might think your monitor has gone on the fritz, but it is only a matter of incorrect configuration. Even with the monitor properly connected, an ill-chosen mode can make it seem like Windows is having trouble detecting it. 

                      4. Update Graphics Drivers 

                      Graphics drivers play a major role in display communication. Outdated or corrupted drivers can prevent Windows from recognizing additional monitors or cause intermittent display issues. 

                      To update drivers: 

                      1. Right-click Start. 
                      2. Open Device Manager. 
                      3. Expand Display Adapters. 
                      4. Right-click your graphics card. 
                      5. Select Update Driver. 
                      6. Choose Search Automatically. 

                      Updated drivers often contain bug fixes, display compatibility improvements, and performance enhancements. Installing the latest version helps ensure that Windows can communicate properly with connected monitors and external displays. 

                      5. Reinstall Display Driver

                      If updating does not work, reinstalling the driver may help. 

                      Steps: 

                      1. Open Device Manager. 
                      2. Expand Display Adapters. 
                      3. Right-click your graphics card. 
                      4. Select Uninstall Device. 
                      5. Restart your computer. 

                      Let Windows handle the driver reinstallation on its own when you start up. It will put in place the right one and, in doing so, clear out any software conflicts, bad settings, or corrupted files that are keeping the OS from seeing your second display.  

                      You will find this to be an effective fix if the monitor has given you trouble for no apparent reason and there have been no hardware changes to account for it. 

                      6. Check for Windows Updates 

                      Microsoft frequently releases updates that improve hardware compatibility and display performance. 

                      To check: 

                      1. Open Settings. 
                      2. Select Windows Update. 
                      3. Click Check for Updates. 

                      Go ahead and put in any updates that are available, then give your machine a restart.  

                      You will find that Windows updates are a good source for compatibility patches and driver enhancements, not to mention the occasional fix for graphics problems of the sort that can cause display detection to fail. 

                      On the other hand, should this trouble have cropped up right on the heels of an update, it would be worth looking through your history to see if something you installed is at odds with the system. 

                      Advanced Troubleshooting for Dual Monitor Issues 

                      • Test the Monitor Independently 

                      Connect the monitor directly to another computer. 

                      If it works: 

                      • The monitor is functioning properly. 
                      • The issue likely exists on the original computer. 
                      • Your graphics settings or drivers may need attention. 

                      If it does not work: 

                      • The monitor itself may require repair or replacement. 
                      • Internal hardware components could be failing. 
                      • The display panel or input board may be damaged. 

                      Independent testing helps eliminate guesswork and narrows down the actual source of the problem. 

                      Unsupported resolutions can sometimes create detection problems. 

                      To check: 

                      1. Open Display Settings. 
                      2. Select the monitor. 
                      3. Choose Recommended Resolution. 
                      4. Check Refresh Rate Settings 

                      An incorrect refresh rate may cause display instability. 

                      To verify: 

                      1. Open Advanced Display Settings. 
                      2. Select the monitor. 
                      3. Adjust the refresh rate. 

                      Testing a lower refresh rate may help restore functionality. 

                      Learn more: How to Restore Your Entire Workspace in One Click (SmartPanels Guide) 

                      • Disable and Re-enable the Monitor 

                      Device Manager allows users to refresh hardware communication. 

                      Steps: 

                      1. Open Device Manager. 
                      2. Expand monitors. 
                      3. Right-click the monitor. 
                      4. Disable the device. 
                      5. Re-enable the device. 

                      This process forces Windows to rebuild the connection between the operating system and the monitor.  

                      Common Causes of a Dual Monitor Not Detected Error 

                      Many users experiencing a dual monitor not detected issue are dealing with one of the following situations: 

                      • Docking Station Conflicts 

                      Docking stations simplify connectivity but can occasionally interfere with monitor detection. 

                      Try: 

                      • Updating docking station firmware. 
                      • Disconnecting and reconnecting the dock. 
                      • Testing monitors without the docking station. 
                      • Checking manufacturer compatibility requirements. 

                      Many display-related issues occur because the docking station firmware is outdated or incompatible with newer operating system updates. 

                      • Graphics Card Limitations 

                      Not all graphics cards support multiple displays

                      Verify: 

                      • Maximum supported monitor count. 
                      • Supported resolutions. 
                      • Available output connections. 
                      • Graphics card specifications. 

                      Entry-level systems may struggle to drive multiple high-resolution displays simultaneously. Reviewing hardware capabilities can prevent unnecessary troubleshooting. 

                      • Adapter Compatibility Problems 

                      HDMI, VGA, DisplayPort, and USB-C adapters vary significantly in quality. 

                      Low-quality adapters may: 

                      • Interrupt signal transmission. 
                      • Cause intermittent display drops. 
                      • Limit supported resolutions. 
                      • Prevent proper monitor detection. 

                      Using certified adapters from reputable manufacturers often resolves connection issues and improves long-term reliability. 

                      How SmartPanels Improves Your Multi-Monitor Experience 

                      Once your displays are working correctly, maximizing productivity becomes the next priority. 

                      SmartPanels helps users create a cleaner and more efficient workspace by enhancing screen organization and workflow management. 

                      • Faster Access to Information 

                      With SmartPanels you have your most important tools, widgets and shortcuts at your fingertips, all without the clutter on your desktop. It is a way to get to the information you need from one tidy, central place rather than having to keep opening and closing applications. The result is less distraction and more efficiency as you go about your day. 

                      • Improved Workflow Management 

                      With SmartPanels, you can put your most important resources in order, making them easy to get at whether you are on a single screen or have a full dual-monitor arrangement. It is a way for teams and solo professionals alike to have their go-to tools right where they need them without cluttering up the desktop. 

                      • Better Screen Utilization 

                      With SmartPanels, you don’t have to keep switching apps; it lets you display your most important content where it’s easy to find and well ordered. For any professional who has to juggle dashboards, analytics, project management, or collaborative tools as part of their day, that kind of convenience is hard to come by. 

                      • Enhanced Productivity 

                      A workspace that is both efficient and makes good use of your screen space is worth a lot. SmartPanels can help with that for the likes of developers, designers, analysts, remote workers, and other professionals.  

                      The idea is to put your most often used resources at your fingertips and cut down on superfluous clicking, which in turn leads to a more productive and fluid workflow. And if you have a solid multi-monitor setup, SmartPanels will tie it all together into a streamlined environment where you can stay focused and organized. 

                      Frequently Asked Questions 

                      1. Why is my second monitor not detected even though it is connected? 

                      The most common causes include loose cables, outdated graphics drivers, incorrect display settings, adapter failures, or hardware compatibility issues. Start by checking physical connections and manually detecting the display through Windows settings. 

                      2. Can a bad HDMI cable cause monitor detection issues? 

                      Yes. Damaged, worn, or low-quality HDMI cables can interrupt signal transmission and prevent Windows from recognizing the monitor correctly. 

                      3. Why does Windows suddenly stop recognizing my second monitor? 

                      This can happen after a Windows update, graphics driver update, hardware modification, sleep mode issue, or accidental display setting change. 

                      4. How do I fix a monitor that appears connected but shows no image? 

                      Verify the monitor’s input source, test a different cable, check resolution settings, review refresh rate settings, and ensure the correct projection mode is selected in Windows. 

                      5. Does SmartPanels work with multi-monitor environments? 

                      Yes. SmartPanels is designed to improve organization, accessibility, and productivity across various workspace configurations, including single-screen and multi-monitor setups. 

                      Conclusion 

                      Nothing kills productivity like a “second monitor not detected” error, but you can usually fix it with some methodical troubleshooting. A quick check of the cables and display settings, an update to your drivers, or a test of the hardware will usually have things running again in no time.  

                      And if you know what is causing the problem, you are less likely to encounter it again later.  

                      If your work involves juggling multiple screens for data analysis, creative endeavors, or just the day-to-day demands of multitasking, you need a display environment that is in good order. When your monitors are behaving themselves, the next thing to do is make the most of your workspace.  

                      That is where SmartPanels comes in. It is a sensible tool for getting rid of desktop clutter and putting your information in its place, which in turn makes for better visibility and a more streamlined workflow on any screen configuration. Paired with a sound monitor setup, it yields a workspace that is both efficient and productive. In short, whether you are ironing out the occasional glitch or fine-tuning your station for the long haul, SmartPanels will give you a more effective computing experience. 

                      [Get Started]