Why is Chrome so slow on Windows 11?

Slow Google Chrome

Windows 11 improves considerably on the previous iterations of Windows. However, users have come to experience slow browsing on Chrome after upgrading to Windows 11.

If you are one of those not happy with a laggy Chrome browsing experience, we have got you covered. We will share a few useful tips to fix slow browsing issues on Windows 11, in this guide.

Reasons for Chrome becoming so slow on Windows 11?

There can be a myriad number of reasons, but the most common one is not upgrading to the latest version of Chrome. Secondly, there can be cache blocking going on that can make browsing on Chrome extremely slow.

Moreover, some other programs or applications might be using too much of your PC’s resources, causing Chrome to slow down.

7 Tips to Fix Slow Chrome Browsing in Windows 11

Here are a few fixes that you can try to make your Chrome browsing experience a breeze in Windows 11.

1. Restart your computer or Chrome

The first fix is an easy one. Just restart your computer. If this doesn’t help, you can also restart your browser.

For restarting Chrome, type chrome://restart in the address bar. This will restart your browser quickly.

2. Close all unused tabs

Google Chrome is famous for using a lot of resources, especially when you open a lot of tabs. Too many tabs can eat a lot of your RAM resources because each tab opens its own process,  which can lead to your browser getting slow.

You can check how many resources your Chrome browser has through the Task Manager. Press Ctrl + Alt + Delete to open the Task Manager. Then find Chrome under the apps section and check how much resources it is consuming in the Memory section on the right.
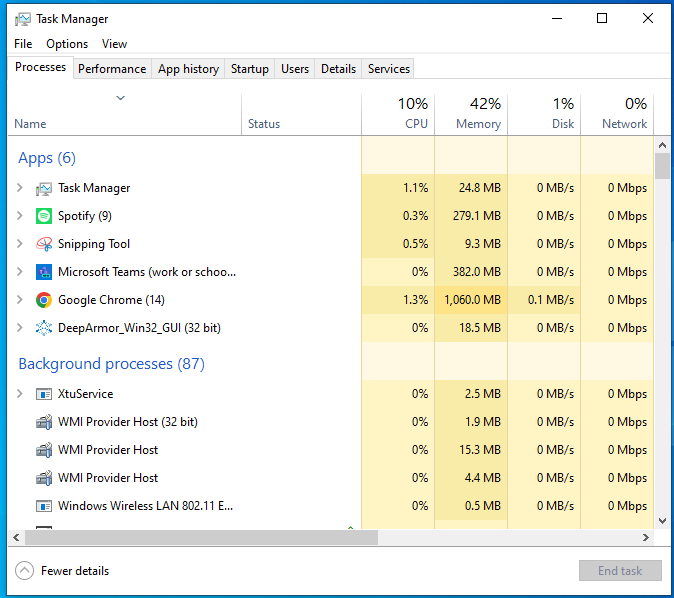
As you can see in the image, Google Chrome is using a lot of memory. Sometimes, if you have a high-end PC with sufficient RAM, then your Chrome window might not slow down. However, if you don’t have a lot of PC resources and your Chrome gets slow, then close unnecessary tabs and see if it fixes the issues.

3. Clear browsing cache and cookies

Accumulated cached data and cookies can also slow down your browser if you have been using Chrome for a long time. You can resolve this issue by clearing the browsing cache and cookies. 

  • Press Ctrl + Shift + Delete to go to the clear browsing page
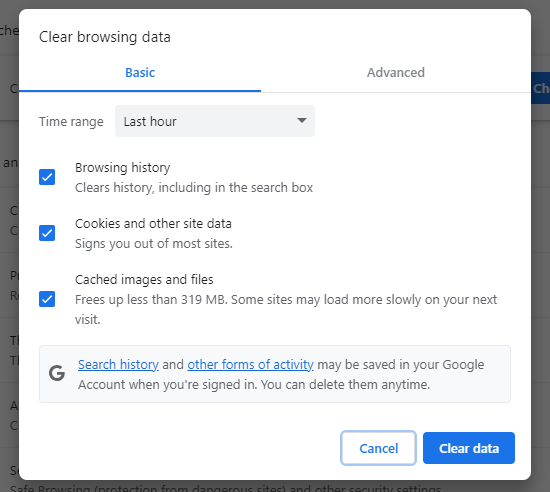
  • The next step is to check the Cache and Cookies boxes
  • Click “Clear Data” to clear the caches and cookies
4. Disable unused Chrome extensions

Your browser might be running slow because of unnecessary extensions. Some extensions can conflict with other programs, hence slowing down your browser. You can easily disable such extensions by:

  • Start by typing chrome://extensions in the address bar
  • From the Extensions page, choose an extension you want to disable. We are using Kaspersky Protection as an example.
  • Turn off the blue toggle button on the extension.
  • You can turn off as many extensions as you want. After that, check whether your Google Chrome is working normally.
5. Disable hardware acceleration

If you are still facing slow Chrome then this next tip can help you. Disabling hardware acceleration is another tip that can fix slow Chrome issues. Hardware acceleration is used to reduce the workload on the CPU by assigning computing tasks to other specialized hardware. But your browser can get slowed down because of this feature.

Here’s how you can disable it:

  • First, find the Settings option.
  • From the Settings page, navigate to the System section.
  • Find the toggle “Use hardware acceleration when available” and disable it.
  • After disabling it, restart your Chrome browser and see if it’s slow or not.
6. Update Chrome version

Another reason for your Chrome browser getting slow might be that you are running an old version of the browser that doesn’t support some plug-ins and features. Google, with the new Chromium built, releases regular monthly updates. To avoid your browser getting slow, keep it up to date.

  • Open settings and navigate to “About Chrome”
  • Check the version of your browser, and update it if necessary
  • After installing the latest version, see if your browser is working normally or not.
7. Use third-party software

If your browser is still slow, then you can always turn to third-party software to effectively allocate PC resources to Chrome. One such software is TurboCharger. TurboCharger is a Windows utility app that can supercharge your PC’s performance. With TurboCharger, you can allocate your PC’s resources to Chrome to ensure that it doesn’t slow down.

Here’s how you can use TurboCharger to boost your browser’s performance:

  • Download and install TurboCharger.
  • Once you launch the application, a menu will open up
  • If you enable the “Auto Manage” toggle in the menu, then TurboCharger will automatically assign the highest priority to apps that are in use.
  • You can assign priority manually to apps through the “Manage Apps” section. Also, you can add other apps and assign them their respective priorities.

TurboCharger

Boost productivity and system performance with TurboCharger. Organize your apps and games and simplify your workflows with TurboChargers’ automatic app prioritization

Conclusion

Chrome on Windows 11 can get slow due to a number of reasons. However, you can restart your browser to resolve simple issues. Also, for more serious issues, you can either clear your caches, disable hardware acceleration, or use third-party software, like TurboCharger, to fix this problem.

FAQs

How Can I Make Chrome Run Faster in Windows 11?

  • Close unnecessary tabs
  • Update Chrome
  • Turn off any unwanted processes
  • Configure your preload settings

How do I reduce RAM Usage in Chrome Windows 11?

To reduce RAM usage in Chrome Windows 11, follow the following steps:

  • Open Chrome and type the following into the address bar:

chrome://flags/#high-efficiency-mode-available

  • Next, type the following in the address bar:

chrome://settings/performance

  •  From the Performance menu, toggle the Memory Saver switch to enable it
  • Restart your browser for the change to take effect

How to stop games minimizing dual monitors windows 11

There is hardly anything to put a damper on a good gaming session like a title that disappears as soon as you give your second screen some attention. One click over to Discord or Spotify, or perhaps to check a walkthrough on the other monitor, and your game has been relegated to the taskbar. It is maddening. But there is an easy remedy for it; one does not have to be particularly tech savvy to put an end to it.  

For the most part, Windows 11 is at fault in how it deals with fullscreen applications, though a couple of adjustments to your settings will see to that. The proper software can also lend a hand in making the whole dual screen experience more fluid. 

In this guide, we will explain exactly why the problem happens, walk through several proven fixes on how to stop games minimizing on dual monitors, and show you how SmartPanels keeps both screens organized. 

Why Games Keep Minimizing on Dual Monitors: The Technical Explanation 

Before jumping into fixes, it helps to understand what is happening under the hood. When games keep minimizing Windows 11 is usually doing exactly what it was designed to do: give full attention to one active window at a time. 

Exclusive Fullscreen vs. Borderless Windowed: What Is the Difference? 

Fullscreen Mode: Most games still default to exclusive fullscreen mode. Here the game makes an end run around the Desktop Window Manager (DWM), the Windows utility responsible for compositing and rendering all your windows. It assumes direct command of the primary display and its output in its place. One gains a marginal reduction in input latency as a result, but it is a fragile arrangement. With the game holding the display in such exclusive terms, it is limited to being either fullscreen and focused or else minimized. Should one put a click on the second monitor, Windows will cede keyboard and mouse focus to whatever app is there; the game’s hold on the display is broken and it will be reduced to an icon on the taskbar. 

Borderless Windowed: This mode works differently. What you see is the game being rendered in a standard window, one that has been made to occupy the whole screen by removing the borders and title bar. The DWM handles all the compositing, so in effect the game is no different from any other window. You can have your mouse and keyboard attention on the second monitor, and it will still be rendering on the first. For most players, borderless mode is the solution precisely because of that one distinction in how things are put together. 

9 Proven Fixes to Stop Games Minimizing on Dual Monitors 

1. Switch to Borderless Windowed Mode 

This is the single most effective fix, for the technical reasons explained above. With borderless windowed mode dual monitor setups finally behave the way you expect: the game fills your main screen edge to edge, yet you can click anything on your second monitor and the game stays put. 

Here is how to enable it: 

  1. Open your game’s settings menu. 
  2. Go to the Display or Video options. 
  3. Find Display Mode and change it from Fullscreen to Borderless, Borderless Windowed, or Windowed Fullscreen (games name it differently). 
  4. Apply the changes and restart the game if prompted. 

        2. Set Your Gaming Monitor as the Main Display 

        By default, Windows will tie the taskbar, notifications and any fullscreen application to the screen it considers the main display. Should you be playing a game on a secondary monitor, for instance, you are much more prone to run into focus conflicts. 

        The remedy is simple. Go to Display settings by right-clicking the desktop, then select the monitor in question and put a check next to Make this my main display after scrolling down. It is a minor adjustment but one that puts an end to all manner of minimizing problems. 

        3. Disable Fullscreen Optimizations 

        Most games in Windows 11 are subject to a feature known as fullscreen optimizations, something the OS puts in place without fanfare. When a game makes an exclusive fullscreen call, the system will step in and handle it via the flip model, running the title in an optimized borderless mode.  

        The idea is to have the best of both worlds: windowed flexibility and the performance one expects from fullscreen. But for all that theory, the arrangement can be a source of confusion for some games, leading to odd stuttering on an alt-tab or erratic minimizing. A more predictable experience is had by disabling the option and putting the game in genuine exclusive fullscreen. 

        1. Right-click the game’s .exe file or shortcut. 
        2. Select Properties, then open the Compatibility tab. 
        3. Check Disable fullscreen optimization. 
        4. Click Apply, then OK. 

              Repeat this for each game that gives you trouble. Test both states, since some titles run better with the feature on. 

              4. Turn Off Game Mode and Silence Notifications 

              While Game Mode is meant to put your game first by reassigning CPU and GPU resources, it can be at odds with multi-screen setups on certain machines. Try disabling it under Settings > Gaming > Game Mode for a better experience. 

              Then there are notifications, which have a way of stealing the show. One toast alert is enough to pull an exclusive fullscreen game back to the taskbar. To put a stop to that, head over to Settings > System > Notifications and in the Turn on do not disturb automatically section, make sure When playing a game is selected. From then on Windows will handle the suppression of any alerts while you are in a fullscreen title. 

              5. Update Your Graphics Drivers Properly 

              When drivers are out of date, a display will tend to drop its connection and have to renegotiate, an interruption that will minimize any fullscreen application. The best way to get the current driver is to download it from NVIDIA, AMD or Intel; do not put your faith in Windows Update as it is prone to serving up older builds. 

              Should an ordinary update fail to resolve the matter, a clean installation is in order. Both the AMD and NVIDIA installers have an option for this that will scrub away any corrupted settings left over from before. In cases of more entrenched driver conflict, one can use the free Display Driver Uninstaller (DDU) to eliminate all vestiges of the old software prior to putting in a new one. 

              6. Hunt Down Focus-Stealing Background Apps 

              There are programs that will insist on your attention in the middle of a game session. You will often see this with overlays, updaters or RGB utilities. A good practice is to hit Ctrl + Shift + Esc for the Task Manager and put an end to any unnecessary processes before you start playing. 

              Should you be looking for the culprit, the Startup apps tab in Task Manager is where to find it; disable what is not essential and put them back one by one after your next session. For those who want to see the evidence of a process taking over, Microsoft offers the PowerToys suite at no cost with tools to log window activity. The Event Viewer will also have a record of any application errors that line up with each time the game is minimized. 

              7. Adjust Your Taskbar Settings 

              If you want to stop game minimizing when clicking second monitor apps, showing the taskbar on both screens helps. Right-click the taskbar, open Taskbar settings, expand Taskbar behaviors, and enable Show my taskbar on all displays. You can then launch and switch second-screen apps directly from that monitor’s own taskbar, which reduces accidental interactions with the game window. 

              8. Match Refresh Rates and Check Cables 

              There is a tendency for micro-stutters to appear when one has a 144 Hz gaming monitor paired with a 60 Hz secondary, and on some older versions of Windows the DWM may even reset the display as it tries to cope with the timing disparity.  

              To put an end to it, there are two remedies. Start by making sure both screens are at their proper refresh rates under Settings > System > Display > Advanced display. Then, if you can, use a DisplayPort connection for the main gaming unit rather than HDMI; the occasional handshake issue with HDMI is well known for causing the kind of momentary drop that will force a game to minimize. 

              9. Stop Windows from Letting Apps Steal Focus (Advanced) 

              There is a timeout built into Windows to govern the length of time an application has to wait before it is allowed to push itself to the foreground. On certain systems the value is zero, so a background process can take focus right away. For those who wish to increase it, the Registry Editor will do the trick. Go to HKEY_CURRENT_USER\Control Panel\Desktop and put in 30d40 (hex) for ForegroundLockTimeout, then do a restart. Of course, one should only tinker with the registry if they are at ease doing so and make sure to have a backup on hand beforehand. 

              Build a Better Two-Screen Gaming Station with SmartPanels 

              The first order of business is to put an end to the minimizing problem. But the real value lies in maintaining an orderly workspace on both screens’ day in and day out, for which we have SmartPanels. 

              This Windows application will record your entire workspace down to the last detail – window placement, app configuration, browser tabs and put it all back in a matter of seconds. In the case of a dual monitor gaming rig, it is quite a different experience. Set up a profile with your launcher on one side and have Discord or OBS and a guide on the other, windows placed just so. Then when you are done with your session, a single click reverts you to your work layout, apps and tabs and all. 

              SmartPanels can accommodate any arrangement of up to six displays. With custom hotkeys there is no need to be dragging windows about to get from a gaming to a work profile. And since it works with Chrome, Firefox and Edge, your second screen’s browser is restored as you left it. Unlike other tools for dual monitors that are content to snap windows into a grid, this one retains the whole session, so you do not have to reconstruct your desktop with every task change. Profiles can be e-mailed to your team as well.  

              There is a 14-day trial available for nothing at SmartPanels. 

              Final Thoughts 

              There is a method to what may seem like random behaviour when running games on a dual monitor. Often, the culprit is exclusive fullscreen mode; a quick change to borderless windowed will put an end to it in no time. Should you run into something more obstinate, make sure your primary display is set right, turn off any fullscreen optimizations and notifications, get a clean install of your graphics drivers and see that the refresh rates are in sync. 

              When your games have been tamed, you can put some order in the rest of your workspace. With SmartPanels, a single click or hotkey is all it takes to have every window, app layout and browser tab on your monitors restored to where they were left. It does not matter if you are moving from a raid to a work call and back, your setup is prepared for you.  

              In short, the desktop works as it should. Put an end to the daily chore of rebuilding it and begin a 14-day free trial over at SmartPanels.

              How to enable developer mode in Windows 11

              Enable Developer Mode in Windows 11

              Developer Mode is a critical setting for any software developer and tester to know. Because, without enabling it, they will not be able to effectively develop and test software and apps for Windows. So, get ready to know “how to enable developer options”.

              As difficult as it may sound, enabling Developer Mode in Windows 11 is extremely easy. But before learning how to enable developer mode in Windows 11, you need to have a clear understanding of what Developer Mode is and features it has.

              Let’s get started then!

              What is the Developer Mode in Windows 11?

              Developer Mode is a policy in Windows that allows developers to sideload, install, and test third-party apps. This feature should only be used by developers and testers since it lets them develop and test apps outside the Microsoft Store.

              However, if you aren’t a software developer or an advanced user and use Windows for only day-to-day tasks (office apps, web browsing, emails, and gaming), you shouldn’t activate it, as it can put your device at risk of being infected with malware through the installation of malicious software.

              How can you enable Developer Mode in Windows 11?

              You can enable Developer Mode in Windows 11 by doing the following:

              • Open Windows Settings by pressing Win+I
              • From there, go to “Privacy and Security
              • Select the “For Developers” page
              • Enable the “Developer Mode” toggle
              • Save the setting by clicking on Yes

              You can sideload and install software and apps from any source once you have taken these steps.

              If you want to disable Developer Mode in Windows 11, then you can follow all of these steps except that you have to disable the Developer Mode toggle in the “For Developers” section.

              What features are there in the Developer Mode?

              With the introduction of Developer Mode, there is no need to get a developer license. Now, by just enabling Developer Mode, users can develop and test any app. Also, Developers Mode offers developers and software testers advanced debugging and additional deployment features.

              When you enable Developer Mode, some features are installed on your device that includes:

              • Windows Device Portal: The Windows device portal is a web server that lets you configure and manage the device settings over a network or a USB connection. Device Portal is only enabled when the Enable Device Portal option is turned on.
              • Another feature that is included in the package is the Device Discovery. When you enable Device Discovery the SSH server will turn on. SSH services allow for remote installation of apps on a device.

              SmartPanels

              Restore Browser Tabs with SmartPanels. It maintains an active tab history and restores browser size as well as display position on one screen or many.

              Conclusion

              Here is the answer of “how to enable developer options”.

              The Developer Mode in Windows 11 is a critical function for developers and testers that lets them sideload, install, develop, and test their software and apps. But it can be a bit of a hassle to enable and disable Developer Mode for multiple users (especially if the other users don’t need Developer Mode enabled).

              But with the SmartPanels multiple profile feature, you can set up separate profiles with Developer Mode enabled and other profiles with Developer Mode disabled.

              FAQs

              Why can’t I enable developer mode in Windows 11?

              You need to be using an administrator account to enable Developer Mode in Windows 11. Usually, guest accounts aren’t allowed to enable Developer Mode. Moreover, if your device is owned by an organization, you need to get them to give you administrator rights or enable Developer Mode.

              Is Developer Mode safe in Windows 11?

              Turning on Developer Mode can be risky, especially if you open a malicious app that you don’t know where it came from. So, if you don’t have expertise in using the Developer Mode feature, we advise that you don’t enable it and start downloading third-party apps from untrusted sources.

              How to change default window size in Windows 11

              Change Default Window Size in Window 11

              You got yourself that new high-end monitor that you always wanted to buy. Congratulations! You deserve it. What? Do you want to change the default window size to your liking? You say that you are facing issues changing the default Windows size setting? Well, you aren’t alone!

              Users of Windows 10 and 11 have surely come across window resizing issues once in a while. Sometimes it can become so frustrating that you have to change them each and every time you start an app or open a browser. Sometimes, due to malware, they cannot even move their windows, let alone change their size.

              Although these are trivial issues, they can eat into your time and reduce your productivity, hence distracting you from working on important tasks.

              However, we have seven tips for you that can help you change the default Windows size in Windows 11.

              7 Tips to Change the Default Windows Size in Windows 11

              If you are facing issues with resizing your Windows, then you can use any of these tips to resolve the issue.

              • Utilize snap layouts

              Launched in Windows 10, Snap Layouts allow users to organize open windows on their desktops to their liking. To use snap layouts, press the Windows + Arrow keys to organize the windows on the left, right, top, or bottom of the screen.

              In Windows 11, you can leverage the Snap Assist tool to access all of your open windows as thumbnails on a single screen. With multiple layouts available, you are free to choose how you want to organize your apps.

              Additionally, with Snap Assist, you can resize the layout of the box sizes entirely by selecting and dragging the dividing lines. When you resize a single window, the adjoining window will resize itself, giving you a neat and organized desktop.

              • Turn off tablet mode

              If you are a Windows 11 user, then you don’t have to worry about enabling or disabling the Tablet Mode in the Action Center; it’s already removed and works in the background.

              However, if you are still on Windows 10, you have to disable it manually in the Action Center. After disabling it, you can use your mouse and keyboard to resize the window. Otherwise, your window size will remain the same.

              • Change the screen resolution and display scale

              Screen resolution and display scale settings play a major role in deciding how the windows and other objects on the desktop look and project. Most users use the default settings. However, some might need to change their screen resolution and scale settings for various tasks.

              By following the steps mentioned next, you can change your screen resolution and display scale in both Windows 10 and 11:

              • Right-click on the desktop and find Display Settings.
              • The Display Settings will open in a new window. Scroll down to find the resolution and scale settings. If you want specific resolution and scale settings, you can select them by choosing them from the drop-down menu. However, if you want to continue with the default settings, then don’t change the recommended settings. Also, ensure that you set the display orientation to landscape.
              • Close All Apps

              Some apps can interfere with how other apps behave. They may change the size and resolution of other apps, causing you to think that these apps might be glitching. So, find this app that is interfering with the others by closing all the apps one by one.

              After closing an app, check whether you are able to change the size of the others. If you can, then you will know which app is causing the issue.

              • Restore the Windows Size

              Users often complain that they are only able to fully minimize or maximize the windows. There is no in-between. Well, there is a simple trick that can help them resize their windows.

              First, you need to right-click on the top of the window bar of your selected window. You will see the option Restore. Click on it. This will reduce the window size. You can now resize the window by pointing at the edges, which appear when you point the mouse there, and dragging the mouse.

              • Run antivirus and malware scanners.

              If your computer is infected with malware, then you can face resizing issues. To resolve this issue, you can start by running Microsoft Defender or any third-party antivirus app you might have installed. Additionally, you can download and run the latest version of the Microsoft Safety Scanner.

              Once the antivirus app has removed the malware, try to resize the windows. If you can resize the windows, then your computer has become malware-free. If not, then you can run the antivirus app again.

              • Create a profile with SmartPanels

              If you have specific display and scale settings, then you can save them by using SmartPanels. SmartPanels allows you to create personalized window profiles that you can access and restore at any time. Now, become more organized and efficient with SmartPanels. If you want to learn how to use SmartPanels, you can read this guide and start organizing your desktops better.

              Final Word!

              As Windows users, the ability to customize and personalize everything, from icons to window sizes, is paramount to us. But with multiple users using a single computer and all of them having their own preferences, you need something that can preserve your settings and preferences.

              SmartPanels is a top-tier Windows organization solution that provides users with the ability to be highly productive and organized by creating unlimited profiles. Now, you can switch between work, play, and study by just switching profiles and having your personalized settings readily available to you.

              SmartPanels

              Restore Browser Tabs with SmartPanels. It maintains an active tab history and restores browser size as well as display position on one screen or many.

              FAQs 

              How Do I Make Windows 11? Remember my window size and position?

              If Windows 11 doesn’t remember your window size and position when you reopen a window after closing it, then you can press the shift button while clicking on the close button. By doing this, Windows 11 will remember your size and position.

              How Do I Change the Screen Scaling in Windows 11?

              • Open Settings
              • Click on System.
              • Under the “Scale & Layout” section, use the scale settings and select your preferred size, including 100%, 125%, 150%, and 175%.
              • You need to restart some apps to see the changes reflected in them.

              How do I reset my default screen size?

              • Open the Windows Settings
              • Choose System
              • Click on the display settings, and then click Advanced Scaling Settings.
              • Clear the previous setting and click on Apply.

              For More Related Information: how to reopen closed tabs | appdata | snipping tool shortcut | windows 10 key 

              How to Show File Extensions in Windows 11

              File Extensions in Window 11

              Upon diving into Windows 11, you might notice an interesting quirk within File Explorer: it conceals the extensions for familiar to show file extension Windows 11 file types as the default setting. Yet fear not, for there exist several avenues through which you can unveil these extensions.

              A file’s extension, a sequence of three or four characters following the dot at the end of its name, symbolizes its format. Consider filenames like ‘my-notes.txt‘ or ‘my-document.docx‘. Although including extensions might seem superfluous once the file is saved, it serves as an additional visual cue to recognize the file format swiftly. Moreover, it proves beneficial when the need arises to switch between compatible extensions—say, transforming ‘.txt‘ to ‘.bat‘, especially when creating scripts or batch files. In this article, we’ll discuss how to show file extensions in Windows 11. So, let’s get started!

              How to Show File Extensions Using File Explorer

              Within Windows functionality, the File Explorer is an important tool, granting you access to and dominion over your operating system’s array of files. Moreover, this versatile utility accommodates the revelation of file extensions dwelling within your computer’s precincts. To undertake this venture, adhere to the following guidelines:

              • Initiate the File Explorer by navigating through the Start menu bar. Simply type ‘file explorer’ and select the most pertinent option from the array of search outcomes.
              • Go to the ‘View’ tab on the interface.
              • Click “View” to see more options, then click “Show” to proceed.
              • Select “File name extensions.”
              • Confirm your intention to display file name extensions Windows 11 and watch the satisfying transformation.
              • With this final step, your computing world will undergo a refreshing transformation. Watch as file extensions are revealed like a curtain being drawn back to reveal the hidden nature of each Windows 11 file.

              See File Extensions via Command Prompt

              If you face any problems with the avenue, don’t worry. You could also try using the Command Prompt. Here are the steps to get started:

              • To start, open the Start menu and type “cmd” in the search bar. Choose the Command Prompt application from the search results.
              • You’re ready to take control with the Command Prompt at your fingertips. Here’s how to show file extensions in Windows 11 command line:

              reg add HKCU\Software\Microsoft\Windows\CurrentVersion\Explorer\Advanced /v HideFileExt /t REG_DWORD /d 0 /f

              • Hit the Enterkey to set this command into motion.

              Using command lines lets you control your system and learn more about it. Using a specific command allows you to see file extensions and better understand your system.

              View File Extensions through File Explorer Options

              File Explorer options let you navigate your system’s settings. By following these steps, you can change how File Explorer behaves, including whether or not to show file extensions:

              • Open the Start menu’s search bar and type ‘control panel.’ Choose the best match that appears.
              • Inside the Control Panel, search for ‘file explorer options‘ and select the most relevant result.
              • Click on the “View” tab.
              • Look for ‘Advanced settings‘ and find the section named ‘Files and Folders.
              • Find the box that says, “Hide extensions for known file types.” Uncheck it to trigger the display of hidden extensions.
              • Confirm by clicking ‘OK.’ Your settings will be saved instantly.

              Display File Extensions in Windows 11 via Folder Options

              To show file extensions on Windows 11 using Folder Options, follow these steps:

              • Launch File Explorer and tap the three-dot menu on the upper toolbar. From there, select “Options.”
              • Move to the “View” tab in the ensuing window. Scroll to find the setting you’re looking for.
              • Spot the checkbox labeled “Hide extensions for known file types.” Uncheck it, then confirm by hitting “OK.”
              • Explore a folder containing various file types, and you’ll now notice the file extensions accompanying each file name.
              • If you wish to revert to the default hidden state, return to Folder Options and check the “Hide extensions for known file types” checkbox. Confirm by clicking “OK.”

              Show File Extensions in Windows 11 via Windows Settings

              To make file extensions visible in Windows 11 using the Settings app, follow these steps:

              • Swiftly launch the Settings app by pressing “Windows + I keys together. Next, let’s head over to the left sidebar and click on “Privacy & Security.” Once you’re there, check out the right pane and click on “For developers.” It’s right there waiting for you!
              • Locate the “File Explorer” section, then click “Show settings” next to the option “Change settings to show file extensions.”
              • The familiar Folder Options window will open, akin to the previous method. In this window, clear the checkmark next to “Hide extensions for known file types.” Confirm by selecting “OK.”
              • Now, your Windows 11 PC will unveil file extensions for easy access.

              The Bottom Line

              The new Windows 11 Explorer interface looks pretty nice. They’ve moved some of the most-used options to the View menu so you can get to them quickly. It’s important to turn on the display of file extensions in Windows 11 so you know what kind of file you’re about to open. To enhance your Windows 11 experience further, consider downloading SmartPanels. This cool application makes your Windows 11 experience smoother and faster, so you can get more done in less time.

              SmartPanels

              Restore Browser Tabs with SmartPanels. It maintains an active tab history and restores browser size as well as display position on one screen or many.

              FAQs

              How do I show all file extensions?

              • Launch File Explorer.
              • Select the View tab.
              • Select the checkbox labeled “File name extension.”
              • Optionally, you can also enable Hidden items.
              • Now, file extensions will be visible.

              What is the shortcut to show file extensions?

              • Use Windows logo + E to open File Explorer.
              • Press Alt, then V, and finally HF to toggle file name extensions.

              How do I hide file extensions in Windows 11?

              When in the Folder Options window, scroll to Advanced settings. You can hide or show file extensions by selecting or deselecting the “Hide extensions for known file types” checkbox in File Explorer. Confirm your choice by clicking Apply and OK at the bottom.

              Why is My Screen Zoomed in Windows 11 – Solved

              A screen zoomed in Windows 11 can turn a simple task into a struggle. When icons are oversized, text is running off the page, and scroll bars have a way of disappearing, it can be disconcerting. In most cases there is no need to suspect faulty hardware; often the issue is with a driver, an accessibility option, or your display scaling in Windows 11. One might see it crop up in the wake of a Windows update, or perhaps a pet has been at the keyboard, or you have hit an errant shortcut. 

              If you keep asking, “Why is my screen zoomed in Windows 11?” start by knowing where to look. We have listed the various issues and how to address them below. 

              Why Is Your Screen Zoomed in Windows 11?

               There are several minor issues with a screen that has zoomed in on Windows 11, and the good news is that most can be resolved in a matter of minutes. You might find that the system’s own Magnifier is working without you realizing it. Or your display scaling could be set to something over 100%, making things appear larger than they should. Then there is the possibility of an improper screen resolution cropping or stretching the view. 

              Do not discount the drivers either; if the graphics driver is old or has become corrupt, it will tend to distort what Windows puts on the screen. In a multi-monitor environment, one unit may also decide to zoom on its own while the rest are unaffected. 

              It is best to eliminate any guesswork by identifying the root of the problem. Identify which of the following sections aligns with what you are seeing and implement that remedy first. 

              How to Tell Which Issue You Have 

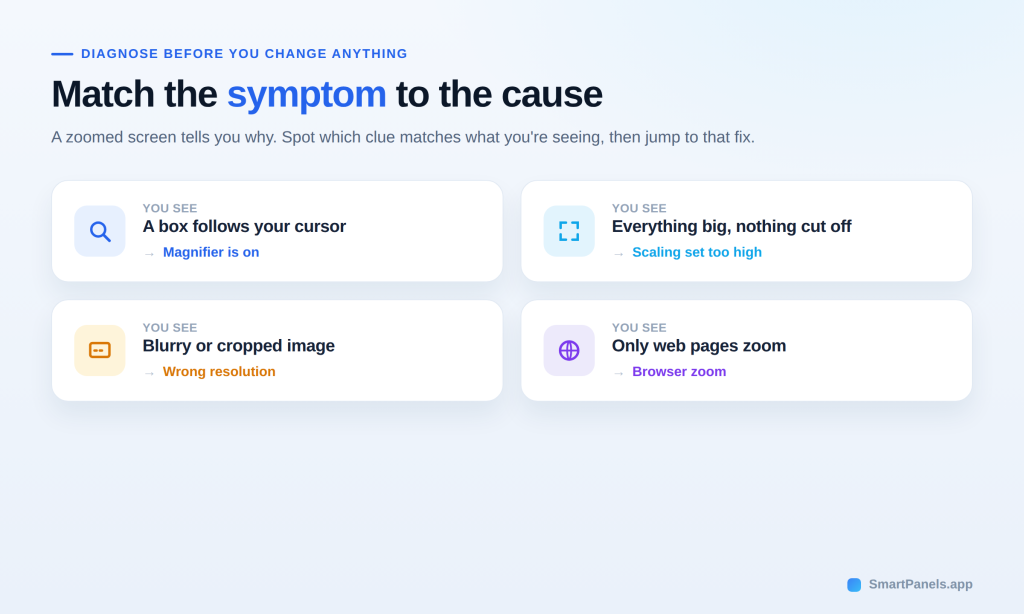
              Take the time to examine your symptoms in detail before making any alterations. In Windows 11, a zoomed screen will give you some indication of why. You can tell the Magnifier is at work if a box tracks with your cursor. Should the text and icons appear oversized, yet nothing is cut off, then the scaling is set too high.  

              A resolution problem will leave the image looking either blurry or cropped. And when it is just the web pages that are zooming in, look to the browser for the answer. It is worth a moment to make the right diagnosis and put an end to the issue without wasting time. 

              How to fix zoomed in screen windows 11? 

              Quick Fix First: Turn Off the Windows 11 Magnifier 

              It is easy to dismiss the Magnifier, but it is the cause of most abrupt zooming. The tool is designed for accessibility to make a portion or the entirety of the screen larger, and all too often it is turned on without meaning to. For example, trying to use Windows + = while in a chat program will turn it on, as will a child or pet touching the keyboard. 

              The quickest remedy is as follows. 

              Steps to turn off magnifier windows 11 

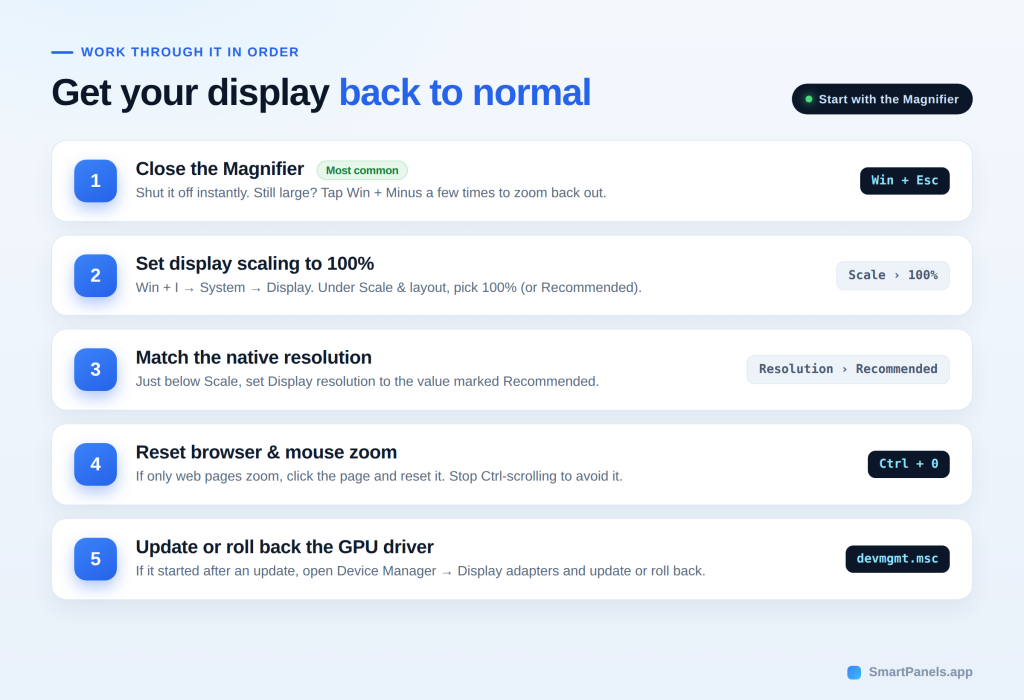
              • Press Windows key + Esc together to close the Magnifier instantly. 
              • If the view still looks large, press Windows key + Minus a few times to reduce the zoom. 
              • When the shortcut fails, open Task Manager with Ctrl + Shift + Esc. 
              • Select the Microsoft Screen Magnifier process, then click End task. 
              • Finally, restart the app or your PC to confirm the fix. 

              If this solves your screen zoomed in Windows 11 issue, you can stop here. Otherwise, continue to the display settings below. 

              Fix Display Scaling for a Screen Zoomed in Windows 11 

              Are you also looking to know about how to reset display settings windows 11? Display scaling is to blame when the screen is full of content, yet everything appears larger than it should. Windows has a feature for making text and icons more legible but set too high and the display will have a zoomed in feel. 

              To put things right, reset display settings by doing the following: 

              • Open your display settings with a quick press of the Windows key + I.  
              • From there, go to System on the left side and select Display.  
              • You will find a Scale dropdown under the Scale and layout heading; open it and pick 100% or whatever is flagged as Recommended.  
              • Should Windows require it, sign out and return. Once you have done so, look at the screen. If it has returned to normal, then the matter is resolved. 

              Set the Correct Screen Resolution 

              Occasionally the picture looks cropped, stretched, or blurry. In that case, the wrong screen resolution is usually to blame. The right value matches your monitor’s native resolution. 

              Here is how to correct it. 

              • Open Display settings again using Windows key + I. 
              • Scroll to Display resolution, which is just below the Scale option. 
              • Pick the value labeled Recommended for your monitor. 
              • Please confirm the change when Windows prompts you. 

              A matching resolution keeps text sharp and edges clean. So, choose the native value whenever possible. 

              Reset Browser and Mouse Zoom 

              In Windows 11, you may notice that the screen zoom is limited to web pages and does not extend to the rest of the desktop. It is a sign of browser zoom at work, not something in the system settings. There is an easy way to put it right with a simple shortcut. 

              All one must do is click within the browser window and hit Ctrl + 0 to bring the page back to 100%. 

              Then there is the matter of mouse zooming on the desktop. Scrolling while holding down Ctrl will alter icon size or page zoom, so the best course of action is to let go of the key and scroll as usual. A minor habit like that will spare you from any unintended zooming. 

              Update or Roll Back Your Graphics Driver 

              A faulty graphics driver often distorts scaling after an update. You have two clear options here. You can update the driver, or you can roll it back to an earlier version. 

              Update the Driver 

              • Press Windows key + R, type devmgmt.msc, then press Enter. 
              • Expand Display adapters by clicking the small arrow. 
              • Right-click your adapter, then choose Update driver. 
              • Select Search automatically for drivers. 
              • Restart your PC once Windows finishes the update. 

              Roll Back the Driver 

              • Open Device Manager again, as shown above. 
              • Right-click your display adapter, then open Properties. 
              • Go to the Driver tab and click Roll Back Driver. 
              • Follow the prompts, then reboot to test the result. 

              Fix One Zoomed Monitor in a Multi-Monitor Setup 

              A tricky case appears with two or more screens. Here, a screen zoomed in Windows 11 hits one monitor while the others look fine. This issue usually reflects a per-display scaling mismatch. 

              Try these quick moves first. 

              • Drag any window from a good monitor onto the affected one. 
              • Watch whether the zoom corrects itself during the drag. 
              • Unplug the zoomed monitor, wait a few seconds, then reconnect it. 
              • Set that monitor’s scaling to Recommended in Display settings. 

              These steps often reset the display without deeper changes. Still, save your layout before you unplug anything. 

              How SmartPanels Keeps Your Workspace Intact 

              Fixing a screen zoomed in Windows 11 is only half the battle. A change in resolution or scale has a way of scattering the windows you have open. Before long, your applications are in the wrong place on every monitor, and putting things back by hand is a drain on time. 

              SmartPanels puts an end to that. With one click it will put everything back where it was, having saved your browser tabs, app layout, and precise window positions. For those with multi-monitor rigs, the utility is even greater since it can handle as many as six displays.  

              There is no need to fiddle with zoom or resolution; SmartPanels is not about that. It restores the lost arrangement, so you do not have to set it up again. If you want to be done with it after a display fix, just set up a custom hotkey, and the entire workspace is rebuilt in a keystroke. 

              Conclusion 

              Many users first ask, “Why is my screen zoomed in Windows 11?” then panic at the sight of it. Still, the fix is usually simple. The magnifier is the usual culprit for any abrupt zooming, so make that your first point of call. Then check your display scaling to make sure it is set to 100%. You should also ensure the screen resolution is in line with what is native to your monitor. 

              Should an update bring the issue back, have a look at the graphics driver; either an update or a rollback will put an end to most recalcitrant cases. Those running multiple monitors can often fix a wayward screen with a simple reconnect or by dragging it around. 

              When things are looking as they should, take a moment to save your layout. This is a good way to safeguard your configuration, so you do not have to start from scratch later and can be back up and running in seconds instead of minutes. Go through these in sequence, and the Windows 11 screen zoom will be no more. One of them should work. 

              Want to restore your Windows’s profile settings? 

              [Get a Free 14-Day Trial] 

              Frequently Asked Questions 

              How do I get my screen back to normal size on Windows 11? 

              First, press the Windows key + Esc to close the magnifier. Next, open your display settings with Windows key + I. Then set the scale to 100% and pick the recommended resolution. Your screen should return to normal immediately. 

              How do I zoom out on Windows 11 fast? 

              For a quick answer to how to zoom out on Windows 11, use keyboard shortcuts. Press the Windows key + Esc to stop the magnifier. Inside a browser, press Ctrl + 0 to reset the page to 100%. 

              Why did my screen zoom in after a Windows update? 

              Updates sometimes replace or reset your graphics driver. This is a common reason for a screen being zoomed in on Windows 11. As a result, your scaling or resolution can shift. Roll back or update the driver, then reset the scale to fix it. 

              Why is only one of my monitors zoomed in? 

              The issue usually reflects a scaling mismatch on that one display. Drag a window onto it or unplug and reconnect the monitor. Then set its scaling to Recommended. 

              Will fixing the zoom move my open windows around? 

              Often, yes. Scaling and resolution changes can shuffle your windows. Save your layout with a tool like SmartPanels, so you restore everything in one click. 

              How to Change Primary Monitor in Windows 11 – Useful Tips

              How to Change Primary Monitor in Windows 11

              Setting up your computer screens can be easy for some people, but hard for others who don’t know much about technology. It might feel confusing to use the new Windows Settings app from Microsoft.

              The Settings app serves as a modernized alternative to the Control Panel. It has many features in the same places as the previous operating system. Setting up multiple monitors is easy and quick once you know where to go. This includes deciding which monitor to designate as your primary display. Would you like to change the monitor that is currently in use? In this article, we’ll tell you how to change primary monitor in windows 11. So, let’s get started!

              Set Up Your Dual Monitors

              When multitasking or tackling complex tasks on your computer, having multiple monitors can boost productivity. While setting up dual monitors is a simple task, there are a few things you should consider before you begin.

              First, you need to check if your computer can support dual monitors. Here are the steps:

              • Open the Settings menu on your Windows computer.
              • Navigate to the “System” section.
              • Click on “Display” from the options listed on the left sidebar.
              • Move the cursor down and find the “Multiple Displays” option. If this option is present, your computer is equipped with dual monitors.
              • Once you’ve confirmed your computer’s dual-monitor capabilities, the next step is to assess the hardware prerequisites.

              Older computers might need a VGA cable and an HDMI to VGA converter to facilitate the connection. Conversely, modern computers typically require just an HDMI cable. In either case, you’ll also need to acquire an external monitor to function as your secondary display.

              Make sure to use the correct cable to connect your computer and monitor. Check your computer’s video output ports and securely attach the cable to your monitor and computer. Finally, choose a display configuration that meets your requirements.

              Selecting Your Display Arrangement

              After successfully connecting your additional monitor, the next step is to determine how you’d like to manage and showcase your content. Follow these steps to access the projection menu using the Windows + P keyboard command. You’ll find four distinct options to choose from:

              PC Screen Only 

              This serves as the default setting. It directs all content exclusively to the primary monitor, leaving the secondary monitor dormant and unutilized.

              Duplicate

              Opting for this mode results in both the primary and secondary monitors displaying identical content. This configuration is especially practical when the secondary monitor is larger and aims to replicate the primary monitor’s output.

              Extend

              Use the second monitor to expand your workspace. Widely adopted due to its versatility, the primary and secondary monitors can exhibit different content, making it an excellent choice for multitasking.

              Second Screen Only

              Here, the secondary monitor takes center stage, exhibiting all content while the primary monitor remains inactive.

              Determining Your Primary Monitor

              It’s important to establish which monitor holds the status of being the primary display. The initial display device linked to your computer assumes this role by default. The built-in screen is inherently the primary monitor for laptops, while any external monitors are considered secondary.

              To pinpoint the primary monitor, adhere to these steps:

              • Launch the Settings menu on your Windows computer.
              • Access the “System” section.
              • Choose the “Display” option.
              • In the case of Windows 11, click on “Identify” to assign a numerical label to each screen.
              • The monitor designated with the number 1 at the center is unequivocally the primary monitor. As you progress numerically, the second monitor assumes the number 2, while a third monitor claims the number 3.

              Changing Your Primary Monitor

              While the default assignment of the primary monitor is typically automated, you have the flexibility to alter this configuration manually. The process for changing your primary monitor varies depending on the type of computer in use. Let’s look at the Windows 11 change display shortcut:

              1. Go to Settings

              To start, go to your settings menu. You can do this by clicking on the Start menu, which is the Windows icon in the bottom-left corner of your screen. Then, click on the gear icon to open Settings.

              Or you can also locate the search icon adjacent to it. You can directly input “Change primary display ” by clicking on this icon. This Windows shortcut change primary monitor will direct you to the relevant settings page, bypassing the need to navigate various menus.

              1. Access the “Multiple Monitors” Option

              Next in line, click on the “Multiple Monitors” setting. Remember that this option might appear greyed out if your computer cannot detect the monitor you intend to designate as the new primary display.

              Should you encounter difficulties with your PC’s ability to identify the intended monitor, a troubleshooting process will be necessary to rectify the issue.

              Troubleshooting 

              Encountering issues with your multi-monitor setup? Here’s a concise troubleshooting guide:

              • Check Connections: Ensure monitors are connected to the graphics card, not the motherboard.
              • Cable Adjustment: Switch cables to the GPU if needed. Consider USB-C or Display Port cables.
              • Quick Settings: Press Windows Key + P to adjust monitor settings. Ensure it’s not set to display one screen only.
              • Try Another Cable: Sometimes, a different cable can solve the problem.
              • Update Drivers: Update graphics card and onboard card drivers. Use software like GeForce Experience for NVIDIA or AMD’s software.
              1. Adjusting Primary Monitor and Display Arrangement

              Inside the menu, you’ll see a visual representation of your connected monitors, complete with approximate display size and their spatial arrangement. This representation corresponds to how you’ll navigate your cursor between the monitors. You can rearrange these icons if your monitor positions change, but the main purpose here is to:

              Select the icon representing the monitor you wish to designate as the primary display. From this point onward, most applications and content will typically open on this screen by default.

              Monitor Disconnection Experience in Windows 11

              Windows 11 has a useful feature that keeps the positions of program windows even if you disconnect your monitor. This is useful for laptop users who switch between various setups, such as docking stations and wired connections. With this feature, returning to your previous setup becomes seamless. You no longer have to endure the frustration of reorganizing your desktop layout due to Windows seemingly shuffling your windows like a game of 52-card pick-up.

              Conclusion 

              Configuring multiple displays and setting a primary monitor can be daunting at first, but it’s actually pretty easy. However, don’t worry, as the elucidation provided within this article serves as your guiding light. Elevate your multitasking prowess both in the home and office settings with the ingenious assistance of SmartPanels. Seamlessly accommodating up to 6 displays, SmartPanels revolutionizes multi-monitor support, enhancing your productivity across many screens.

              SmartPanels

              Restore Browser Tabs with SmartPanels. It maintains an active tab history and restores browser size as well as display position on one screen or many.

              FAQs

              How do I change the main monitor in Windows 11?

              To designate a monitor as your primary display, click on its corresponding number in the section above the “Multiple Displays” option. Customize your display by changing the wallpaper or screensaver, adding widgets, and selecting your monitor as the main display for the best viewing experience. For added convenience, Windows 11 allows you to retain your open windows’ positions by clicking on the “Remember window locations based on monitor connection” button. 

              How to shift a window from one monitor to the other?

              Should a window materialize on the incorrect monitor within your multi-display setup, rectifying the situation is a breeze. By employing the Windows Key + Shift + Left/Right Arrow Key shortcut keys, you can smoothly navigate the window to the desired monitor. Use the left arrow key to shift it to the previous display or the right arrow key to relocate it to the subsequent one.

              How do I change my primary monitor fast?

              Customizing your primary display is a simple process. To customize your display, simply right-click on your desktop and choose “Display settings.” Once there, click on the box corresponding to the numbered display you intend to set as your main. Scroll to the bottom of the page and tick the checkbox labeled “Make this my main display.” Click the top-right X to finalize changes.

              How to Make Windows 11 Taskbar Transparent – Useful Guide

              How to Make Windows 11 Taskbar Transparent

              Windows 11 shows significant advancements in both design and performance compared to its predecessors. This operating system introduces unprecedented customization. While transparency has been a feature since the Windows 7 era, its implementation has been notably refined in the latest version.

              Despite the numerous iterations of the operating system, the level of transparency achievable is limited to a translucent Taskbar rather than full transparency. This has left Windows users seeking methods to achieve a completely transparent Taskbar. Is Microsoft receptive to this desire from its user base?

              Fortunately, there are ways to solve the problem. If the semi-transparent Taskbar doesn’t align with your preferences, rest assured that multiple techniques exist to attain transparency on your computer. In this guide, we’ll discuss how to make Windows 11 taskbar transparent. So, let’s get started!

              Why You Need Taskbar Transparency in Windows 11

              The rationale for imparting transparency to your taskbar is largely a matter of personal preference, albeit one that resonates with many individuals. A widely acknowledged point is that a transparent taskbar exudes a heightened aesthetic appeal. The conventional solid expanse that once occupied the lower echelon of your desktop harkens back to ancient Windows iterations, an era distant from the contemporary interface.

              A solid, opaque taskbar might seem inappropriate in modern operating systems. This divergence becomes particularly pronounced when juxtaposed with the sleekness of a Mac’s Dock. Through the integration of taskbar transparency, the scope of your desktop wallpaper is fully revealed, culminating in an enhanced visual experience. Windows 11 has a modern look with some transparent elements.

              How to Make Taskbar Transparent in Windows 11

              As you get used to the see-through taskbar on Windows 10, you may find it hard to resist its charm when upgrading to Windows 11. Let’s see how to make taskbar transparent.

              Adjust Windows Settings

              Personalizing the Windows 11 taskbar and infusing it with a captivating transparency effect can be effortlessly achieved by modifying your system settings. Here’s a step-by-step guide on how to achieve this:

              • Press the Windows key + I to launch the Windows Settings menu.
              • Navigate to the “Personalization” section, followed by “Colors.”
              • Engage the toggle adjacent to “Transparency effects.” 

              Should your taskbar remain steadfastly opaque, a further tweak is in order. Head to the “Accessibility” category within the Settings interface, then proceed to “Visual effects.” It’s here that you can activate the elusive “Transparency effects.”

              If you’re not satisfied with the level of transparency, don’t worry. There are other ways you can try to achieve the outcome you want.

              Use a Registry Tweak 

              An alternative approach to bestow transparency upon the Windows 11 taskbar involves delving into the intricacies of the Windows Registry. However, exercise prudence: prior to embarking on this endeavor, it is imperative to manually create a restore point. This precautionary measure shall facilitate a return to a prior system configuration should the need arise. Here’s your roadmap for Registry manipulation:

              • Access the Registry Editor with administrative authority to initiate the forthcoming modification.
              • Traverse the intricate corridors of the Registry Editor, following this pathway: HKEY_LOCAL_MACHINE > SOFTWARE > Microsoft > Windows > CurrentVersion > Explorer > Advanced.
              • In the expanse of the right pane, perform a right-click within an unoccupied area. From the ensuing options, opt for “New” followed by “DWORD (32-bit) value.”
              • Confer a name upon this fresh entry: “UseOLEDTaskbarTransparency.” Upon doing so, assign a Value data of 1 to this newly christened entry.
              • End your journey through the Registry Editor, ensuring all changes are saved. The final step: reboot your computer, allowing the modifications to permeate your system.

              Registry changes can have a big impact on your system. Prudence and vigilance are paramount, and a preliminary grasp of the Registry’s mechanics is advised.

              Use Taskbar Transparency with TranslucentTB

              Embarking on the quest for total taskbar transparency invokes a realm of possibilities through third-party applications. A myriad of complimentary and premium options are at your disposal, each holding the promise of a seamlessly enhanced visual experience.

              For this example, let’s look into TranslucentTB, a gratis offering poised to revolutionize your taskbar aesthetics. So, here’s how to make taskbar transparent with TranslucentTB

              • Search for “TranslucentTB” to find this transformative app.
              • Amongst the outcomes, grasp the TranslucentTB gem and select it to set the wheels in motion.
              • Click on the installation voyage with a click on “Get.” Upon completion, beckon the app into existence by selecting “Open.”
              • As if by enchantment, your taskbar undergoes a complete metamorphosis, donning the cloak of transparency that befits its newfound status.
              • Customize your taskbar with the “Desktop” option to make it transparent and elegant.
              • To suspend TranslucentTB, click its taskbar icon, go to the Desktop tab, and reset to Normal. To exit, click Exit.

              In visual augmentation, TranslucentTB becomes your passport to a captivatingly transparent taskbar, an enigma that fuels your quest for aesthetic excellence.

              Conclusion 

              Hopefully, at least one of the solutions above has improved the look of your desktop. Now that the taskbar is transparent, you can customize it further by choosing a custom theme matching your style. To increase your productivity, SmartPanels is your best bet! This app boosts productivity by streamlining window management. Elevate your efficiency and take command of your Windows 10 and 11 experience with SmartPanels! This app boosts productivity by streamlining window management.

              SmartPanels

              Restore Browser Tabs with SmartPanels. It maintains an active tab history and restores browser size as well as display position on one screen or many.

              FAQs

              How do I force transparency in Windows 11?

              Curious about enhancing your Windows 11 experience with transparency? Here’s how you effortlessly wield control:

              • Open Settings with Win + I to customize your PC.
              • Go to Personalization > Colors.
              • Toggle “Transparency effects” to enable or disable translucency in Windows 11.

              Can you make the taskbar thinner in Windows 11?

              Mold your taskbar’s size effortlessly through the Windows Registry:

              • Begin by accessing the Registry Editor with administrative privileges.
              • Head to HKEY_CURRENT_USER > Software > Microsoft > Windows > CurrentVersion > Explorer > Advanced.
              • Modify the “TaskbarSi” key value. Set it to 0 for a smaller taskbar or 1 to revert to the default size.

              Why translucent TB is not working in Windows 11?

              When TranslucentTB clashes with Windows 11’s defaults, consider a straightforward remedy:

              • Navigate to your taskbar settings.
              • Execute taskbar settings reset, reverting to the default values.
              • After resetting, monitor TranslucentTB. Does it now operate smoothly? Evaluate if harmony is restored.

              How to Connect PS4 Controller to Windows 11 – Explained

              Connect PS4 Controller

              Gaming consoles provide an immersive gaming experience. While you can also play games on a Windows PC or laptop, the quality and feel of console games are exceptional. PlayStation 5 is in high demand and hard to find. Despite this, many individuals stick with their trusty PS4 instead of upgrading.

              Microsoft’s latest operating system, Windows 11, has been released, and people are interested in how to connect a PS4 controller to it. In this article, we’ll discuss how to connect ps4 controller to pc windows 11. So, let’s get started! 

              DualShock 4 Compatibility with Windows 11

              Many people wonder if the DualShock 4 controller can be used with Windows 11. The answer is yes – Windows 11 is compatible with the DualShock 4.

              However, the actual compatibility between these two devices can be more complicated. You might feel frustrated if the DS4 doesn’t work with specific games. Windows prefers the Xbox console for better compatibility with Windows 10 and 11, although it still maintains its own console.

              If your Bluetooth connection isn’t working well, it could be because your Bluetooth driver is outdated. This is a factor to bear in mind when resolving the problem. Keep your Bluetooth driver updated for better controller performance and connectivity. Keeping your Bluetooth driver current is one of the best steps to enhance compatibility.

              How Can You Connect PS4 Controller to Windows 11 

              Connecting Your PS4 DualShock 4 Controller to Steam

              Steam, a widely-used gaming platform, supports connecting the DualShock 4 controller. To set up a PS4 controller with Steam:

              • Download and launch the latest Steam client on your PC. Log in to your Steam account.
              • Connect your controller to the PC. You have two options to connect via a wired USB connection or wirelessly through Bluetooth for gameplay.
              • To pair your PS4 controller with your computer via Bluetooth, simply hold down the PS and Share buttons until the light bar starts flashing.
              • Open the Windows 11 Settings (press Windows key + I) and go to the “Bluetooth & devices” section. Click on the “Add device” option.
              • Select the found PS4 controller under Bluetooth and connect it. It may be identified as a PS4 Wireless Controller.
              • Return to the Steam interface and click the Steam button at the top-left corner. Navigate to “Settings.”
              • Navigate to “Controller” in Steam Settings and select “General Control Settings” on the right-hand side.
              • Check the box for “PlayStation configuration support.
              • Now, you have the option to personalize your controller settings for Steam.

              However, if this method doesn’t work for you and your PS4 controller isn’t detected by the game you’re attempting to play on Steam, you might find the next method helpful.

              Connecting a PS4 Controller using DS4Windows 

              Using DS4Window involves a few additional steps, but it enables you to use your PS4 controller on your PC by tricking the system into recognizing it as an Xbox 360 controller. Rest assured; this method works seamlessly with PS4 controllers as well.

              To connect a PS4 controller to a PC using DS4Windows:

              1. Go to the DS4Window website and get the newest software version.
              2. Unzip the files and open DS4Windows.
              3. To start installing, just follow the instructions on the screen in the new window.
              4. Connect your PS4 controller after installation. Plug it into a USB port or use Bluetooth for wireless connectivity.
                • Your PC will automatically detect the controller for a USB connection, and you’re set to play games.
                • To connect via Bluetooth, hold down the PS and Share buttons until the controller light begins blinking.
              5. Connect your controller and open DS4Window. Once it’s connected, select “C” to the controller and then click “Finish” to start using it. This process works for PS4 controllers.

              When Your PS4 Controller Appears as an Xbox Controller on Steam

              Using a PS4 controller on Windows offers benefits but can come with certain challenges. In certain games, you might notice that your PS4 controller’s layout resembles an Xbox controller’s. PS4 controller emulation in Steam causes the issue.

              No need to worry, though. Simply become familiar with the Xbox button layout:

              • Cross = A
              • Circle = B
              • Triangle = Y
              • Square = X
              • R1 = RT
              • R2 = RB
              • L1 = LT
              • L2 = LB

              To resolve this, we recommend connecting your PS4 controller to your Windows PC to ensure the correct PlayStation button setup is configured. This way, you can enjoy your games with the appropriate button layout.

              Conclusion 

              Enhancing your gaming experience on your PC is easy with Windows 11. Whether you opt for Steam integration, DS4Window software, or other methods, seamlessly using your PS4 controller brings a new level of convenience and enjoyment to your gaming sessions. Once you follow the steps and set it up correctly, you can use your PS4 controller to play your favorite games.

              SmartPanels improves gaming on Windows 11 with user-focused features such as compatibility, customization, and community-driven options. Due to its user-friendly design, gamers can anticipate an engrossing and immersive gaming experience.

              SmartPanels

              Restore Browser Tabs with SmartPanels. It maintains an active tab history and restores browser size as well as display position on one screen or many.

              FAQs

              Why Is My Bluetooth Not Detecting My PS4 Controller Windows 11?

              If your PS4 controller isn’t recognized or keeps disconnecting from Windows 11 Bluetooth, follow these steps:

              • Reboot your Windows 11 PC.
              • Before using your DS4 controller, ensure that it has a full charge.
              • To access Bluetooth settings on Windows 11, simply press the Windows key and “I” to open Settings. From there, select “Bluetooth & devices.”
              • Locate your PS4 controller in the list of connected devices and disconnect it by removing or unpairing it.
              • Ensure your controller is charged.

              How do I add a wireless controller to Windows 11?

              • Type “Bluetooth” into the Windows search bar.
              • Ensure Bluetooth discovery is enabled.
              • Power on your PS4 controller.
              • Keep pressing the Sync button until the Guide light flashes.
              • Go to the Bluetooth menu on your PC and select “Add device.”
              • Your computer will search for your controller.

              Why can’t my PC find my PS4 controller?

              To troubleshoot the issue of a connected PS4 controller not being detected on a Windows PC through Bluetooth, you can try the following steps:

              • Disable Bluetooth on your computer. You can do this in the Windows Action Center or Windows Settings.
              • Hold on for just a moment.
              • To use Bluetooth, turn it back on your computer.
              • Attempt to pair your PS4 controller to your device once more.

              Why is my PC not picking up my controller?

              Your PC might not detect your controller due to:

              Port Compatibility

              Ensure your controller works with your USB port (USB 2.0 or 3.0).

              Controller Compatibility 

              Check controller compatibility with PC and game.

              XInput API 

              Some games need the XInput API. If your controller doesn’t support it, it might not work correctly in those games.

              Why Does Windows 11 Keep Disconnecting from Wifi – Solved

              Why Does Windows 11 Keep Disconnecting From Wifi

              Is your Windows 11 upgrade causing your laptop’s WiFi to keep dropping and reconnecting? This situation can be incredibly exasperating, leading to an unstable internet connection and hindering your ability to browse websites seamlessly. Many users who switched to Windows 11 are experiencing an issue with their laptop’s WiFi disconnecting, disrupting their internet access. 

              Interestingly, this issue persists even when the network is well within range, leaving users perplexed as to why their WiFi connection disconnects and fails to reestablish itself promptly. You’re not alone if your laptop’s WiFi keeps disconnecting and reconnecting. In this blog, we’ll discuss why Windows WiFi keeps disconnecting and how to solve it. So, let’s get started! 

              Why Windows 11 Keep Disconnecting from WiFi

              Are you frustrated by your Windows 11 WiFi connection constantly dropping? Here are some possible explanations for why this issue could be occurring:

              File System Corruption

              The specter of file system corruption might shadow your Windows 11 experience. Users who have embraced this new iteration may encounter WiFi disconnections. A clean install can fix the problem, as explained in this article.

              DNS Dilemma

              DNS issues can cause WiFi problems in Windows 11. Check your DNS settings and try a different DNS server if you’re having problems connecting to WiFi. An imperative emerges the upholding of DNS consistency. Failure to heed this call might necessitate configuring your present DNS settings.

              The Network Card Conundrum

              The network card is the unsung hero of your computer. It connects you to the internet and makes your WiFi work. Alas, the curtain might rise on connection issues stemming from an ailing network card, causing the disconnect you’re contending with.

              TCIP and DHCP Duress 

              When multiple devices are connected to WiFi, there can be problems with the TCP/IP and DHCP settings. This can cause WiFi problems on your Windows 11 computer.

              Solutions to Fix Windows 11 Frequent Wifi Disconnection 

              If your Windows 11 PC keeps disconnecting from Wi-Fi, there are some basic things you can try before moving on to more complex solutions. To fix the problem, identify the cause. Here are the first steps to take:

              1. Activating and Deactivating Airplane Mode

              If you’re experiencing issues with your WiFi on Windows 11, one solution you could try is turning on and off Airplane mode. This can give your connection a quick and effective restart. 

              • To quickly access the Action Center in Windows, simply press the Windows key and A at the same time. 
              • Toggle Flight mode to turn off your wireless connections.
              • Turn off Airplane mode.

              WiFi issues may be resolved, allowing your digital devices to connect again. Check your WiFi connection to see if your virtual world is back to normal.

              1. Forgetting and Reconnecting to Your WiFi Network

              If you’re experiencing connectivity issues with Windows 11, try forgetting and then reconnecting to your WiFi network. Here’s how:

              • Access the Action Center by invoking Windows + A.
              • Look at your WiFi icon and click on it.
              • Forget WiFi connection.
              • To start free, forget your WiFi network and reconnect to it.
              1. Enabling Automatic WiFi Connection

              If your Windows 11 device is having trouble connecting to your nearby WiFi, you can easily solve the issue by granting permission to auto-connect. Follow these steps to do so and enjoy seamless connectivity.

              • Open the Action Center (Windows + A) and click on the WiFi icon.
              • Click “WiFi Properties” for a digital tour of your connection.
              • Turn on “Connect automatically when in range” for a seamless Windows 11 connection.
              1. Designating Your WiFi Network as Private

              To protect your WiFi network, make it private in Windows 11. Follow these steps:

              • Press Windows+A to open the Action Center, then click on the WiFi icon.
              • Go to WiFi Properties and find the digital tapestry for fortification.
              • When you declare your WiFi private, you are protecting your digital space.
              1. Activating the WLAN AutoConfig Service in Windows 11

              To keep your WiFi running smoothly on Windows 11, it’s important to make sure the WLAN AutoConfig service is active. Follow these steps:

              • Press Win + R to open Run, type services.msc, and press OK.
              • Double-click WLAN AutoConfig to enable.

              To change the startup type of service to Automatic, follow these steps:

              • Right-click the service in Services and select Properties.
              • Select Automatic in Startup type.
              • Click Start.
              • Click OK.
              1. Updating Your WiFi Driver

              To keep your WiFi connection strong in Windows 11, update your WiFi driver regularly. Here’s how:

              • Press Windows Key + X to open Device Manager.
              • Explore network adapters in this digital domain. A tap reveals your WiFi drivers.
              • Improve your Windows 11 WiFi connection with driver update.
              • Keep searching for the latest drivers online to improve your WiFi.

              Updating your WiFi driver breathes new life into your Windows 11 WiFi connection.

              1. Modifying Power Management Settings 

              Windows 11 may disconnect your WiFi to save power. You can disable this in the following steps:

              • Press Windows+X to open Device Manager, a powerful tool for managing your devices.
              • Right-click WiFi drivers to access their properties.
              • In the Power Management tab, uncheck Allow the computer to turn off this device to save power” to keep your WiFi on.
              1. Adjusting Power Plan Settings 

              Windows 11 power plan settings affect your computer’s performance. Follow these steps to optimize performance:

              • To customize your power plan, search for “Power plan” in Windows 11 and click “Edit power plan.
              • Optimize power plan in Advanced power settings.
              • To maximize wireless adapter performance, choose “Maximum Performance” in the Wireless Adapter Settings and press “OK.”
              1. Resetting Network Settings in Windows 11

              When your Windows 11 network is having problems, reset it for a clean slate. Here’s how:

              • Press Windows + I to open Windows Settings.
              • Explore Network & Internet for advanced settings.
              • Network reset is a digital rebirth. Take the plunge and start fresh.
              1. Running the Network Troubleshooter in Windows 11

              A troubleshooter can help you fix your internet connection. Here are some steps to follow:

              • To access Troubleshoot settings, simply press the Windows key and type “Troubleshoot settings.” 
              • To find solutions, select “Other troubleshooters” in this digital haven. 
              • Use the “Internet Connections” troubleshooter to fix your Windows 11 internet connection.

              Conclusion 

              When you experience frustrating WiFi signal drops and disconnections on your Windows 11 system, there are several solutions you can try. First, toggle Airplane mode and reconnect to networks. You can also enable automatic connections and activate WLAN AutoConfig. Updating your WiFi drivers, adjusting power settings, resetting network configurations, and employing the troubleshooter can also help. Download SmartPanels: Your key to a smoother, more efficient Windows 11 experience. Elevate performance and streamline interactions with this essential app.

              SmartPanels

              Restore Browser Tabs with SmartPanels. It maintains an active tab history and restores browser size as well as display position on one screen or many.

              FAQs

              How do I fix the Wi-Fi bug on Windows 11?

              • Select Start > Settings > System > Troubleshoot > Other troubleshooters.
              • Under Most frequent, choose Network & Internet > Run, or click the button below to launch the Network & Internet Get Help feature.
              • Open Get Help for Network & Internet.

              Why does my computer keep disconnecting from the Wi-Fi for no reason?

              If your device keeps disconnecting from the internet for no apparent reason, it might be because of outdated software or glitches in the internal programming. The drivers that control your device’s WiFi connectivity can become obsolete or corrupted over time. Be on the lookout for these potential problems.

              Why does my laptop keep disconnecting from Wi-Fi when it goes to sleep?

              Windows may disable some devices to save battery life. Disable the power-saving mode to keep your wireless network adapter working. A faulty firmware or driver may also prevent your wireless network adapter from waking up from sleep mode. Make sure your drivers are up to date.