
Screenshots have become part of nearly every one of us. You might capture an error message, save a receipt, or share a quick note with a coworker. Windows includes a built-in snipping tool, a Windows 11 utility for exactly such tasks. Still, hunting for it through the search box wastes time. A pinned icon fixes that.
This guide explains how to add the snipping tool to the taskbar in Windows 11 in a few short steps. There is hardly a workday that goes by without the need for a screenshot, whether to put an error message on record, keep a copy of a receipt, or pass a note to someone in the office.
What Is the Snipping Tool in Windows 11?
Microsoft has made the Snipping Tool its primary built-in utility for screenshots in Windows 11. With it you can take a free-form shot or capture an entire window or screen. This is not always how it was; in the past Microsoft put out two distinct apps. There was the old Snipping Tool for basic tasks and then Snip & Sketch for those who wanted to annotate or share quickly.
Subsequent updates have done away with that division by rolling them into one modern application. Today’s version does it all: capturing, recording, setting delay timers, and markup are all in one place, so there is little call for a third-party editor for anything simple. It comes pre-installed too, meaning a trip to the Microsoft Store is seldom necessary.
Under the hood, though, the app is a packaged Store product in MSIX format, with the internal name Microsoft ScreenSketch. That is of some consequence. If you run the legacy SnippingTool.exe on an updated system, it won’t behave as expected; it is now just a launcher for the packaged app. And while the two have been merged, a major update can occasionally dislodge the icon from your taskbar.
What You Can Capture with the Snipping Tool
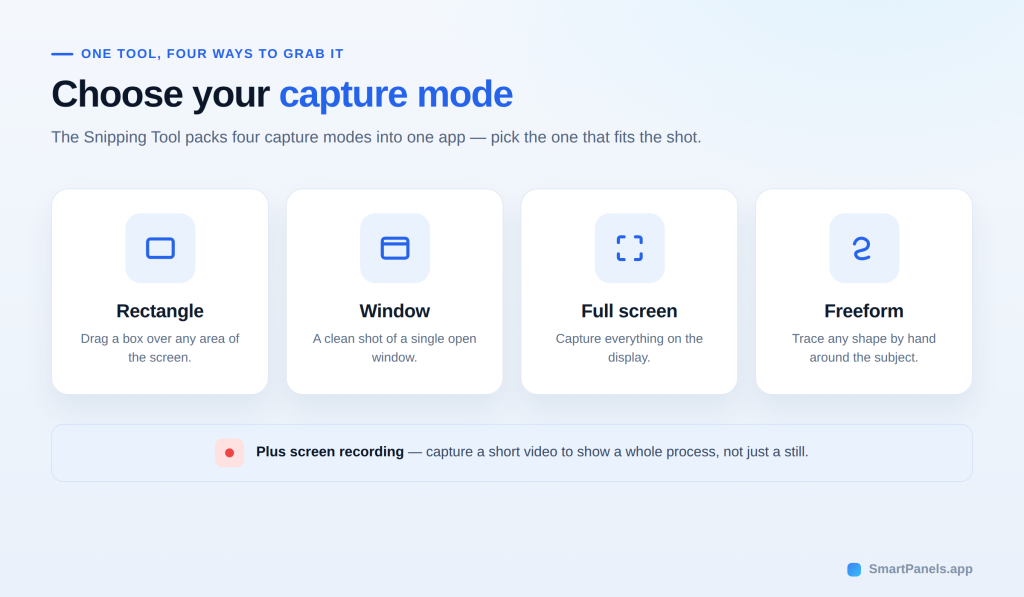
With four capture modes to pick from, the app is designed to handle whatever task is at hand. Simply select the one that serves your purpose.
- You can use rectangular mode to draw a box over an area of interest.
- Window mode for a clean shot of an open window.
- The full-screen option will take in the entire display.
- Freeform allows you to trace a shape by hand.
The tool is not limited to stills; it can put together a short video of the screen as well, which is handy for demonstrating a process in its entirety rather than a static moment. Capturing an image is only half the job; you also need to make sure it saves correctly. If your screenshots are missing or refusing to save, this guide explains how to fix screenshots not saving in Windows 11.
Before You Start: A Quick Check
For the most part, what is set out below will be relevant to a standard Windows 11 setup, but there is no harm in doing a quick check first. It is worth your time to make sure of a few things:
- You are using one of the main editions of Windows 11, whether it is Home, Pro, Enterprise, or Education.
- The Snipping Tool is current and installed.
- There are no work or school policies in place to lock down the taskbar, and your account can put its own stamp on it.
To verify your version, open Settings and go to System, then About. And if the app needs an update, a trip to the Microsoft Store will take care of that.
Why Pin Snipping Tool to Taskbar in Windows 11?
When you pin the snipping tool to the taskbar, you cut a multi-step task down to one click. To begin with, there is no need to make use of the search box. The icon will remain where it is even after a sign-out or restart. And for any transient material, one can respond quickly.
Take error dialogs and pop-up menus, for instance; they have a way of vanishing in a hurry. With the icon pinned, there is time to put in a reaction before they are gone. It is a matter of real time saved for the teams that produce documentation, and over the course of dozens of captures, those little efficiencies mount up.
The taskbar puts tools at your fingertips, making it well suited to heavy screenshot work. A pin here and there takes the edge off what would otherwise be a daily irritation. For writers and support staff in particular, the value is clear. When it comes down to it, a click on the taskbar is preferable to starting a new search from scratch.
Once your frequently used apps are within easy reach, you can also customize the Windows 11 taskbar to make your desktop feel more organized and suited to your workflow.
How to Add Snipping Tool to Taskbar Windows 11: Step by Step
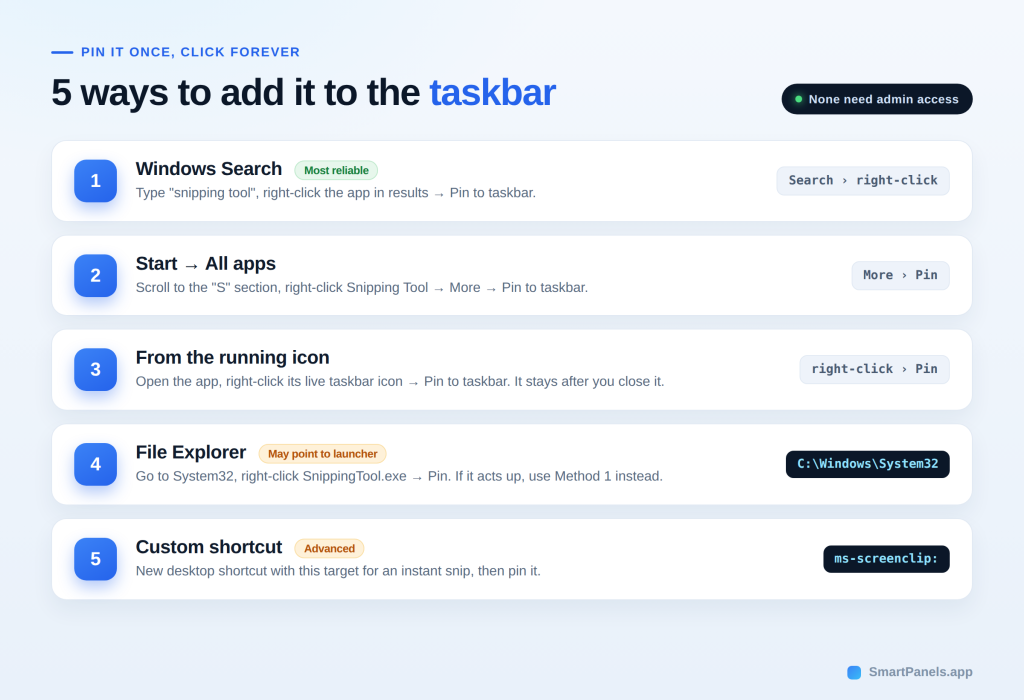
Below are five methods for how to add snipping tool to the Windows 11 taskbar. Each one works on standard Windows 11 editions. Pick whichever feels fastest for you. Notably, none of them require admin access.
Method 1: Pin Using Windows Search
To get started:
- Use the Windows key or click on the Search icon in the taskbar.
- Enter “snipping tool” and let the app come up in the Apps section.
- A right-click on it will bring up an option to “Pin to taskbar,” and the icon will appear immediately.
It is a reliable way to do things since Search has access to what is registered on the system; the approach is no different whether one is on a Home, Pro, or managed version of the OS, which is why most users make this their first port of call.
Method 2: Pin From the Start Menu
- To get to it, open the Start menu and go to “All apps.”
- From there, scroll until you are at the S section and right-click on the Snipping Tool.
- You will see an option for “More”; hover over that and choose “Pin to taskbar.”
It is a good way to do things if Search is being uncooperative. The All-apps list is comprehensive in that it includes every program you have put on the system so the tool is sure to be found. And one does not have to type anything out to make it work.
Method 3: Pin From the Running Icon
- Open the app using any method above.
- Watch for its icon on the taskbar while it runs.
- Right-click that live icon.
- Choose “Pin to taskbar” to keep it there.
This trick suits people who already opened the tool. Afterward, the icon stays there even after you close the app.
Method 4: Pin From File Explorer
You can also pin from the file that opens the app. First, open File Explorer. Next, browse to this location:
C:\Windows\System32
Then find SnippingTool.exe, right-click it, and choose “Pin to taskbar.” Here is the technical catch. On updated systems, this file only redirects to the packaged app. So, the pin may point at the launcher, not the app itself. If the icon behaves oddly, remove it and use Method 1 instead. When troubleshooting files and shortcuts in File Explorer, it can also help to show file extensions in Windows 11 so you can distinguish file types more easily.
Method 5: Create a Custom Shortcut (Advanced)
This method suits power users who want a one-click snip. In effect, the shortcut skips the app window and starts a capture right away.
- Right-click the desktop, then choose New, then Shortcut.
- In the location box, type ms-screenclip: as the target.
- Name the shortcut, then click Finish.
- Right-click the new shortcut, then pick “Show more options.”
- Select “Pin to taskbar” to place it there.
A custom icon is an option as well; simply go to the shortcut’s Properties and select Change Icon. There is one thing to bear in mind, however: with Microsoft having done away with the old ms-screenclip: launch method for app integration back in May 2025, one can expect some of these features to be altered in later versions. If long-term dependability is the goal, stick with Methods 1 to 3.
For a faster way to get things done without using shortcuts, there are a few commands at hand. Hit Win + R and put in snippingtool to bring up the application. Or enter ms-screenclip in that same field, and it will take you right to a fresh snip.
Snipping Tool Shortcut Windows 11: Faster Keyboard Options
A pinned icon is handy. Yet a keyboard combo can be even quicker. The main snipping tool shortcut Windows 11 users rely on is simple. Press Windows + Shift + S to instantly open the capture overlay. Keyboard shortcuts can make everyday Windows tasks much faster. You can also explore how to use Windows hotkeys more effectively when managing open applications.
From the little toolbar up top, select a mode. You can capture the entire screen, a window, or a rectangle, and the image will be copied to your clipboard. There is a banner that will allow for some quick editing and saving as well.
Should you wish to have the Print Screen key do the work, go into Settings and find the Keyboard section under Accessibility. Enable the option there, and a single tap will be all it takes to start a snip via screen capture. While you cannot rename the app with a custom shortcut, the built-in combinations are more than sufficient for most purposes.
What to Do When the Pin Option Is Missing
Occasionally the “Pin to taskbar” choice does not appear. Usually, a quick check solves it. Try these steps in order:
- Confirm you right-clicked the app, not a file or web suggestion.
- Restart Windows Explorer through Task Manager, then retry the pin.
- Check whether a work or school policy manages your device.
- Reinstall the app from the Microsoft Store if it seems missing.
If a policy blocks pinning, contact your IT admin. Otherwise, one of the methods above should work.
Where Windows Stores Your Pins
Do not mistake your taskbar pins for mere decoration. Windows keeps a record of them in two separate locations. You will find the actual shortcut files in the following directory:
%AppData%\Microsoft\Internet Explorer\Quick Launch\User Pinned\TaskBar
As for how they are arranged, that is stored in the registry under the Taskband key. It is no wonder that an unresponsive taskbar may sometimes disregard new pins you place. The way to get around it and have them reload properly is to bring up the Task Manager, locate Windows Explorer, and hit Restart.
Keep Your Pinned Layout Steady with SmartPanels
There is convenience in pinning the tool for quick access, but on a shared machine it is not enough. Someone else will put your windows and icons out of place, and you are left to put things right by hand, an exercise in futility that eats into your day. If you want to see how these workspace features work in practice, follow our guide on how to use SmartPanels to save and restore your preferred window arrangements.
SmartPanels takes care of such matters. With a single click, the application saves and restores your screen positions and window dimensions. You might put together a profile for your design work or gaming and, at a moment’s notice, change over to another layout, be it on one display or several.
The software is made for multi-monitor use and will have your workspace back in order in no time, keeping your full desktop and snipping tools in their proper places. Give SmartPanels a go and have every window exactly as you see fit. When screenshots are part of your daily work, keeping the capture tool beside your browser, editor, or documentation can also help. Learn how to view multiple apps side by side for a more efficient workflow.
Conclusion
Getting quick access to screenshots should not slow you down. Learning how to add the snipping tool to the Windows 11 taskbar takes only a minute. Pinning is straightforward whether you are in Search, the Start menu, or File Explorer; a custom shortcut or an icon already in use will do as well. Any of these approaches puts the tool at your fingertips with a single click. For speed, there is always the Windows + Shift + S keyboard combination. Should the pin option go missing for some reason, the troubleshooting outlined above will put things right. For a more consistent desktop setup, you can also learn how to save your workspace layout in Windows 11 and reduce the effort of arranging applications every time you start work.
Choose whatever suits your way of working and get on with it. But having access is only part of the equation. An orderly, consistent desktop is what separates true productivity from the rest. This is where SmartPanels comes in. It will preserve your layout and have it back in place in an instant, even on a shared system.
Make use of SmartPanels to ensure your workspace remains exactly to your liking.