How to Use Hotkeys to Keep a Window Always on Top in Windows 11?

Keep A Window Always On Top in Windows 10

Ever been in the middle of working on a project and wished you could keep one window always visible, no matter what else you’re doing? That’s where the “always on top” feature comes in handy. This little trick keeps your chosen window right where you need it, staying on top of everything else. So, here you would know about “windows hotkey keep window open windows 11”.

So, why should you bother with this feature? For starters, it’s a real game-changer for multitasking. Imagine you’re on a video call and need to keep an eye on your to-do list at the same time. When a window is configured to be “always on top,” you may stop constantly navigating between them. It’s all about streamlining and optimizing your process. It also keeps crucial information visible and out of the way of other windows. Although it’s a basic function, the way you use your screen space may be greatly affected by it.

Let’s see how you can use hotkeys to keep your Windows always on top in Windows 11!

Related Blog: https://smartpanels.app/blog/how-to-keep-a-window-always-on-top-in-windows-10/

Using Built-In Windows 11 Features

Windows 11 doesn’t have a built-in feature specifically for keeping Windows always on top, but there are some native options and workarounds you can use to achieve a similar effect.

Snap Layouts

While not the same as “always on top,” Windows 11’s Snap Layouts can help you organize your windows more effectively. You may easily organize open windows into pre-defined sections of your screen by using Snap Layouts. Here’s how to use them:

  • Open the windows you want to arrange.
  • Press Win + Z or hover your cursor over the maximize button located in the upper-right corner of a window.
  • From the options that show, choose a layout. This will snap the window into place, making it easier to keep multiple windows visible.

Virtual Desktops

Another built-in feature is Virtual Desktops, which can help manage multiple windows more efficiently, even though it doesn’t always keep a window on top. This is how virtual desktops are used:

  • On your taskbar, click the Task View icon (or hit Win + Tab).
  • To launch another virtual desktop, select “New desktop.”
  • Task View allows you to move windows across desktops.

Focus Assis

Focus Assist can help you stay focused on one window by minimizing distractions. You can set it up to suppress notifications and alerts that might distract you from your important window.

  • Go to Settings (press Win + I).
  • Go to System > Focus Assist.
  • Choose your preferred focus settings to limit interruptions.

Using Keyboard Shortcuts

If you’re a fan of keyboard shortcuts and want to keep a window always on top, you’re in luck! While Windows 11 doesn’t have a built-in hotkey for this feature, you can use some handy shortcuts or tools to achieve a similar effect.

Common Hotkeys

One popular hotkey to keep a window always on top is Win + Shift + T. This shortcut isn’t built into Windows 11 by default, but you can create a custom hotkey to make it work. Here’s a quick look at how this works with third-party tools:

  • OnTopReplica: This free tool allows you to pin a window on top of others. Once installed, you can use its interface to set a specific window as always on top. The hotkey for this might vary based on the tool, so check its settings.

Creating and Customizing Hotkeys

You’ll need a third-party tool to set up or customize hotkeys since Windows 11 doesn’t provide this feature out of the box. Here’s a general guide using tools like AutoHotkey:

Create a New Script:

  • On your desktop, right-click and choose New > AutoHotkey Script.
  • Name something memorable in your script file, like “AlwaysOnTop.ahk.”

Edit the Script:

  • Right-click the script file and choose Edit Script.
  • Add the following code to the script

^SPACE::  ; Ctrl + Space hotkey

Winset, AlwaysOnTop, , A

return

  • This script sets the currently active window to always stay on top when you press Ctrl + Space.
  • To execute the script, double-click after saving it.
  • Use the hotkey you’ve defined (e.g., Ctrl + Space) to toggle the always-on-top feature for your active window.

Using Third-Party Tools

If you want to keep a window always on top and built-in options aren’t cutting it, third-party tools are your best bet. These tools offer more flexibility and features to help you manage your windows effectively. Here’s a quick look at some popular options and how to use them:

Popular Third-Party Tools

  • DeskSoft’s “Always On Top” is a straightforward tool that does exactly what it says, it keeps any selected window on top. It is simple to use and requires little setup.
  • OnTopReplica: This tool allows you to create a resizable, always-on-top replica of any window. It’s handy for monitoring applications or content while working on other tasks.

How to Set Up and Use These Tools

DeskSoft’s “Always On Top”:

  • Download and install the software from DeskSoft’s official site.
  • Upon launching the tool, a little icon will appear in the system tray.
  • Right-click the tray icon and choose the appropriate option to select the window you want to keep on top. The selected window will now remain on top of all others.

“OnTopReplica”:

  • OnTopReplica’s official website offers a download and installation option.
  • Run the application. You’ll see a window with options to select which window you want to replicate.
  • Choose the target window from the list or by using the window selector tool within OnTopReplica.
  • Adjust the replica as needed by resizing or moving it around. All other windows will continue to be layered over the imitation window.

Troubleshooting

When attempting to keep a window always on top, you may encounter some difficulties even with the appropriate tools and shortcuts. Here’s a rundown of common issues and practical tips to resolve them:

Hotkeys Not Working

If your hotkeys aren’t doing their job, it could be due to several reasons:

  • Conflicting Shortcuts: Other programs or system functions might use the same hotkeys. Check your tool’s settings to ensure there are no conflicts.
  • Script Issues: If you’re using a tool like AutoHotkey, ensure your script runs correctly. Verify the script again for any mistakes or typos.
  • Administrative Permissions: Some tools or scripts need administrative rights to function properly. Try running your tool or script as an administrator.

Solution:

  • Check for Conflicts: Go into your tool’s settings and look for any conflicting shortcuts. Adjust as necessary.
  • Verify Script: Open your script file and review the code for errors. You might find an easy fix if there’s a mistake.
  • Run as Administrator: Right-click your tool or script and select “Run as administrator” to ensure it has the permissions it needs.

Tool Not Responding

Sometimes, the tool itself may not respond as expected:

  • Outdated Software: Your tool might need an update to work correctly with the latest Windows version.
  • Compatibility Issues: It’s possible that the program won’t work perfectly with Windows 11 or the most recent versions.

Solution:

  • Update the Tool: Check the tool’s website or settings and install any available updates.
  • Reinstall: Try removing and then reinstalling the tool if updating doesn’t work. This can fix problems with corruption or compatibility.

Window Not Staying On Top

If the window you want to keep on top isn’t staying put:

  • Application-Specific Issues: Some applications may override the always-on-top setting due to their design or settings.
  • System Settings: Occasionally, system settings or other software might interfere with your tool.

Solution:

  • Look into the application settings you’re trying to manage. There might be options related to window behavior.
  • Make sure that the operation of your tool is not hampered by any system utilities or other applications.

SmartPanels

Restore Browser Tabs with SmartPanels. It maintains an active tab history and restores browser size as well as display position on one screen or many.

How Can You Use SmartPanels to Keep Your Window on Top?

SmartPanels has got you covered if you want a simple way to keep certain windows on top. Using only a few clicks, you can preserve your window preferences using this useful utility. You can make and store numerous profiles using SmartPanels, each having a top-level window of its own. Whether you’re switching from work to study or moving into entertainment mode, SmartPanels makes it easy to jump between your favorite setups quickly. Keeping your workspace organized and efficient is key to maximizing time and effort savings.

How to Save and Restore Your Workspace Layout in Windows 11?

Every morning, you waste time setting up your screen. You open your browser and drag it into position. Next, you resize your email window. Then, you snap a document right beside it.

A single restart ruins everything. A random Windows crash scatters your apps. You have to start the whole process over again.

Windows 11 comes with some helpful tools to restore your screens, and you can do it in a few clicks. There are the snap functions, virtual desktops, and the like. Most designs focus on a single session rather than a workspace you return to day after day.

We set out to show how to restore your workspace layout in windows 11, where it falls short, and how SmartPanels is the answer. With this approach, you can have your precise configuration back in seconds, no matter how many of the six displays you use. 

Why a Saved Workspace Layout Matters 

Consider the part your setup plays in how you work. Writers keep notes on one side and a draft on the other. Support agents monitor live chats alongside their ticket queues. Traders spread multiple dashboards across two or three monitors.  

The value lies in the arrangement as much as in the applications, so resetting the layout comes at a cost. You lose your place, spend time finding windows, and waste precious effort. That is why having a workspace on file is about more than tidiness; it is a safeguard for your concentration.  

Ultimately, the quicker you can get back to your configuration, the faster you are back in focus. 

Native Tools to Save Workspace Layout Windows 11 

Windows 11 includes several features that arrange and recall windows. Each one solves a slightly different problem. Therefore, it helps to know what they do first.  

Below, we break down the main options and how they behave. 

Snap Layouts: Instant Window Grids 

With Snap Layouts, you have a set of preset grids at your disposal to arrange your open windows. Access them easily by hovering your cursor over any window’s maximize button or pressing the Windows key + Z. This brings up a little picker with a selection of numbered layouts from which to pick halves, thirds, quarters, or something more mixed. 

Once the first window is in position, Snap Assist will prompt you with other apps for the remaining space. Windows 11 automatically adjusts these options to match your display scaling, orientation, and resolution, offering more zones on wide or ultrawide monitors. Dragging a window to the top edge reveals the Snap bar.

As a result, snap layouts windows 11 shows more zones on wide and ultrawide monitors. For full keyboard control, press the Windows key + Z, then a layout number, then a zone number. To adjust the behavior, open Settings, then System, and then Multitasking. 

Snap Groups: Return to a Full Arrangement 

When you group several apps together, Windows saves the layout as a single unit. You can then bring up the entire set with a single action. A simple hover over one of the grouped applications on the taskbar is enough to bring up a preview; from there, a click restores the layout in its original form.  

You can also find these groups in Task View and the Alt + Tab feature, which added them in Windows 11 version 22H2. For those in the middle of a work session, it is a convenient way to switch context in no time. 

However, snap groups windows 11 stores this data during your current session. Shut down or restart, and the grouping disappears. 

Virtual Desktops: Separate Spaces per Project 

Virtual desktops give each project its own screen space. For example, keep client work on one and personal tasks on another.

  1. Open Task View by pressing the Windows key + Tab.
  2. Add a new desktop using Windows key + Ctrl + D, and switch between them with Windows key + Ctrl + Left Arrow or Right Arrow.
  3. You can drag apps between spaces inside Task View and rename each desktop to keep your projects organized.

Technically, windows 11 multiple desktops run as lightweight, session-based containers. Each one uses a small amount of memory. Yet Windows does not record which app belongs on which desktop. Therefore, after a restart, your apps reopen on the primary desktop. 

Window Positions and Size: What Windows Remembers 

Beyond snapping, many people search for how windows save window positions and size by default. Windows 11 will generally put every window back where you left it during a session.  

The system remembers your monitor topology as well, so an external display you plug in will have the appropriate windows appear on it. Then there are certain programs that have their own session restore and will open on their own accord.  

But do not mistake this for a saved profile. Reboot the machine or unplug it for a while, and you will find that the positions can start to wander, especially when dealing with monitors of varying scale. If you depend on a particular arrangement from day to day, any such discrepancy is all too apparent. 

Where Windows 11 Falls Short 

While the tools in question are adequate for a given work session, problems arise once that session ends. A restart will see your Snap groups disappear and virtual desktops consolidate your applications back onto one.  

Then there is the matter of the browser; even if the layout is restored, it will not be with the same tabs you had open. Windows does not let you put a name to a full configuration and save it as a profile either.  

You are left to put things together by hand when moving from one arrangement to another, say from a design to a writing setup, since they have nothing in common. With several projects on the go and regular restarts, this process amounts to a good deal of rework. 

Clearly, to save workspace layout Windows 11 builds and keep them after a reboot, you need a dedicated tool. 

Save Your Entire Setup Automatically with SmartPanels 

SmartPanels runs on Microsoft Windows and does the one thing native tools skip. It shows how to save workspace layout profiles and restore them in seconds.  

What happens behind the scenes is that it logs the app, its size, and its position on the monitor for every window. It will also pick up your browser tabs in Chrome, Firefox or Edge before reopening them and putting them right where they were. The process is straightforward: 

  1. Install SmartPanels. Then open it beside the apps you use most. 
  2. Arrange your windows exactly how you like them. Spread apps across monitors and open your usual tabs. 
  3. Save the arrangement as a profile. SmartPanels captures the full layout. In one move, you save and restore your display settings and app positioning with a single click. 
  4. Assign a hotkey for instant access. Your saved Workspaces with Custom Hotkeys launch with one keypress. 
  5. Restore any profile whenever you need it. One click brings back your windows, apps, and tabs. 

There is no need to worry about a restart clearing out your work zone since the profile retains the whole configuration. You can keep multiple profiles on hand as well, meaning your client, personal, and meeting setups are all just a click away from being restored. 

Make SmartPanels Fit Your Workflow 

With SmartPanels, the software is as flexible as your desk. One can make multi-monitor productivity a simple matter on as many as six screens, whether in a home office or a trading setup.  

Need to coordinate with a colleague? A profile can be sent along by way of email through our Seamless Profile Sharing; they will have the identical layout open with just a couple of clicks. It is equally well suited for an agency to maintain distinct client accounts or for a researcher to put browsers and papers side by side. Even a teacher can move from one set of lesson plans to another in seconds.  

In the end, it is a consistent process: put the pieces where you want them, save the arrangement, and SmartPanels will do the rest. 

Learn how SmartPanels Save & Restore Your Workspace Instantly 

Frequently Asked Questions 

Does Windows 11 save my workspace layout after a restart? 

The answer is no, not entirely. When you save the workspace layout windows 11, a shutdown will cause any virtual desktop assignments and Snap groups to be reset, with your applications resuming on the primary desktop. While the monitors tend to fall back into place, you will not have the complete setup as before. 

What is the difference between Snap Layouts and Snap Groups? 

As for Snap Layouts, those are the preset grids for tiling. A Snap Group is what you get when you put a set of windows together. Windows will keep track of that group for the duration of your session to let you get it back up and running in short order. 

Can I use SmartPanels across more than one monitor? 

That is correct. SmartPanels will handle as many as six displays, remembering the position of every window on them so your multi-monitor arrangement is preserved in one profile. 

Will SmartPanels restore my browser tabs? 

As for browser compatibility, it is fully functional with Chrome, Firefox, and Edge; any tabs you have open will be restored along with the rest of your layout. 

Do I need to pay to try SmartPanels? 

There is no charge to begin with. The trial runs at zero cost, giving you the chance to put the hotkeys and profiles to the test before planning. 

Bring Your Workspace Back in Seconds 

With Windows 11, one has a solid foundation to work from. Snap functions put your windows in order in an instant, and virtual desktops are there to segregate your projects. The problem is that such conveniences are lost on a restart, forcing you to put the same configuration back together over and over.  

SmartPanels is designed to put an end to that kind of tedium. 

Simply create a profile for your apps, tabs, and windows, and with a hotkey or single click, you have the entire arrangement restored. This holds true even if you are running six monitors. What might have been a ten-minute chore in the morning is now done in two seconds, making it easy to move from one project to the next. Over 2,000 others have switched from managing their workspace by hand; there is no cost to start the trial so you can do the same. Put in your layout once and let SmartPanels take care of it. 

Want to restore your workspace? 
 
[Get Started] 

How to Split Screen in Windows 10 and 11?

Split Screen in Windows 10 and 11

Multitasking is more than just a buzzword; it’s a necessity. The ability to split your screen may greatly increase productivity, whether you’re a professional managing many tasks, a student juggling assignment, or a gamer streaming while playing. 

Splitting your screen allows you to view and interact with multiple windows simultaneously, making it easier to compare documents, monitor different applications, or keep an eye on your work while staying connected with others.  

We’ll look at how to utilize Windows 10 and Windows 11’s split screen functionality in this post, giving you practical advice and step-by-step instructions. 

What is Split Screen? 

With split screens, you may partition your computer screen into many areas, each showing a separate window or application. When it comes to multitasking, this function is very helpful because it allows you to work on many projects at once without continually switching windows.  

You may, for example, take notes during a video chat or write a report while citing a website. The benefits of using split screen extend to various users, from students who need to manage coursework efficiently to professionals who require multiple data streams and even gamers who want to enhance their gameplay experience. 

Split Screen in Windows 10 

Using Snap Assist 

Windows 10 comes with a built-in tool called Snap Assist that makes it simple to arrange your windows by simply snapping them into position. This is how to apply it:  

  • Launch the desired windows or programs.  
  • Grab the first window’s title bar with your mouse.  
  • When you see an outline showing where the window will snap, drag it to the edge of the screen.  
  • When you let go of the mouse button, the window will slide into position to take up half of the screen.  
  • On the other side of the screen, Snap Assist will show thumbnails of the other open windows you have. To move one of these thumbnails to the other side of the screen, click on it. 

Keyboard Shortcuts for Snap Assist 

  • To move the active window to the left or right side of the screen, use Windows Key + Left Arrow or Windows Key + Right Arrow
  • You may clip a window into a corner and see up to four windows at once by pressing the Windows Key + Up or Down Arrow keys

Adjusting Window Sizes 

  • Move your mouse across the line that separates the two snapped windows until the cursor changes to a resizing one.  
  • To adjust the windows’ size to your liking, click and drag the dividing line. 

Using the Task View 

Task View is another useful feature in Windows 10 that allows you to manage multiple windows and virtual desktops. Here’s how:  

  • To access the Task View button from the taskbar, use Windows Key + Tab
  • In Task View, drag one of your open windows to the desired part of the screen. 
  • Drag a different window to take up the leftover space on the screen. 

Task View is particularly useful for organizing your workspace and managing multiple tasks more efficiently. 

Drag and Drop Method 

For a more manual approach, you can simply drag and drop windows to split your screen: 

  • Open the applications or windows you want to view. 
  • Drag the first window’s title bar with your mouse. 
  • When you see an outline, release it from the edge of the screen. 
  • Repeat the process for the other window, dragging it to the opposite edge. 

This is an easy-to-use approach that allows you to precisely align your windows. 

Split Screen in Windows 11 

Using Snap Layouts 

With Windows 11, a new feature called Snap Layouts makes it simpler to organize several windows. Here’s how to use Snap Layouts: 

  • Move the pointer over any open window’s maximize button.  
  • A little menu with many layout choices (such as split screen, triple screen, etc.) will show up.  
  • Select the layout choice that you want.  
  • Decide the windows you wish to put in each layout component.  

With Snap Layouts, you may select the arrangement that best fits your workflow from a variety of options. 

Using Snap Groups 

Snap Groups is another new feature in Windows 11 that enhances multitasking by allowing you to group and switch between sets of windows easily. Here’s how to create and manage Snap Groups: 

  • Arrange your windows using Snap Layouts or manually. 
  • Windows 11 will automatically remember these arrangements as Snap Groups. 
  • Hover over the taskbar icons of any of the grouped windows, and you’ll see the option to restore the entire group. 

With Snap Groups, switching between various processes is simple and doesn’t affect your window layout. 

Using Virtual Desktops 

Virtual Desktops in Windows 11 provide an advanced way to manage multiple tasks.  

  • To access the Task View button from the taskbar, use Windows Key + Tab
  • In order to start a new virtual desktop, click “New Desktop”.  
  • To arrange your duties, drag and drop windows between desktops.  

By alternating between virtual desktops, you may better focus and reduce clutter by keeping various tasks or types of work apart. 

Tips and Tricks for Effective Split Screen Use 

To make the most out of the split screen feature, consider the following tips and tricks: 

Customizing Split Screen Settings 

Adjust the snap settings in the Settings app (System > Multitasking) to suit your preferences. 

Using Multiple Monitors 

You may increase your workspace and productivity by extending your split screen configuration over additional monitors if you have them. 

Organizing Windows and Applications 

Keep related windows together and use Snap Groups or Virtual Desktops to manage different projects efficiently. 

Recommended Apps and Tools 

Explore third-party apps like FancyZones (part of Microsoft PowerToys) for more advanced window management options. 

Troubleshooting Common Issues 

Despite its usefulness, you might encounter some issues with the split screen feature. Here are some common problems and their solutions: 

Windows Won’t Snap 

Ensure Snap Assist is enabled in the Settings app (System > Multitasking). Should it already be activated, consider restarting your computer. 

Uneven Window Sizes 

To resize snapped windows, move the spacer between them. If the issue persists, consider resetting your display settings. 

Applications Not Showing in Snap Assist 

Not all applications support Snap Assist. Ensure you’re using compatible apps and try updating them if necessary. 

For additional help, refer to the Microsoft support website or online forums where you can find solutions from other users. 

SmartPanels

Restore Browser Tabs with SmartPanels. It maintains an active tab history and restores browser size as well as display position on one screen or many.

Conclusion 

With Windows 10 and 11, you may handle numerous projects more effectively by splitting your screen, which can greatly increase your productivity. Whether you’re using Snap Assist in Windows 10 or exploring the new Snap Layouts and Snap Groups in Windows 11, these features provide flexible and powerful ways to organize your workspace. You may maximize the area on your screen and enhance your multitasking skills by using the techniques and advice provided in this article. Now you know “how to split screen windows 10”.

For More Related Information: how to reopen closed tabs | appdata | snipping tool shortcut | windows 10 key 

10+ Tips to Improve Your PCs Performance in Windows 11

10 Tips to Improve PC Performance

Our computers play an increasingly pivotal role in our daily lives. Whether we’re tackling work tasks, engaging in creative pursuits, or unwinding with our favorite games, the performance of our PCs can make or break the experience. Microsoft has ushered in a new age of computing with Windows 11, promising improved productivity, design, and seamless cross-device integration. 

However, if you want more juice out of Windows 11 fast then we can help you.  In this blog, we’ll delve into a comprehensive array of strategies designed to maximize the performance of your Windows 11 PC. 

Tips to Improving PC Performance in Windows 11

Improving PC performance in Windows 11 fast can be achieved through a combination of system settings adjustments, software management, and hardware optimization. Here are some tips to help enhance your PC’s performance: 

System Settings Adjustments

  1. Update Windows and Drivers

Ensure Windows 11 is up to date by checking for updates in the Settings app. Update your device drivers, especially graphics, audio, and network drivers, through Device Manager or the manufacturer’s website.

  1. Adjust Power Settings

For optimal performance, choose “High Performance” or “Balanced” for your power plan.  

  • Navigate to Power & Battery > Power mode under Settings > System. 
  1. Manage Startup Programs

Disable unnecessary startup programs to speed up boot time. 

  • Open Task Manager (Ctrl + Shift + Esc) > Startup tab and disable unwanted programs. 
  1. Optimize Visual Effects

Reduce visual effects for better performance. 

  • Go to Settings > System > About > Advanced system settings > Performance Settings and select “Adjust for best performance” or customize which effects to disable. 
  1. Disk Cleanup and Defragmentation

To get rid of system cache and temporary files, use Disk Cleanup. Here’s how to do it: 

  • Go to Settings > System > Storage > Cleanup recommendations. 
  • For HDDs, use the defragmentation tool (Defragment and Optimize Drives). 

Software Management

  1. Uninstall Unnecessary Software

Remove bloatware and unused programs to free up resources. 

Go to Settings > Apps > Apps & features and uninstall unwanted applications. 

  1. Use Lightweight Software 

Use software that is less resource-intensive for your everyday tasks. 

  1. Manage Background Processes 

Disable or limit background processes and apps. Here’s how: 

Go to Settings > Apps > Apps & features, select the app, and configure its background activity. 

Hardware Optimization

  1. Upgrade RAM 

Adding more RAM can significantly boost performance, especially for multitasking and memory-intensive applications. 

  1. Switch to an SSD 

An SSD may significantly speed up boot times and general system responsiveness if you’re still using an HDD.  

  1. Check for Overheating 

Make sure your computer is not overheated and has adequate ventilation because too much heat might stifle performance. Clean dust from vents and consider using a cooling pad for laptops. 

  1. Optimize Graphics Settings 

To strike a balance between performance and visual quality, adjust the in-game visuals. To adjust performance parameters, use your GPU’s control panel (NVIDIA Control Panel or AMD Radeon parameters). 

  1. Virtual Memory (Paging File) 

Adjust the size of the virtual memory (paging file) for better performance. 

Go to Settings > System > About > Advanced system settings > Performance Settings > Advanced tab > Virtual memory. 

  1. Disable Search Indexing 

If you rarely use Windows search, disabling indexing can improve performance. 

Open Services (type services.msc in the Run dialog), find “Windows Search,” and set it to “Manual” or “Disabled.” 

  1. Use Performance Monitoring Tools 

Use built-in tools like Task Manager or third-party tools to monitor and manage system resources effectively. 

  1. Keep Your System Secure 

Regularly scan for malware and viruses using Windows Defender or other reputable antivirus software, as infections can severely impact performance. 

However, if you don’t want the hassle of applying these tips, then you can use FastWindows to improve your PCs performance in Windows 11 fast. FastWindows is a top-tier windows utility app that users can use to prioritize their apps and programs and improve their computer’s performance.

TurboCharger

Boost productivity and system performance with TurboCharger. Organize your apps and games and simplify your workflows with TurboChargers’ automatic app prioritization

Final Word 

Optimizing the performance of your Windows 11 PC is not merely about enhancing speed; it’s about cultivating a smoother, more efficient computing experience. By implementing the strategies outlined in this guide, from adjusting system settings to managing software and hardware, you can breathe new life into your device.  

Whether you’re aiming to boost productivity, enhance gaming experiences, or simply streamline everyday tasks, these tips offer a roadmap to success. On Windows 11, though, you may also utilize FastWindows to enhance PC performance. 

Why is Your GPU Not Showing in Task Manager in Windows 11?

GPU Not Showing in Task Manager

If you have ever opened the Task Manager in Windows 11 and cannot seem to find your GPU, then, for once, you are not alone.

The details of your GPU are shown in the Task Manager. The Task Manager lets users monitor and manage their system resources, including their GPU. However, sometimes, for many reasons, you won’t be able to see your GPU listed there. In this article, we will help you fix this issue.

Why is my GPU not showing up in the task manager in Windows 11?

The Task Manager shows your GPU’s entire processing report. However, sometimes, your GPU won’t appear in the Task Manager. The following tips can help you fix this problem.

Update your graphic drivers.

Updating your GPU should be your first step towards fixing this problem. Updating the drivers can become critical, as corrupted drivers can cause your GPU to not appear in the Task Manager.

  • Open Settings and go to Update & Security; from there, navigate to Windows Update.
  • Look for a link named View Optional Updates.
  • You will see a list of updates. Install those you need.

However, you can use Driver Update Software, or if you have an AMD graphics card, you can use AMD Driver Autodetect to update your GPU. Moreover, you can use the NV Updater to update your GPU if you have an NVIDIA card.

Check the BIOS settings.

If your BIOS settings are misconfigured, your GPU won’t appear in the Task Manager. So, it is vital to configure your BIOS to the correct settings to ensure your GPU is visible.

Go to the BIOS settings during system startup and ensure that the integrated graphics or discrete GPU is enabled. However, if this setting is already enabled, reset the BIOS to its default values. A corrupted BIOS can cause your system to malfunction.

Repair all the corrupted system files.

Another reason you cannot see your GPU, is due to corrupted or missing files. You can fix this issue through a SFC scan.

  • Search for the Command Prompt by pressing the Windows key.
  • In the administrator mode, run the Command Prompt.
  • Type the command: sfc/scannow
  • Check whether the issue is resolved by restarting your device

Disable power-saving mode.

Power-Saving mode can be a great way to save battery, but it can limit your GPU’s performance. But you can turn it off to resolve this issue.

  • Open Settings by pressing Windows + I.
  • Navigate to System and Power & Battery.
  • Select Balanced or Best Performance from the drop-down menu.

Check for hardware issues.

Lastly, check whether your device’s hardware has any issues. Run the Hardware and Devices Troubleshooter to fix the issue. However, if that doesn’t fix the issue, visit your nearest service center.

How do I make my GPU show up in the Task Manager in Windows 11?

If you want your GPU to appear in the Task Manager, press CTRL + ALT + Delete and select Task Manager. Expand the Performance section and click on your GPU. Moreover, if your device has multiple GPUs, they will be labeled as GPU 1, GPU 2, etc.

SmartPanels

Restore Browser Tabs with SmartPanels. It maintains an active tab history and restores browser size as well as display position on one screen or many.

Conclusion

Your GPU is one of the most important parts of your device, and being unable to find it in the Task Manager can adversely impact it. You won’t be able to monitor how your GPU is performing and what apps are consuming the most GPU resources. However, you can implement the fixes described in this article and get the most out of your device.

How to Resolve Screenshots Not Saving in Windows 11?

Resolve Screenshots Not Saving in Windows 11

Does your work require you to take a lot of screenshots? If yes, then you might have faced the issue of your screenshots not saving at your desired location. This can happen due to a few reasons, most commonly a change of destination folder.

But sometimes, it can be a bit more serious than that, and you might have to dig into the Windows registry settings to set it right.

In this blog post, we will look into the reasons why your screenshots are not saving into the default Pictures folder and how you can fix that issue with a few simple fixes.

Why are my screenshots not saving in Windows 11?

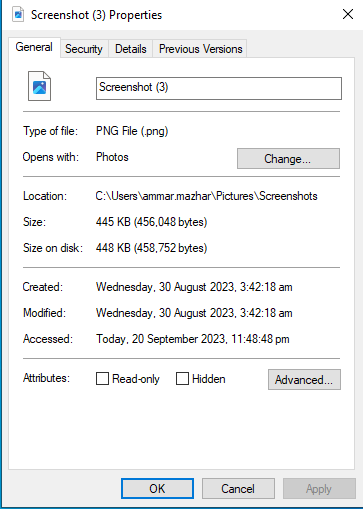
A simple reason why your screenshots are not being saved in the Pictures folder is that your default folder has been changed. You can check where your screenshots are saved by right-clicking on the image and clicking on the Properties option.

But if your images are still not saving in your desired folder, then it might be that your registry files are corrupted. But if you go about fixing it without knowing what you are doing, then you can do more harm than good and might disturb other registry settings.

How can I save my screenshots in Windows 11?

If your registry files are corrupted, which is causing your screenshots to not save in your desired folder, then you can implement the following fix to resolve the issue:

  • Press Win+R to open the Run dialogue box.
  • In the dialog box, type regedit
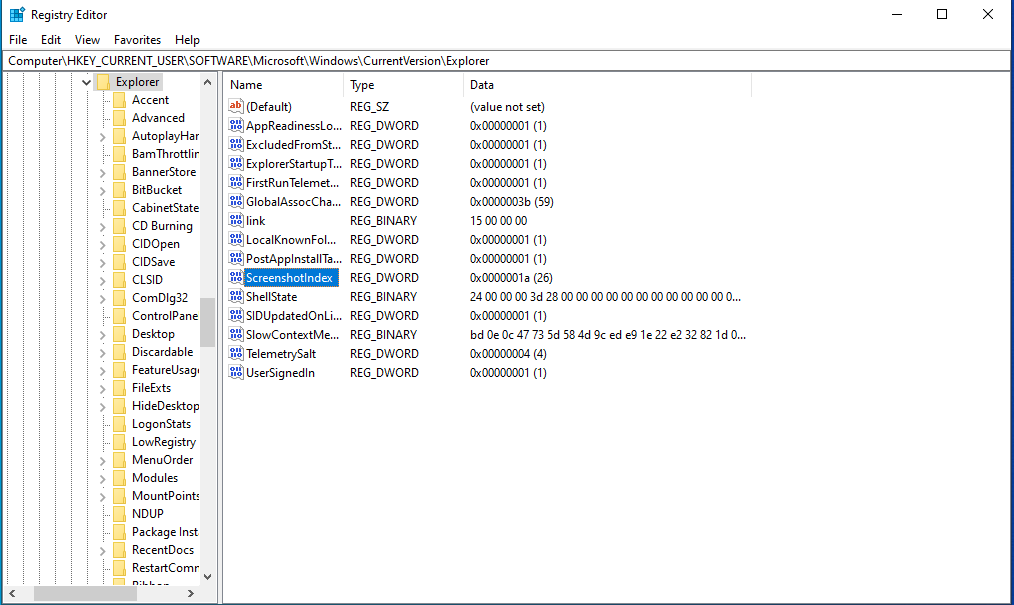
  • Navigate to Explorer in HKCU.
  • Right-click on it and create a new DWORD (32-bit) value.
  • Rename it ScreenshotIndex.
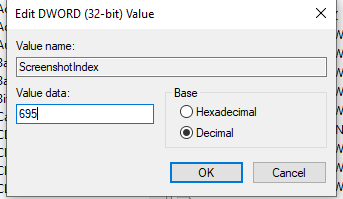
  • Select the decimal option by double-clicking on it.
  • Enter the data value of 695.
  • Save these settings by clicking OK.
  • Navigate to the User Shell folders.
  • After that, click on the following {B7BEDE81-DF94-4682-A7D8-57A52620B86F}
  • Enter the following user profile: %USERPROFILE%\Pictures\ Screenshots
  • Save the it and reboot your PC

Here’s a bit more detail on these steps:

Before changing your registry settings, make sure to create a system restore point. Subsequently,  press the Windows + R keys to open the Run dialog box. Type regedit in the dialog box to open the Registry Editor.

Afterward, navigate to the following location:

HKEY_CURRENT_USER\Software\Microsoft\Windows\CurrentVersion\Explorer

Once you navigate to the aforementioned location, look for ScreenshotIndex. You will not find this DWORD in your registry editor. This is the reason why your screenshots aren’t being saved in the default folder. You have to create this word yourself.

Start by right-clicking on the right window pane and create a new DWORD value. Double-click on the word to modify its decimal value to 695.

The next step is to point out this word in the correct user profile settings. You can do this through the User Shell Folders entry inside the Registry Editor. Start by navigating to the following location:

HKEY_CURRENT_USER\Software\Microsoft\Windows\CurrentVersion\Explorer\User Shell Folders

In the right pane, click on the following entry:

 {B7BEDE81-DF94-4682-A7D8-57A52620B86F}

Make sure that the entry points to the following value data:

%USERPROFILE%\Pictures\Screenshots

After setting the value data, close the Registry Editor and reboot your PC. Now, try to take screenshots. You’ll see that your screenshots are saved in your desired folder.

How can you change where your screenshots are saved in Windows 11?

If you don’t want to use the default screenshot folder and want to change it, you can do it through the Registry Editor. After changing the default location through the Registry Editor, your computer will automatically start saving your screenshots to your new provided location.

SmartPanels

Restore Browser Tabs with SmartPanels. It maintains an active tab history and restores browser size as well as display position on one screen or many.

Conclusion

There you have it. With the steps mentioned in this guide, you can successfully resolve your screenshot-saving issues by just tweaking a few Registry Editor settings. But, before you change any settings in the Registry Editor, ensure that you first create a restore point. Because if the registry settings are wrongly changed, you can face serious issues with your PC.

That’s why you can save and restore your app positioning, display settings, and Registry Editor settings with SmartPanels. SmartPanels is a top-notch Windows utility tool that lets you become highly productive by allowing you to create multiple profiles for your Windows for multiple users and various tasks.

How to Free Up RAM on Your Computer and Windows 11?

Free Up RAM on Computer

In the fast-paced world of technology, the need for optimal computer performance is more critical than ever. One key aspect that significantly influences your system’s speed and responsiveness is the Random Access Memory (RAM). In this blog post, we’ll delve into the importance of freeing up RAM and provide practical tips for enhancing your computer’s efficiency. 

Why is it important to free up RAM?

Random Access Memory (RAM) is like the workspace of your computer, where it temporarily stores data for active applications. When your RAM is overloaded, your system may slow down, leading to reduced performance and responsiveness. By freeing up RAM, you can ensure that your computer operates smoothly and efficiently, allowing you to tackle tasks seamlessly. 

5 Ways to Free up RAM on Any Computer

Restart Your Computer

A simple yet effective solution is to restart your computer regularly. This closes all running programs, freeing up RAM and giving your system a fresh start. Make it a habit to reboot your computer at least once a week to maintain optimal performance. 

Update Your Software

Keeping your operating system and software up to date is crucial for performance improvements. Software updates often include bug fixes and optimizations that can enhance the efficiency of your applications, ultimately freeing up valuable RAM. 

Clear Cache

Over time, cached files can accumulate on your computer, consuming precious RAM. Clearing your cache regularly, especially in web browsers, can help free up memory. This simple step can be performed in browser settings, giving your system a memory boost. 

Change Your Browser

Some web browsers are more resource-intensive than others. If you find your current browser is putting a strain on your computer’s RAM, consider switching to a lighter alternative. This can significantly improve your browsing experience and free up valuable memory. 

Remove Heavy Browser Extensions

Browser extensions can be convenient, but they can also contribute to RAM usage. Evaluate your installed extensions and remove any that you don’t regularly use or that are known to be resource intensive. This can lead to a noticeable reduction in RAM usage. 

4 Steps to Free up RAM on Windows 11

Disable Startup Programs You Don’t Need

Many programs launch automatically when you start your computer, consuming RAM from the get-go. Disable unnecessary startup programs to reduce the strain on your system memory. You can use the Task Manager to keep a check on programs that use a lot of RAM and stop those that are no longer needed. 

To disable these programs, you can: 

  • Open the Task Manager by pressing Ctrl + Alt + Esc
  • Choose the “Startups apps” tab from the Task Manager 
  • Click on “Startup Impact” to organize the programs from high to low usage 
  • Select apps you want to disable 
  • Click on the option “Disable” in the upper corner 

Stop Running Background Apps

Windows 11 may have background apps running that you’re not aware of. Check and close any unnecessary background processes to free up RAM and improve system performance. You can use your computer for years without realizing that these apps can take up a lot of RAM. These apps can quickly exhaust your memory, battery, and data bandwidth.  

To stop these background apps from eating up your RAM, you can follow these next steps: 

  • Go to your computer’s settings 
  • Click on “Apps”  
  • Click on “Installed apps” 
  • Scroll to the app you want to disable and click the three dots on the right 
  • Click on “Advanced Options” 
  • Under the option “Let this app run in the background,” select “Never” 

By following these steps, you can stop background apps from consuming additional RAM and keep your computer running smoothly.  

Reduce Visual Effects

Windows 11 comes with various visual effects that enhance the user interface but can also demand more RAM. Adjusting or disabling these effects can help optimize your system’s memory usage. You can turn off the animations for apps and icons that use storage for unnecessary effects. 

To access your computer’s visual effects: 

  • Open the computer settings 
  • Click on the “Accessibility Tab” 
  • Click “Visual effects.” 
  • Next to “Animation effects” toggle off the switch 
  • Also, toggle off the switch next to “Transparency effects” 

Track Memory

Use the Task Manager to monitor your computer’s memory usage. Identify processes that are consuming a significant amount of RAM and, if possible, close or limit their impact on your system.  

You can access the Task Manager, and use it to close additional programs, by following the below mentioned steps: 

  • Press and hold the Ctrl + Alt + Del keys to open the task manager 
  • Go to the “Performance” tab 
  • Check the memory column to view how much space they are taking 

You can now see which of the programs on your computer are taking up the most time and space on your computer and take timely action. 

SmartPanels

Restore Browser Tabs with SmartPanels. It maintains an active tab history and restores browser size as well as display position on one screen or many.

Conclusion

Freeing up RAM is a crucial step in ensuring your computer operates at its best. By following the outlined tips, you can optimize your system’s performance, resulting in a faster, more responsive computing experience. Whether you’re on a Windows 11 machine or any other operating system, incorporating these practices into your routine will help keep your computer running smoothly for the long haul.

How to Add Snipping Tool to Taskbar Windows 11?

Screenshots have become part of nearly every one of us. You might capture an error message, save a receipt, or share a quick note with a coworker. Windows includes a built-in snipping tool, a Windows 11 utility for exactly such tasks. Still, hunting for it through the search box wastes time. A pinned icon fixes that.  

This guide explains how to add the snipping tool to the taskbar in Windows 11 in a few short steps. There is hardly a workday that goes by without the need for a screenshot, whether to put an error message on record, keep a copy of a receipt, or pass a note to someone in the office. 

What Is the Snipping Tool in Windows 11? 

Microsoft has made the Snipping Tool its primary built-in utility for screenshots in Windows 11. With it you can take a free-form shot or capture an entire window or screen. This is not always how it was; in the past Microsoft put out two distinct apps. There was the old Snipping Tool for basic tasks and then Snip & Sketch for those who wanted to annotate or share quickly. 

Subsequent updates have done away with that division by rolling them into one modern application. Today’s version does it all: capturing, recording, setting delay timers, and markup are all in one place, so there is little call for a third-party editor for anything simple. It comes pre-installed too, meaning a trip to the Microsoft Store is seldom necessary. 

Under the hood, though, the app is a packaged Store product in MSIX format, with the internal name Microsoft ScreenSketch. That is of some consequence. If you run the legacy SnippingTool.exe on an updated system, it won’t behave as expected; it is now just a launcher for the packaged app. And while the two have been merged, a major update can occasionally dislodge the icon from your taskbar.  

What You Can Capture with the Snipping Tool 

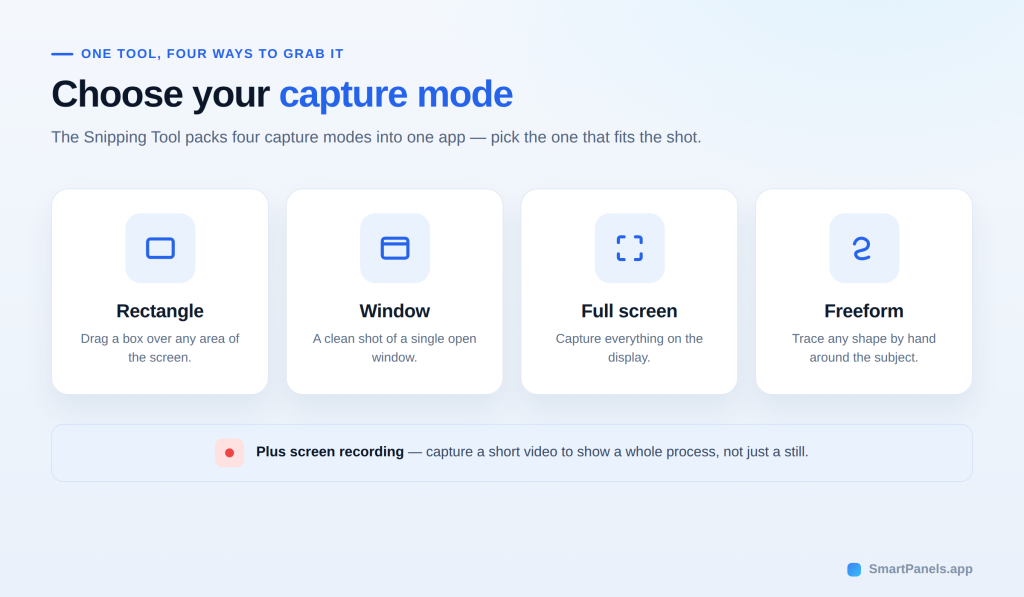
With four capture modes to pick from, the app is designed to handle whatever task is at hand. Simply select the one that serves your purpose. 

  1. You can use rectangular mode to draw a box over an area of interest. 
  2. Window mode for a clean shot of an open window.  
  3. The full-screen option will take in the entire display. 
  4. Freeform allows you to trace a shape by hand.  

        The tool is not limited to stills; it can put together a short video of the screen as well, which is handy for demonstrating a process in its entirety rather than a static moment. 

        Before You Start: A Quick Check 

        For the most part, what is set out below will be relevant to a standard Windows 11 setup, but there is no harm in doing a quick check first. It is worth your time to make sure of a few things: 

        1. You are using one of the main editions of Windows 11, whether it is Home, Pro, Enterprise, or Education.  
        2. The Snipping Tool is current and installed.  
        3. There are no work or school policies in place to lock down the taskbar, and your account can put its own stamp on it. 

            To verify your version, open Settings and go to System, then About. And if the app needs an update, a trip to the Microsoft Store will take care of that. 

            Why Pin Snipping Tool to Taskbar in Windows 11? 

            When you pin the snipping tool to the taskbar, you cut a multi-step task down to one click. To begin with, there is no need to make use of the search box. The icon will remain where it is even after a sign-out or restart. And for any transient material, one can respond quickly. 

            Take error dialogs and pop-up menus, for instance; they have a way of vanishing in a hurry. With the icon pinned, there is time to put in a reaction before they are gone. It is a matter of real time saved for the teams that produce documentation, and over the course of dozens of captures, those little efficiencies mount up. 

            The taskbar puts tools at your fingertips, making it well suited to heavy screenshot work. A pin here and there takes the edge off what would otherwise be a daily irritation. For writers and support staff in particular, the value is clear. When it comes down to it, a click on the taskbar is preferable to starting a new search from scratch. 

            How to Add Snipping Tool to Taskbar Windows 11: Step by Step 

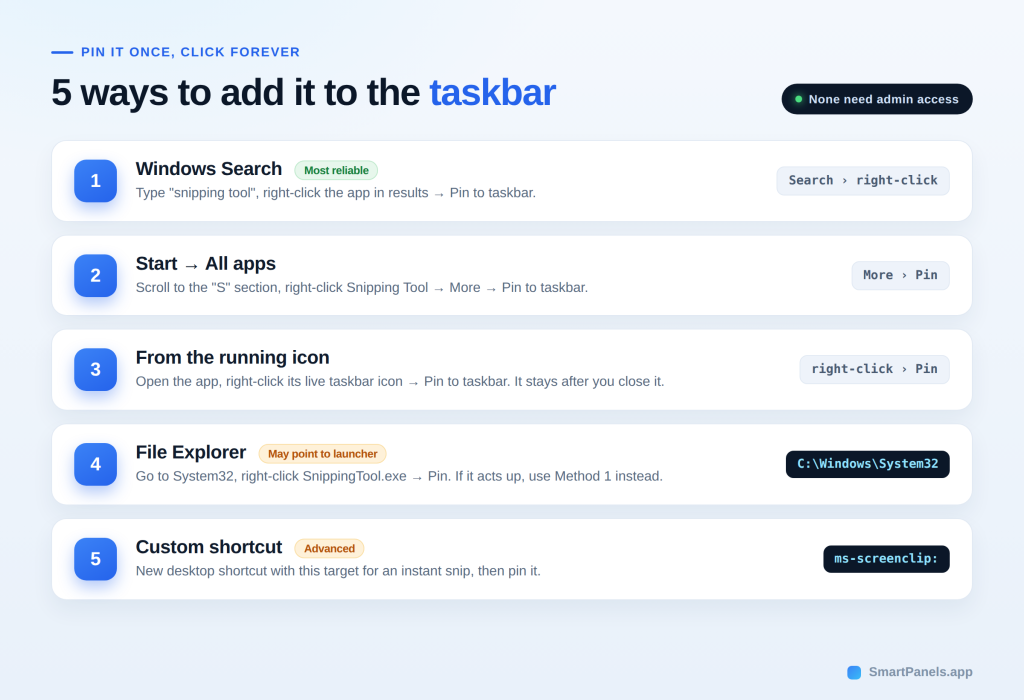
            Below are five methods for how to add snipping tool to the Windows 11 taskbar. Each one works on standard Windows 11 editions. Pick whichever feels fastest for you. Notably, none of them require admin access. 

            Method 1: Pin Using Windows Search 

            To get started: 

            1. Use the Windows key or click on the Search icon in the taskbar.  
            2. Enter “snipping tool” and let the app come up in the Apps section.  
            3. A right-click on it will bring up an option to “Pin to taskbar,” and the icon will appear immediately.  

                It is a reliable way to do things since Search has access to what is registered on the system; the approach is no different whether one is on a Home, Pro, or managed version of the OS, which is why most users make this their first port of call. 

                Method 2: Pin From the Start Menu 

                1. To get to it, open the Start menu and go to “All apps.” 
                2. From there, scroll until you are at the S section and right-click on the Snipping Tool.  
                3. You will see an option for “More”; hover over that and choose “Pin to taskbar.” 

                    It is a good way to do things if Search is being uncooperative. The All-apps list is comprehensive in that it includes every program you have put on the system so the tool is sure to be found. And one does not have to type anything out to make it work. 

                    Method 3: Pin From the Running Icon 

                    1. Open the app using any method above. 
                    2. Watch for its icon on the taskbar while it runs. 
                    3. Right-click that live icon. 
                    4. Choose “Pin to taskbar” to keep it there. 

                          This trick suits people who already opened the tool. Afterward, the icon stays there even after you close the app. 

                          Method 4: Pin From File Explorer 

                          You can also pin from the file that opens the app. First, open File Explorer. Next, browse to this location: 

                          C:\Windows\System32 

                          Then find SnippingTool.exe, right-click it, and choose “Pin to taskbar.” Here is the technical catch. On updated systems, this file only redirects to the packaged app. So, the pin may point at the launcher, not the app itself. If the icon behaves oddly, remove it and use Method 1 instead. 

                          Method 5: Create a Custom Shortcut (Advanced) 

                          This method suits power users who want a one-click snip. In effect, the shortcut skips the app window and starts a capture right away. 

                          1. Right-click the desktop, then choose New, then Shortcut. 
                          2. In the location box, type ms-screenclip: as the target. 
                          3. Name the shortcut, then click Finish. 
                          4. Right-click the new shortcut, then pick “Show more options.” 
                          5. Select “Pin to taskbar” to place it there. 

                                  A custom icon is an option as well; simply go to the shortcut’s Properties and select Change Icon. There is one thing to bear in mind, however: with Microsoft having done away with the old ms-screenclip: launch method for app integration back in May 2025, one can expect some of these features to be altered in later versions. If long-term dependability is the goal, stick with Methods 1 to 3. 

                                  For a faster way to get things done without using shortcuts, there are a few commands at hand. Hit Win + R and put in snippingtool to bring up the application. Or enter ms-screenclip in that same field, and it will take you right to a fresh snip. 

                                  Snipping Tool Shortcut Windows 11: Faster Keyboard Options

                                   A pinned icon is handy. Yet a keyboard combo can be even quicker. The main snipping tool shortcut Windows 11 users rely on is simple. Press Windows + Shift + S to instantly open the capture overlay. 

                                  From the little toolbar up top, select a mode. You can capture the entire screen, a window, or a rectangle, and the image will be copied to your clipboard. There is a banner that will allow for some quick editing and saving as well. 

                                  Should you wish to have the Print Screen key do the work, go into Settings and find the Keyboard section under Accessibility. Enable the option there, and a single tap will be all it takes to start a snip via screen capture. While you cannot rename the app with a custom shortcut, the built-in combinations are more than sufficient for most purposes. 

                                  What to Do When the Pin Option Is Missing 

                                  Occasionally the “Pin to taskbar” choice does not appear. Usually, a quick check solves it. Try these steps in order: 

                                  • Confirm you right-clicked the app, not a file or web suggestion. 
                                  • Restart Windows Explorer through Task Manager, then retry the pin. 
                                  • Check whether a work or school policy manages your device. 
                                  • Reinstall the app from the Microsoft Store if it seems missing. 

                                  If a policy blocks pinning, contact your IT admin. Otherwise, one of the methods above should work. 

                                  Where Windows Stores Your Pins 

                                  Do not mistake your taskbar pins for mere decoration. Windows keeps a record of them in two separate locations. You will find the actual shortcut files in the following directory: 

                                  %AppData%\Microsoft\Internet Explorer\Quick Launch\User Pinned\TaskBar 

                                  As for how they are arranged, that is stored in the registry under the Taskband key. It is no wonder that an unresponsive taskbar may sometimes disregard new pins you place. The way to get around it and have them reload properly is to bring up the Task Manager, locate Windows Explorer, and hit Restart. 

                                  Keep Your Pinned Layout Steady with SmartPanels

                                   There is convenience in pinning the tool for quick access, but on a shared machine it is not enough. Someone else will put your windows and icons out of place, and you are left to put things right by hand, an exercise in futility that eats into your day. 

                                  SmartPanels takes care of such matters. With a single click, the application saves and restores your screen positions and window dimensions. You might put together a profile for your design work or gaming and, at a moment’s notice, change over to another layout, be it on one display or several.  

                                  The software is made for multi-monitor use and will have your workspace back in order in no time, keeping your full desktop and snipping tools in their proper places. Give SmartPanels a go and have every window exactly as you see fit. 

                                  Conclusion

                                   Getting quick access to screenshots should not slow you down. Learning how to add the snipping tool to the Windows 11 taskbar takes only a minute. Pinning is straightforward whether you are in Search, the Start menu, or File Explorer; a custom shortcut or an icon already in use will do as well. Any of these approaches puts the tool at your fingertips with a single click. For speed, there is always the Windows + Shift + S keyboard combination. Should the pin option go missing for some reason, the troubleshooting outlined above will put things right. 

                                  Choose whatever suits your way of working and get on with it. But having access is only part of the equation. An orderly, consistent desktop is what separates true productivity from the rest. This is where SmartPanels comes in. It will preserve your layout and have it back in place in an instant, even on a shared system.  

                                  Make use of SmartPanels to ensure your workspace remains exactly to your liking. 

                                  How to Clean AppData Folder in Windows 11?

                                  How to Clean AppData Folder Windows11

                                  Are you experiencing a slow PC? Then this could be due to your AppData folder taking a lot of storage space on your PC. Here you can know about “appdata folder windows 11”.

                                  So, if you don’t want to compromise on your PC’s performance, you have to clean your AppData folder. If you are looking for ways to clean your AppData folder in Windows 11 then this guide has all that you need to know about cleaning your AppData folder.

                                  But first, let’s understand what the AppData folder is and how cleaning it can affect your computer.

                                  What is the AppData folder?

                                  The AppData folder is where all the app data and settings of all applications and programs are stored.  This folder can be found on the C drive in every Windows computer. C:\Users\User Name\AppData is the path of this folder.

                                  As it is hidden by default in Windows, you first have to make the AppData folder visible. You can unhide this folder by going to View > Show and select Hidden items on Windows 11. This will make the Windows show all the hidden files and folders.

                                  Why does the AppData folder take up a lot of space on your computer?

                                  When you use your PC for a long time, the AppData folder can take a lot of GBs on your C drive. If there are too many files in C drive, then it can slow down your system and cause performance issues.

                                  However, it is not safe to jump the gun and delete all the files in the AppData manually as it can cause serious performance issues. The files in the AppData folder are important for the apps that are installed on your PC. If you delete these files then your apps might not work properly, and you will also lose user information and all other saved data.

                                  How to delete the AppData Folder in Windows 11?

                                  Here are 3 ways you can delete temporary files from the AppData folders in Windows 11.

                                  1. Manually delete the files

                                  You can manually delete temporary files in the AppData folder. Temporary files of the app are saved in a folder called Temp. Here’s how you can delete these files:

                                  • Open Run by pressing Win + R
                                  • In the Run dialogue, type %LocalAppData%\Temp and press Enter. With this, you can navigate to the Temp folder in the AppData folder. There you will find some temporary files which are safe to delete
                                  • Press Ctrl + A to select all temporary files. Then delete the files by pressing the delete button or by right-clicking on the selected files and selecting the delete option
                                  • If you want to permanently delete the temporary files press Shift after right-clicking and selecting all the files, and then click on the Delete option. After you do it, a pop-up will appear saying “Are you sure you want to permanently delete these XYZ items.” Click Yes to complete the process
                                  • To permanently delete these files from the Recycle Bin, just right-click on it and click on “Empty Recycle Bin”.

                                  2. Through the settings app

                                  Windows 11 has some built-in features for users to delete temporary files in the AppData folders. Storage is a feature in the settings app that lets you safely delete temporary files.

                                  • Press Win + I to open the settings apps
                                  • Navigate to System > Storage 
                                  • Click on Temporary files
                                  • You have to make sure that the Temporary Files option is selected. Click on the Remove Files button. This will clean up the temporary files in the AppData folder. 

                                  3. Use the Disk Cleanup feature

                                  Disk Cleanup is another built-in Windows feature that can help you to remove temporary files from your computer. Here’s how you can use this tool:

                                  • Into the search box, Type cleanup and select Disk cleanup from the result to open this tool
                                  • Select drive C and click OK to start the scan for junk and temporary files
                                  • In the Disk cleanup interface, select Temporary files to remove them. Moreover, you can also select junk files to delete.
                                  • After the process ends, click OK.

                                  It doesn’t matter what way you use to clear your AppData folder, you will find more space in your C drive after you are done.

                                  Why should you clean your AppData folder?

                                  Cleaning your AppData folder can help you improve your PC’s performance. Temporary files can cause your PC to slow down, or at least, to lag. But deleting the contents manually can also affect the performance of your apps. 

                                  If you don’t want to delete AppData folders, but don’t want to compromise on your PC’s performance, then you can use FastWindows.

                                  FastWindows is a top-tier windows utility app that allows you to allocate your PC’s resources effectively so that you get optimal performance from your PC.

                                  Simply just download and install FastWindows, launch it, and the app will automatically assign priority to the apps and games you use the most. If you want to personalize your app prioritization, then you can do that as well with FastWindows.

                                  TurboCharger

                                  Boost productivity and system performance with TurboCharger. Organize your apps and games and simplify your workflows with TurboChargers’ automatic app prioritization

                                  Conclusion

                                  Given how many apps we use these days on our PC, it shouldn’t come as a surprise when our PCs become slower. However, you can clean your AppData folder to improve your PC’s performance with all the ways listed in this guide.

                                  How Can You Stop Windows From Automatically Resizing in Windows 11?

                                  Stop Windows from automatically Resizing

                                  As a Windows user, you might have experienced turn off automatic window resizing windows 11 when you split your screen in two and the other resizes automatically. This can be a little frustrating as it can create undue hindrance in your work, study, or gaming experience.

                                  If you are worried about it, then we have prepared a small guide that can help you overcome this.

                                  How do I stop Windows from automatically resizing in Windows 11?

                                  Snap layouts is a great feature that allows you to place various windows at different locations automatically. It is extremely helpful for multitasking.

                                  But it can get in the way of your productivity when you try to resize the window, to adjust the font or something else, and the next adjacent window resizes automatically, causing you to adjust your windows every time you adjust one or the other.

                                  If you want to disable the automatic resizing of windows in Windows 11, you can do so in the following way:

                                  • Press Win+I to open windows settings
                                  • Navigate to the System tab
                                  • Click on the Multitasking option
                                  • Locate the settings “Adjust Windows,” and turn it off

                                  How can you stop Windows from snapping Windows?

                                  You can stop Windows from snapping windows by disabling the Snap Window feature. Here’s what you can do:

                                  • Press the Win+I keys to open the Windows Settings
                                  • From the Windows Settings, navigate to System > Multitasking
                                  • From there, switch the toggle off called Snap windows

                                  How can you save your resizing preferences in Windows 11?

                                  If you want to save your resized window preferences in Windows 11 then you have no option but to use third-party software. One of the best windows utility apps that you can use to save your windows size preferences is SmartPanels.

                                  SmartPanels is a top-notch Windows utility app that lets you save and restore your preset display arrangements and app positions with just a click. With SmartPanels, you can create unlimited profiles for your work, study, and entertainment. Whether you use a single screen or have a multi-screen setup, SmartPanels can remember every screen size and app position efficiently.

                                  SmartPanels

                                  Restore Browser Tabs with SmartPanels. It maintains an active tab history and restores browser size as well as display position on one screen or many.

                                  Conclusion

                                  With these simple and quick fixes, we are sure that you won’t face any resizing issues. You can save your display and app positioning with SmartPanels and don’t have to worry about your turn off automatic window resizing windows 11.

                                  For More Related Information: how to reopen closed tabs | appdata | snipping tool shortcut | windows 10 key