What is the Startup Folder in Windows 10? 

Startup Folder in Windows 10

When you power on your computer, various programs and processes begin to load, some of which are necessary, while others may not be as crucial.  

These programs are managed through the Startup Folder, a vital component in ensuring a smooth and efficient startup experience. This blog will delve into the intricacies of the Startup Folder in Windows 10, including its location, how to modify its contents, and troubleshooting tips to fix common issues. 

What is the Startup Folder? 

The Startup Folder in Windows is a special directory where shortcuts to programs are placed, allowing them to launch automatically when your computer boots up. This feature is designed to save users time and enhance productivity by ensuring that essential applications and services are ready to use immediately upon startup. 

The Startup Folder can include various types of software, such as: 

  • Antivirus programs to ensure your computer is protected right from the start. 
  • Cloud storage services like OneDrive or Google Drive to keep your files synced. 
  • Communication tools like Skype or Microsoft Teams for instant connectivity. 

However, not all programs that load during startup are beneficial. An excessive number of starting apps might cause your computer to run slowly, take longer to load up, and use up system resources. Therefore, keeping your system operating at its best requires that you understand and take care of the Startup Folder. 

Where is the Startup Folder in Windows 10? 

Finding the Startup Folder in Windows 10 can be somewhat elusive if you’re not familiar with the system’s structure. Windows 10 has two primary Startup Folders: 

  • The User-Specific Startup Folder: This folder contains programs that start only for the currently logged-in user. 
  • Path: C:\Users\[Username]\AppData\Roaming\Microsoft\Windows\Start Menu\Programs\Startup 
  • The System-Wide Startup Folder: This folder includes programs that start for all users on the computer. 
  • Path: C:\ProgramData\Windows\Microsoft\Start Menu\Programs\beginning  

You may use the Run dialog box to access these folders:  

  • Utilize Windows + R to initiate the Run dialog box. 
  • Type shell:startup for the user-specific folder or shell:common startup for the system-wide folder. 
  • Press Enter, and the respective Startup Folder will open. 

How to Change Programs in the Startup Folder in Windows 10? 

Managing the programs in your Startup Folder involves adding or removing program shortcuts. Here’s a step-by-step guide: 

Adding Programs to the Startup Folder 

Locate the program you want to add: Find the executable file (.exe) of the program or its shortcut. 

Create a shortcut: Create a shortcut may be selected by right clicking the executable file or its shortcut. 

Move the shortcut: Copy and paste this shortcut into the appropriate Startup Folder (user-specific or system-wide). 

Removing Programs from the Startup Folder 

Open the Startup Folder: Use the Run dialog as described above to navigate to the user-specific or system-wide Startup Folder. 

Delete the unwanted shortcuts: Locate the shortcut of the program you wish to remove, right-click it, and select Delete. 

Using Task Manager to Manage Startup Programs 

Windows 10 also allows users to manage startup programs through the Task Manager: 

Open Task Manager: Press Ctrl + Shift + Esc or right-click the taskbar and select Task Manager. 

Navigate to the Startup tab: A list of the applications that launch on your computer may be found here. 

Enable or disable programs: To enable or disable a software, right-click on it and choose. 

How to Fix Windows 10 Startup Folder? 

Sometimes, issues with the Startup Folder can arise, causing certain programs not to launch correctly or the system to experience delays. Here are some common problems and their solutions: 

Missing Startup Folder 

If the Startup Folder is missing or inaccessible, it could be due to file corruption or incorrect settings. 

Check for hidden files: Go to the File Explorer Options > View tab > Show hidden files, folders, and drives to make sure hidden files and folders are visible. 

Restore the default folder path: If the folder is still missing, you might need to recreate it manually at the default path. 

Startup Programs Not Launching 

If certain programs are not launching at startup, consider the following: 

Check the shortcut path: Ensure the shortcuts in the Startup Folder point to the correct executable files. 

Run as administrator: Some programs require administrative privileges to run. Set the shortcut attributes so that the administrator is always run. 

Compatibility issues: Check for compatibility issues with Windows 10. Sometimes, older software may need compatibility mode enabled. 

Slow Startup Times 

Excessive programs in the Startup Folder can slow down boot times.  

Disable unused applications: To disable unused starting programs, use Task Manager.  

Conduct a system scan: Use the built-in utilities DISM and sfc /scannow to examine and fix system files. 

Conclusion 

The Startup Folder in Windows 10 is a powerful tool for enhancing productivity and ensuring essential programs are ready to use immediately upon booting up your computer. By understanding its location, how to manage its contents, and troubleshooting common issues, you can maintain a fast and efficient system startup. 

You can keep your computer running at its best by keeping your startup folder organized and optimized. Recall that although setting up some apps to launch automatically might be handy, you should balance them to prevent using your system’s resources too much. 

By following the guidelines provided in this blog, you’ll be well-equipped to manage your Windows 10 Startup Folder effectively, ensuring a seamless and productive computing experience. 

How to Split Screen in Windows 10 and 11?

Split Screen in Windows 10 and 11

Multitasking is more than just a buzzword; it’s a necessity. The ability to split your screen may greatly increase productivity, whether you’re a professional managing many tasks, a student juggling assignment, or a gamer streaming while playing. 

Splitting your screen allows you to view and interact with multiple windows simultaneously, making it easier to compare documents, monitor different applications, or keep an eye on your work while staying connected with others.  

We’ll look at how to utilize Windows 10 and Windows 11’s split screen functionality in this post, giving you practical advice and step-by-step instructions. 

What is Split Screen? 

With split screens, you may partition your computer screen into many areas, each showing a separate window or application. When it comes to multitasking, this function is very helpful because it allows you to work on many projects at once without continually switching windows.  

You may, for example, take notes during a video chat or write a report while citing a website. The benefits of using split screen extend to various users, from students who need to manage coursework efficiently to professionals who require multiple data streams and even gamers who want to enhance their gameplay experience. 

Split Screen in Windows 10 

Using Snap Assist 

Windows 10 comes with a built-in tool called Snap Assist that makes it simple to arrange your windows by simply snapping them into position. This is how to apply it:  

  • Launch the desired windows or programs.  
  • Grab the first window’s title bar with your mouse.  
  • When you see an outline showing where the window will snap, drag it to the edge of the screen.  
  • When you let go of the mouse button, the window will slide into position to take up half of the screen.  
  • On the other side of the screen, Snap Assist will show thumbnails of the other open windows you have. To move one of these thumbnails to the other side of the screen, click on it. 

Keyboard Shortcuts for Snap Assist 

  • To move the active window to the left or right side of the screen, use Windows Key + Left Arrow or Windows Key + Right Arrow
  • You may clip a window into a corner and see up to four windows at once by pressing the Windows Key + Up or Down Arrow keys

Adjusting Window Sizes 

  • Move your mouse across the line that separates the two snapped windows until the cursor changes to a resizing one.  
  • To adjust the windows’ size to your liking, click and drag the dividing line. 

Using the Task View 

Task View is another useful feature in Windows 10 that allows you to manage multiple windows and virtual desktops. Here’s how:  

  • To access the Task View button from the taskbar, use Windows Key + Tab
  • In Task View, drag one of your open windows to the desired part of the screen. 
  • Drag a different window to take up the leftover space on the screen. 

Task View is particularly useful for organizing your workspace and managing multiple tasks more efficiently. 

Drag and Drop Method 

For a more manual approach, you can simply drag and drop windows to split your screen: 

  • Open the applications or windows you want to view. 
  • Drag the first window’s title bar with your mouse. 
  • When you see an outline, release it from the edge of the screen. 
  • Repeat the process for the other window, dragging it to the opposite edge. 

This is an easy-to-use approach that allows you to precisely align your windows. 

Split Screen in Windows 11 

Using Snap Layouts 

With Windows 11, a new feature called Snap Layouts makes it simpler to organize several windows. Here’s how to use Snap Layouts: 

  • Move the pointer over any open window’s maximize button.  
  • A little menu with many layout choices (such as split screen, triple screen, etc.) will show up.  
  • Select the layout choice that you want.  
  • Decide the windows you wish to put in each layout component.  

With Snap Layouts, you may select the arrangement that best fits your workflow from a variety of options. 

Using Snap Groups 

Snap Groups is another new feature in Windows 11 that enhances multitasking by allowing you to group and switch between sets of windows easily. Here’s how to create and manage Snap Groups: 

  • Arrange your windows using Snap Layouts or manually. 
  • Windows 11 will automatically remember these arrangements as Snap Groups. 
  • Hover over the taskbar icons of any of the grouped windows, and you’ll see the option to restore the entire group. 

With Snap Groups, switching between various processes is simple and doesn’t affect your window layout. 

Using Virtual Desktops 

Virtual Desktops in Windows 11 provide an advanced way to manage multiple tasks.  

  • To access the Task View button from the taskbar, use Windows Key + Tab
  • In order to start a new virtual desktop, click “New Desktop”.  
  • To arrange your duties, drag and drop windows between desktops.  

By alternating between virtual desktops, you may better focus and reduce clutter by keeping various tasks or types of work apart. 

Tips and Tricks for Effective Split Screen Use 

To make the most out of the split screen feature, consider the following tips and tricks: 

Customizing Split Screen Settings 

Adjust the snap settings in the Settings app (System > Multitasking) to suit your preferences. 

Using Multiple Monitors 

You may increase your workspace and productivity by extending your split screen configuration over additional monitors if you have them. 

Organizing Windows and Applications 

Keep related windows together and use Snap Groups or Virtual Desktops to manage different projects efficiently. 

Recommended Apps and Tools 

Explore third-party apps like FancyZones (part of Microsoft PowerToys) for more advanced window management options. 

Troubleshooting Common Issues 

Despite its usefulness, you might encounter some issues with the split screen feature. Here are some common problems and their solutions: 

Windows Won’t Snap 

Ensure Snap Assist is enabled in the Settings app (System > Multitasking). Should it already be activated, consider restarting your computer. 

Uneven Window Sizes 

To resize snapped windows, move the spacer between them. If the issue persists, consider resetting your display settings. 

Applications Not Showing in Snap Assist 

Not all applications support Snap Assist. Ensure you’re using compatible apps and try updating them if necessary. 

For additional help, refer to the Microsoft support website or online forums where you can find solutions from other users. 

SmartPanels

Restore Browser Tabs with SmartPanels. It maintains an active tab history and restores browser size as well as display position on one screen or many.

Conclusion 

With Windows 10 and 11, you may handle numerous projects more effectively by splitting your screen, which can greatly increase your productivity. Whether you’re using Snap Assist in Windows 10 or exploring the new Snap Layouts and Snap Groups in Windows 11, these features provide flexible and powerful ways to organize your workspace. You may maximize the area on your screen and enhance your multitasking skills by using the techniques and advice provided in this article. Now you know “how to split screen windows 10”.

For More Related Information: how to reopen closed tabs | appdata | snipping tool shortcut | windows 10 key 

How to Upgrade from Windows 7 to Windows 10?

Upgrade From Windows 7 to 10

For many customers looking for better speed, more robust security measures, and access to the most recent software updates, upgrading from Windows 7 to Windows 10 is an essential step. Microsoft has ceased support for Windows 7, making it essential for users to transition to a more modern operating system. This guide will walk you through “how to upgrade to windows 7 from windows 10”, ensuring a smooth transition with minimal disruptions. 
 
For more related Information: https://smartpanels.app/blog/how-can-you-reinstall-windows-10/ 

Why Upgrade to Windows 10? 

Before diving into the upgrade process, it’s important to understand the benefits of moving to Windows 10. Here are a few main benefits: 

Security Updates 

Regular security upgrades for Windows 10 shield your computer against flaws and cyber threats. 

Improved Performance 

Windows 10 is optimized for better performance, offering faster boot times and enhanced multitasking capabilities. 

New Features 

Savor the addition of new features like virtual desktops, Microsoft Edge, and Cortana, the digital assistant. 

Compatibility 

Windows 10 ensures compatibility with contemporary apps and peripherals by supporting the newest hardware and software. 

Step-by-Step Guide to Upgrade from Windows 7 to Windows 10 

Step 1: Check System Requirements 

Make sure your computer satisfies Windows 10’s minimal system requirements:  

  • Processor: a suitable CPU running at 1 GHz or higher  
  • RAM: 1 GB in 32-bit mode or 2 GB in 64-bit mode.  
  • Hard drive space requirements: 16 GB for 32-bit operating systems and 20 GB for 64-bit ones. 
  • Graphics Card: WDDM 1.0 driver and DirectX 9 or later  
  • 800 x 600 resolution on display 

Step 2: Backup Your Data 

It’s crucial to back up your critical files and data before starting the update. Use an external hard drive, cloud storage service, or a backup tool to ensure all your documents, photos, and other essential data are safely stored. 

Step 3: Obtain a Valid Windows 10 License 

To upgrade to Windows 10, you’ll need a valid license key. If you don’t already have one, you can purchase it from the Microsoft Store or other authorized retailers. If you are upgrading from a licensed copy of Windows 7, you may still be eligible for a free upgrade, but this offer has officially ended, so check the current terms on Microsoft’s website. 

Step 4: Download the Windows 10 Media Creation Tool 

Visit the Microsoft website to download Windows 10.  

To get the Media Creation Tool, click “Download tool now.” 

Step 5: Run the Media Creation Tool 

Find and launch the Media Creation Tool that you downloaded.  Acknowledge the license’s terms. Once you’ve selected “Upgrade this PC now,” hit “Next.” 

Step 6: Choose What to Keep 

The Media Creation Tool will give you the option to keep personal files and apps or to start fresh with a clean installation. Select the one that best meets your requirements. If you’re unsure, it’s generally safer to keep your files and apps. 

Step 7: Download and Install Windows 10 

Depending on your internet speed, the utility may take some time to finish downloading Windows 10. The download will finish, and the installation procedure will start on its own. Follow the on-screen instructions to complete the installation. 

Step 8: Set Up Windows 10 

Your computer will restart when the installation is finished, and you will be walked through the first setup procedure. This entails setting up your network, logging in with your Microsoft account, and adjusting your settings. 

Post-Upgrade Steps 

Step 1: Install Updates 

After upgrading, it’s important to check for any available updates to ensure your system is up to date. Once you have selected “Windows Update > Settings > Update & Security,” click “Check for updates”. 

Step 2: Reinstall Drivers and Applications 

Some drivers and applications may need to be reinstalled after the upgrade. To get the most recent hardware drivers and reinstall any programs that were lost during the update, go to the manufacturer’s website. 

Step 3: Personalize Your Settings 

Spend some time customizing your preferences and settings. There are several customization choices available in Windows 10, such as display settings, background pictures, and themes. 

Troubleshooting Common Issues 

Although most of the update process goes well, there might be a few problems. The following are some typical issues and how to fix them: 

Insufficient Storage Space 

If you see a message about not having enough storage space, use external storage or delete things that aren’t needed to make room on your hard disk. 

Compatibility Issues 

It’s possible that certain outdated devices and applications won’t work with Windows 10. Prior to updating, make sure your apps and devices are compatible. 

Activation Problems 

Check to make sure you’re using a valid license key if Windows 10 doesn’t activate. For more support, if required, get in touch with Microsoft Support. 

SmartPanels

Restore Browser Tabs with SmartPanels. It maintains an active tab history and restores browser size as well as display position on one screen or many.

Conclusion 

Upgrading your computer from Windows 7 to Windows 10 is necessary to keep it secure and functional. You can easily update your computer and take advantage of Windows 10’s improved features and speed by following these thorough instructions. To guarantee a seamless transfer, don’t forget to verify system requirements, backup your data, and take your time. 

How to Change Administrator on Windows 10?

How to Change Administrator On Windows 10

Controlling administrator access in Windows 10 is essential for preserving system security and control. Whether you’re setting up a new computer, adjusting permissions, or passing administrative duties to someone else, knowing how to change administrators effectively is essential.  

This guide will walk you through how to change administrators on Windows 10, ensuring you can handle this task confidently and securely. 

How to Change Administrator on Windows 10? 

On Windows 10, it only takes a few easy steps to change the administrator. Here’s how to go about it: 

Accessing Settings 

To begin the process of changing the administrator on your Windows 10 PC, you first need to access the Settings menu. This can be done in a couple of ways: 

Using the Start Menu: 

Click on the Start menu button located at the bottom-left corner of your screen. This will cause the Start menu to appear, showing several shortcuts and choices. 

Locate the Settings icon—a gear-shaped icon—from the Start menu. The Settings window will open when you click on this button. 

Using a Keyboard Shortcut: 

An alternative and quicker method is to press the Windows key + I on your keyboard simultaneously. This keyboard shortcut is designed to open the Settings window directly, bypassing the need to navigate through the Start menu. 

Navigating to Accounts 

Once the Settings window is open, the next step is to navigate to the section where you can manage user accounts: 

Locate the Accounts Section: 

In the Settings window, you will see several options organized by categories. Go to the Accounts section. You may control every element of user accounts on your computer, including email accounts, family & other users, and sign-in preferences, under the Accounts area. 

Choosing Family & Other Users 

In the Accounts section, you will find various settings related to user accounts. To change the administrator, you need to focus on managing other users on your PC: 

Select Family & Other Users: 

In the left sidebar of the Accounts window, you will see several tabs. Select the “Family & Other Users” tab. This tab allows you to view and manage accounts that are either part of your family group or other users who have access to your computer. 

The Family & other users tab is divided into two sections: Family and Other users. For changing the administrator, you will typically be working within the other users’ section unless you are managing a family group. 

Selecting the Account 

You may choose the account you wish to convert to administrator now that you are in the Family & other users section: 

Find the Account: 

You may find a list of accounts that have access to your computer under the “Other users” section. Choose the account you want to become an administrator for by scrolling through this list.  

Once you’ve found the account, click on its name. You will be able to access additional account management options by doing this. 

Changing Account Type 

With the desired user account selected, you can now change its account type to Administrator: 

Change Account Type: 

After clicking on the account name, you will see options such as “Change account type” and “Remove”. Click on Change account type

A new window will appear, showing the current account type of the selected user. The heading “Account type” will have a dropdown menu. Select an account type from this dropdown menu to see the options. 

From the list, select Administrator. This change will grant the user administrative privileges on the PC. 

You may be prompted to confirm your selection or enter your password. If so, proceed with the modifications as directed. 

Verifying Changes 

Once you have changed the account type to Administrator, it is important to verify that the changes have taken effect: 

Immediate Effect: 

The changes should take effect immediately after you select the Administrator and confirm any prompts. You can now close the Settings window. 

To ensure the change has been applied correctly, it is good practice to log out of your current session or restart your computer. 

Testing Access 

Finally, to confirm that the new administrator account is functioning as expected, you should test the access: 

Log Out or Restart: 

Log out of your current user session or restart your computer. By doing this, you can make sure the system acknowledges the updated administrator settings. 

When the login screen appears, select the newly designated administrator account and enter the corresponding credentials to log in. 

Verify Administrator Access: 

Once logged in, you can perform a few actions that require administrative privileges to verify that the account has been successfully updated. For instance, try accessing system settings that are restricted to administrators, installing software, or managing other user accounts. 

SmartPanels

Restore Browser Tabs with SmartPanels. It maintains an active tab history and restores browser size as well as display position on one screen or many.

Conclusion 

On Windows 10, changing administrators is a simple procedure that gives you effective control over rights and access. By following the steps outlined above, you can confidently manage user accounts on your PC, ensuring security and efficient management of your system. Whether you’re configuring a new device or updating existing permissions, understanding these steps is essential for every Windows 10 user. Mastering these skills will enhance your ability to maintain your system’s integrity and manage user access according to your needs. 

However, if your PC is used by multiple users, and you don’t want to change its administrator settings then you can use SmartPanels for managing different users. 

SmartPanels is a top windows utility app that allows users to create multiple profiles that saves their distinct settings for easier access. With SmartPanels, you don’t have to give administrator controls to different users, ensuring your PC settings remain under your control. 

How To Do a Windows 10 Factory Reset? A Comprehensive Guide

Factory Reset Windows 10

Maintaining your computer’s performance and security is essential. Sometimes, despite all efforts to keep your system in top shape, you may encounter persistent issues that require more than just routine maintenance. A factory reset is one such solution. This blog will guide you through understanding when a factory reset is necessary and how to perform it on a Windows 10 system.

When is a Windows 10 Factory Reset Required?

Restoring your computer to its initial configuration by erasing all installed applications, personal data, and system settings is possible with a factory reset. Here are some scenarios where a factory reset might be necessary: 

Persistent Performance Issues

If your computer is running slow, freezing, or crashing frequently, and no amount of troubleshooting, updating, or optimizing seems to help, a factory reset can give it a fresh start.

Malware or Virus Infection

When your system is compromised by malware or a virus that you cannot remove through antivirus software or other security measures, a factory reset ensures that all traces of malicious software are eliminated.

Preparing to Sell or Give Away Your PC

Ensure all your personal data is deleted before giving someone else access to your computer. A factory reset ensures all your private data is lost.

Corrupt System Files

Sometimes, system files become corrupted due to software conflicts, unexpected shutdowns, or failed updates. A factory reset can resolve these issues by reinstalling a clean version of Windows 10.

How to Factory Reset Windows 10?

Performing a factory reset on Windows 10 is straightforward, but it’s essential to back up your data before proceeding, as this process will erase everything on your hard drive. Here’s how you can do: 

Step 1: Open Settings

Choose Settings (the gear symbol) from the Start Menu by clicking on it.

Step 2: Go to the Update & Security page

Click Update & Security in the Settings window.

Step 3: Recovery Options

Pick the Recovery option from the menu on the left.

Step 4: Launch the Reset Process

Under the Reset this PC section, select the Get started option.

Step 5: Select an Option

There will be two choices available to you: 

  • Keep my files: Using this option will save your personal files while removing applications and settings.
  • Remove everything: This will erase all private files, settings, and applications.

Step 6: Follow the On-Screen Instructions

Select the one that best fits you, then adhere to the on-screen directions. Also, if you wish to wipe everything, you will be asked to choose if you want to erase all your data or the entire drive. A full clean is more secure but takes longer.

Step 7: Complete the Reset

Click Reset after making your selections. Once the procedure starts, your computer will restart many times. After everything is finished, Windows 10 will be reinstalled, and the factory settings of your machine will be restored.

SmartPanels

Restore Browser Tabs with SmartPanels. It maintains an active tab history and restores browser size as well as display position on one screen or many.

Conclusion

A factory reset can be a lifesaver when dealing with persistent system issues, malware infections, or preparing your PC for a new user. You can make sure your Windows 10 system resets successfully by following the instructions. Keep in mind that this procedure will remove every piece of data from your hard disk, so before starting, make a backup of any crucial information. With a fresh start, your computer will run like new, free from previous issues and ready for future tasks.

How Can You Reinstall Windows 10?

How to Reinstall Windows 10

These days, a large portion of our lives—including work, entertainment, and personal organization—center around computers. When our systems encounter problems, it can be incredibly frustrating. Installing the operating system again is one way to fix a lot of problems. For Windows 10 users, this can be a highly effective way to restore system performance, resolve persistent problems, and ensure a fresh start.

In this blog, we’ll explore what issues can be resolved by reinstalling Windows 10, the types of reinstalls available, and a step-by-step guide on how to perform a reinstall.

Related Blogs: https://smartpanels.app/blog/12-tips-for-improving-your-slow-laptops-speed/  

What Issues Can Be Resolved by Reinstalling Windows 10?

Reinstalling Windows 10 can address a wide range of problems that may be affecting your computer. The following are some typical problems that are fixable: 

1. System Performance Problems

Your computer may get slowed down over time by unnecessary files, out-of-date applications, and fragmented data. Reinstalling the software can help solve these problems and increase speed and performance.

2. Malware and Viruses

If your system has been compromised by malware or viruses, reinstalling Windows 10 can help to completely remove these threats and restore your computer to a secure state.

3. Software Conflicts

Installing and uninstalling various programs can sometimes lead to software conflicts and system instability. A clean reinstall can help resolve these conflicts by providing a fresh start.

4. System Crashes and Errors

Frequent system crashes, blue screens of death (BSOD), and other persistent errors can often be resolved by reinstalling Windows 10, as it can fix corrupted system files and drivers.

5. Upgrade Issues

If you’ve encountered problems during a Windows update or upgrade, a fresh install can help ensure that your system is running the latest version of Windows 10 without any issues.

Types of Reinstalls for Windows 10

When it comes to reinstalling Windows 10, there are several methods you can choose from, depending on your needs and the severity of the issues you’re experiencing: 

Reset This PC

This option allows you to reinstall Windows 10 while keeping your personal files intact. It’s a good choice if you want to address performance issues or remove problematic software without losing your data. 

Clean Install

To do a clean installation, you must format your hard drive and install a brand-new copy of Windows 10. This method is the most thorough and is ideal for resolving severe issues, such as malware infections or significant system errors. However, it requires you to back up your data beforehand, as everything on your drive will be wiped. 

In-Place Upgrade

This method involves using the Windows 10 installation media to upgrade your current installation. It can resolve some system issues without affecting your files or applications. However, it’s not as comprehensive as a clean install. 

How to Reinstall Windows 10?

Although reinstalling Windows 10 could appear difficult, if you follow the appropriate instructions, it’s a simple procedure. Here’s how: 

1. Using the “Reset This PC” Option

  • Open Settings: Select “Settings” (the gear symbol) by clicking on the Start menu. 
  • Navigate to Update & Security: To access the Settings panel, select “Update & Security.” 
  • Choose Recovery: From the option on the left, choose “Recovery.” 
  • Reset This PC: Click the “Get started” button located under the “Reset this PC” section. 
  • Choose an Option: Either select “Keep my files” or select “Remove everything.” Select the solution that best meets your requirements. 
  • Follow the Prompts: To finish the reset process, adhere to the on-screen directions. 

2. Performing a Clean Install

  • Back-Up Your Data: Before starting, ensure that you back up all important files and data. 
  • Create Installation Media: Make a bootable USB device or DVD by downloading the Windows 10 Media Creation Tool from the Microsoft website. 
  • Boot from Installation Media: After inserting the USB drive or DVD, turn on your computer again. To access the BIOS or boot menu and choose the installation medium, press the corresponding key. 
  • Install Windows 10: For Windows 10 installation, follow the on-screen directions. Choose “Custom: Install Windows only (advanced)” to perform a clean install. 
  • Complete Setup: After the installation is finished, set up your fresh Windows 10 installation by following the instructions. 

3. Performing an In-Place Upgrade 

  • Download the Installation Media: Use the Windows 10 Media Creation Tool to download the latest version of Windows 10. 
  • Run the Setup: Open the downloaded file and run the setup. Choose “Upgrade this PC now.” 
  • Follow the Prompts: Follow the on-screen instructions to complete the upgrade process. 

SmartPanels

Restore Browser Tabs with SmartPanels. It maintains an active tab history and restores browser size as well as display position on one screen or many.

Conclusion

Reinstalling Windows 10 may be a useful fix for several system problems, including malware and performance concerns. You can guarantee a seamless and effective reinstallation procedure by being aware of the various reinstallation options and taking the right precautions. Whether you choose to reset your PC, perform a clean install, or do an in-place upgrade, you’ll be able to restore your computer to its optimal state and enjoy a fresh start.

How Many Times Can You Use A Windows 10 Key?

There is a legitimate question to be asked when one purchases a Windows 10 product key: will it be of any use down the road? Be it a new PC build or a Windows reinstallation, you should have a straight answer.  

But the truth of the matter is dictated by your license. While certain keys are portable from one machine to another, some are permanently tied to a single computer. That is why the type of license you hold is of consequence before you do any upgrading or reinstalling. 

We have put together this guide to lay out the rules in no uncertain terms. It starts with an explanation of how the different licenses operate and what is required to transfer a key properly. We also take the time to dispel the usual myths and seller talk, run through some quick checks and touch on the latest changes to Windows 10 support.  

How Many Times Can You Use a Windows 10 Key? The Short Answer 

There is a straightforward answer to the question of how often one can make use of a Windows 10 key: it is all a matter of the license. With the several types of licenses in play for Windows 10, the rules for reuse are dictated by which one you have. 

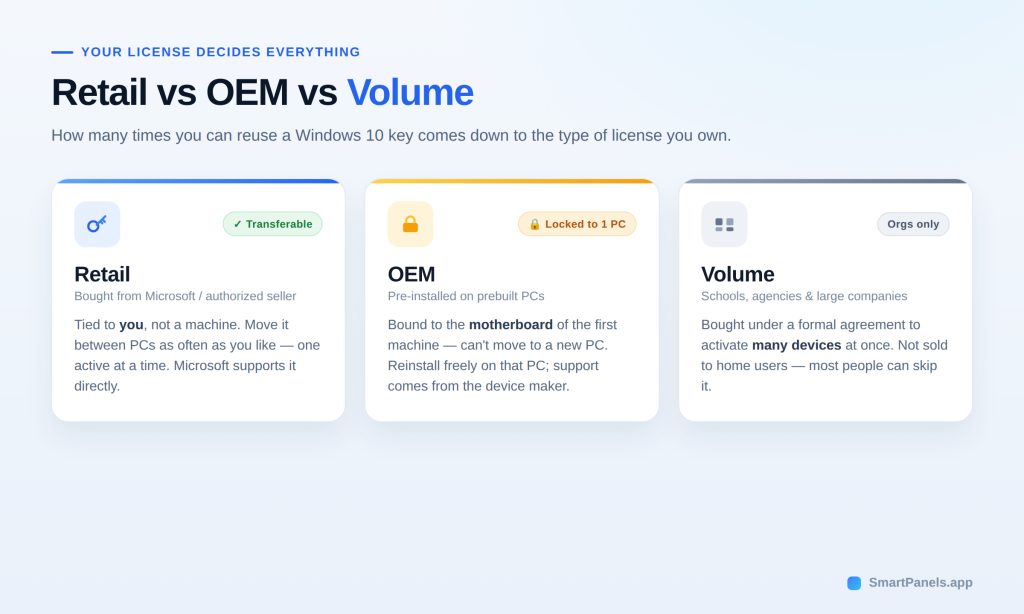
A retail key affords the greatest latitude; it may be transferred from one computer to another on an ongoing basis, provided only a single PC is running it at any given moment. The OEM variety is quite another story. Once activated on a machine, that key is bound to it and there is no legal way to put it on a new system. Then there are volume keys, which are the province of businesses rather than the home user. 

In short, your answer to how many times can you use a Windows 10 key depends on your key. Below, we explain each type clearly. That way, you can check your own key with confidence. 

Windows 10 OEM vs Retail License Explained 

Your license type decides everything about reuse. So let us compare the Windows 10 OEM vs retail license options side by side. Each one comes from a different source. Each one carries different rights. Understanding both helps you avoid costly mistakes. 

OEM License 

You will find an OEM key on any prebuilt computer, having been put in place by the manufacturer prior to purchase. In some cases, those putting together a custom PC might procure one on their own. It is a more economical proposition than retail, but there is a caveat to that savings. The license is tied to the motherboard of the initial system and will not be moved to another machine. While you are free to do as many reinstalls of Windows on that PC as you want, do not expect Microsoft to offer you direct support with an OEM key; that is left to the maker of the device.  

Retail License 

You will find a retail key at an authorized seller or the Microsoft Store. It is the version with the most to offer in terms of flexibility. The key is tied to you rather than a machine, so you are free to activate it and then take it over to another PC after deactivating it on the first one. Of course, it is limited to a single computer at any given time. Then there is the matter of support; Microsoft handles retail keys directly and for that reason many opt for them. If one is in the habit of upgrading often, the retail option is plainly the way to go. 

Volume License 

Volume keys serve schools, agencies, and large companies. Organizations buy them under a formal agreement with Microsoft. These keys can activate many devices at once. However, they are not sold to individual home users. So most readers can skip this option entirely. 

Can I Use a Windows 10 Key on Multiple Computers? 

Many people ask, can I use Windows 10 key on multiple computers at the same time? The answer is no. The license is for one active installation and that is the end of the story. It holds true for retail as well as OEM keys.  

While you can take a retail key off one PC and put it on another, it is only good for a single machine at any given time. An OEM key will not transfer once it has been activated for the first time. You may come across sellers who say their key is good for ten devices simultaneously; do not be taken in by such talk, it is nothing but a myth.  

Microsoft links activation to your hardware and account, so to have the same key on two running PCs is to violate the terms of the license. The proper course is to purchase an individual key for every additional machine. In this way each device remains genuine and there are no issues with updates. 

Transfer Windows 10 License to a New PC 

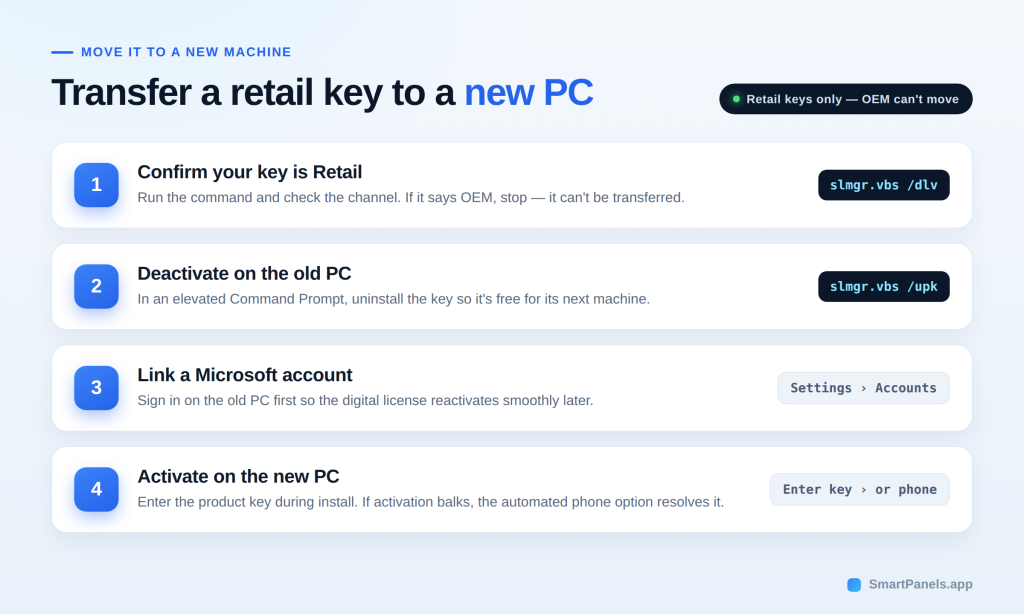
You can transfer Windows 10 license rights only when you hold a retail key. The process stays simple once you know the steps. Follow them carefully to avoid activation errors. 

Step 1: Confirm Your Key Is Retail 

Before getting started, take a moment to see what kind of license you have. It is a time saver to do this up front since OEM keys are not transferable. 

Step 2: Remove the Key From the Old PC 

To put the license at ease for its next host, you will need to deactivate Windows on the present computer. Launch an elevated Command Prompt and type in slmgr.vbs /upk; that will uninstall the key. 

Step 3: Link a Microsoft Account 

It is also advisable to log into your Microsoft account on the old PC first so that the activation process goes without a hitch down the line. 

Step 4: Activate on the New PC 

When you are ready to put Windows on the new hardware, simply input the product key as part of the installation. Should you run into any trouble with activation, the phone option is available. An automated call of it should be enough to resolve the matter. 

How to Reuse a Windows 10 Product Key Safely 

You can reuse Windows 10 product key licenses many times on the same hardware. A Windows reinstallation on a single PC is rarely an issue. One might run into trouble after a string of quick reactivations, at which point Microsoft could put in a request for phone verification to make sure the key is not being shared. It is prudent to have your product key on file in a secure location like a password manager. If you can, tie it to your Microsoft account as well; the digital license will handle reactivation on its own once you have done a clean install. 

Then there is the matter of where you get the key. Stick with Microsoft or other reputable sources. You do not want to end up with a gray-market bargain that gets blocked out of nowhere. An authentic key will stand up to repeated reinstalls. Having an account linked means Windows has no trouble identifying the device and takes care of the manual activation work, so you are spared any uncomfortable calls for verification down the road. 

How to Check Which License You Own 

Determining the type of license you have is a matter of seconds.  

  1. Simply go to the Start menu and put in “command prompt.”  
  2. From there, right-click on it and select the option to run as administrator.  
  3. Enter slmgr.vbs /dlv and hit the Enter key.  
  4. There will be a brief pause before a window comes up; check the channel listed within.  
  5. If it says “Retail,” the key is transferable to a different PC, whereas an “OEM” designation indicates it is bound to the device at hand.  

          What About Windows 10 End of Support? 

          As of October 14, 2025, Microsoft has put an end to free support for Windows 10 and with it the routine security updates. The key itself will still do its job and activate the OS as usual, but for those wanting an added measure of protection there is the Extended Security Updates program from Microsoft. That will see consumers get their essential patches until October of 2027. 

          One can also take the free route by making a backup of one’s settings and moving on to Windows 11, which is an option for most licensed Windows 10 machines. In any event, the reuse rights attached to your current key remain in effect. 

          Keep Your Workspace Safe with SmartPanels 

          A Windows reinstall or a new PC will do more than put your mind at ease; it has a way of erasing the open tabs and window arrangements you have put in place. To put things back the way they were is a daily time sink.  

          SmartPanels for Microsoft Windows takes care of that. The application memorises your app layout and the precise position of every window, then with one click it is all restored. Tabs in Chrome, Firefox and Edge are no exception. Those who work with multiple monitors will find it accommodating, as it handles up to six displays. There are custom hotkeys for an immediate profile change, and should the need arise to get a team up and running, a profile can be shared over email.  

          In short, your workspace is back in seconds following any kind of reinstallation.  

          Final Thoughts 

          So, how many times can you use a Windows 10 key? It all comes down to the type of license you have. A retail key will go with you from one computer to another over the years, though it is limited to a single active PC. An OEM key is a different matter; it is bound to that first machine for good. Then there are volume keys which are for the organization, not the home user. 

          Make it a practice to run a quick command and check your channel prior to an upgrade or reinstall. It is the best way to avoid wasting time on setup and dealing with activation issues. And do not forget to source your keys from Microsoft or a seller you can trust so the license remains in good standing. 

          Your key is an asset worth protecting, as is the work that a new install can put in jeopardy. With SmartPanels, one click is enough to save and then restore your whole workspace.  

          If you want to get back some of the time lost to configuration, put the free trial to use at SmartPanels

          Frequently Asked Questions 

          1. Can I use one Windows 10 key on two computers at once?  

          The answer is no. A single license is good for one active installation only. While a retail key can be transferred from one PC to another, you are limited to running it on a single machine at any given time. 

          2. Does reinstalling Windows use up my product key?  

          As for reinstallation, that is not an issue. You are free to do so on the same PC as many times as you see fit; the system will re-activate of its own accord following a clean install. 

          3. Can I move an OEM key to a new PC?  

          An OEM key is a different matter. It remains bound to the computer on which it was first used, so a retail key would be required to put it on another machine in good standing. 

          4. Will my Windows 10 key still work after end of support?  

          It will work fine and the key will activate Windows as expected. Do note though that Microsoft has stopped issuing free security updates unless you sign up for their Extended Security Updates program. 

          5. How do I keep my apps and layout when I reinstall Windows?  

          For your workspace, I would recommend SmartPanels. With a single click after a reinstall it puts everything back in order, from browser tabs to window layouts. 

          How Many Monitors Can Windows 10 Support?

          How many Monitors Can Windows 10 Support

          Do you need to attach more monitors to your PC for work, study, or even gaming? Also, do you run Windows 10 on your PC and find it difficult to effectively set up the monitors running the same OS? 

          In this guide, we will be suggesting fixes that can help you to fix these issues.

          How many monitors can Windows 10 support?

          Windows 10 supports a maximum resolution of 5120 x 2880. So you can set up, in addition to your primary monitor, up to ten 1080p and four 4K monitors. However, there are some issues that can prevent you from connecting additional monitors to your PC.

          Monitor limit set

          Windows 10 is able to support ten additional monitors due to the default setting in Applet, however, some users can only attach up to three monitors. This is because there is a set limit by the Display Properties Applet, which doesn’t allow the configuration of monitors exceeding four or more.

          Exceeded graphic card limit

          Another reason why your Windows 10 might not support additional monitors is due to your PC’s graphics card. Usually, typical graphics cards support two additional monitors. When the limit of the graphics card exceeds, it becomes impossible to configure additional monitors.

          Compatibility issues

          Sometimes a monitor isn’t compatible with Windows 10. If the Windows 10 OS doesn’t recognize a monitor it will not be able to support any external monitors.

          Limited USB and HDMI ports

          If your PC has a limited number of USB and HDMI ports and all are used up, then you cannot attach any other external monitors unless an external source is attached to them.

          Graphic cards and motherboard compatibility issues

          Usually, graphic cards can support up to two monitors, but it is still possible that your graphics card isn’t compatible with your motherboard. So, you have to update the motherboard or the graphics card.

          How can you fix the Windows 10 support issue?

          To fix these issues, you can follow the following steps:

          Check the maximum configurable limit

          By changing the default settings of the Display Properties Applet in Windows 10, you can attach multiple monitors. Also, you can change the limit on how many monitors you want to attach. Here’s how:

          • Go to the Control Panel.
          • Search for Display Properties Applet
          • Click on the Customize button.
          • Configure more than ten monitors by customizing the Display Properties Applet
          • Turn off your PC and attach the additional monitors.
          • Turn on your PC, and your monitors will be set up.

          Check the graphic card limit.

          If you cannot configure your computer with more than four external monitors, then check the limit of monitors a graphic card can support. Usually, it depends on the model of the graphic card, but a graphic card usually supports up to two monitors.

          You can check the limit of your graphic card by checking the settings of your graphic card.

          Check the compatibility of your monitors with Windows 10.

          Another thing you need to check before attaching a monitor is whether or not it is compatible with Windows 10. Check with the manufacturing company to see if it is compatible with Windows 10. Your screen will not boot if you don’t check its compatibility.

          Check the total number of USB and HDMI ports.

          Before you attach your monitors to your PC, check how many USB and HDMI ports are on the motherboard. If your computer has only a few USB ports, it can only attach and support only those monitors attached to them. You can attach an additional CPU or a USB hub to attach additional monitors.

          Use a graphic card that is compatible with the motherboard.

          Last but not least, you can try changing your graphics card to one that is compatible with your motherboard. 

          Set up your monitors with SmartPanels!

          Here you have it! Windows 10 can support up to 10 monitors by just customizing the Display Properties applet. Moreover, you should check the compatibility of your graphics card with both Windows 10 and your PC.

          Also, check the USB and HDMI ports on your motherboard. This will also give you an idea of how many monitors you can attach to your PC.

          If you want to boost your productivity, you can use SmartPanels! SmartPanels is a Windows utility app that lets you improve multi-screen productivity by prioritizing app positioning and snap layouts on up to six displays.

          SmartPanels

          Restore Browser Tabs with SmartPanels. It maintains an active tab history and restores browser size as well as display position on one screen or many.

          FAQs

          Is it possible to attach multiple monitors to a laptop?

          Yes. You can attach multiple monitors to a laptop that has Windows 10 installed. Moreover, even if the laptop has a single USB or HDMI port, a setup of two or more monitors However, to save the laptop from any extra load, it is recommended to use a USB hub or additional GPUs.

          Can you use HDMI cables to attach monitors to a PC?

          Yes. It is necessary to use HDMI cables to attach monitors to a PC. Otherwise, the PC will not be able to detect the additional monitors.

          Can Windows 10 support seven monitors or more?

          Windows 10 can support up to ten monitors via the Display Applet. Therefore, it is possible to attach seven monitors or more to a PC.

          How to keep a window always on top in Windows 10

          Keep A Window Always On

          It really is a tedious task when you have to constantly click and drag windows to keep them on top of your screen. It can disrupt your workflow and reduce your productivity.

          But Windows 10 has a number of tricks that you can use to keep your windows on top and, thus, be productive and efficient.

          In this guide, we will share with you a few useful tips that can help you keep your windows always on top in Windows 10.

          How to Keep a Window Always on Top in Windows?

          It is always useful to keep windows on top when you are working on multiple windows simultaneously. In Windows 10, there are numerous ways you can keep windows on top and keep them visible at all times.

          • Using the Keyboard Shortcut

          The first way you can keep a window on top is by using a keyboard shortcut. To keep a window on top,simply press the “Alt” and “Space” keys simultaneously. This will open the system’s menu in the window. From the system’s menu, select the “Always on top” option.

          • Using the System Tray

          The second way you can keep a window on top is through the use of the system tray. Simply select the window you want to keep on top and then right-click on the system tray icon and select the “Stay Always on Top option.

          • Using the Context Menu

          Using the context menu is another way to keep a window always on top. Select the window you want to keep on top, right-click on the title bar, and select the “Stay Always on Top” option. This will keep the window on top until you turn off the feature.

          • Using Microsoft PowerToys

          Microsoft PowerToys is an open-source tool developed by Microsoft. It has a ton of powerful Windows utilities that you can use to streamline your tasks and become more efficient and productive.

          You can utilize the Always-on Top feature of PowerToy to keep your windows on top. First, install PowerToys from Microsoft’s website. After installing PowerToys, launch it and press Windows+CTRL+T. A sound will play, and a blue border will appear around the window that you choose to be on top of. This will indicate that your chosen window has become the primary window.

          • Using DeskPins

          DeskPins is a third-party software that allows you to “pin” your windows on the top. Start by installing DeskPins. After installing DeskPins, you will see an icon appear in your system tray.

          Click on the icon, and you will see the cursor become a thumb pin. With this, you can pin your chosen window(s) on the top. The pinned windows will display a small pin in their title bars. This will help you discern which windows are pinned and which are not.

          How Can You Use Smart Windows for Keeping Your Window on Top?

          If you use any or all of these tips for keeping your windows on top, then you can save your preferences by using Smart Windows. Smart Windows is a Windows utility tool that allows you to organize your Windows with a single click. With Smart Windows, you can create and save unlimited profiles, with each profile having your favorite windows on top. So, whether you want to jump from work to study or to entertainment, you can do so quickly.

          SmartPanels

          Restore Browser Tabs with SmartPanels. It maintains an active tab history and restores browser size as well as display position on one screen or many.

          Conclusion

          By using these tips, you can not only keep your windows on top in Windows 10 but also do away with the fuss of manually adjusting them. Moreover, with SmartPanels, you can save your preferences and quickly access them with just a single click, increasing productivity and efficiency.