Ever tried to plug in your second monitor and… nothing? No flicker, no recognition, just a cold blank stare from your screen. You’re not alone. The whole “not detecting second monitor” issue is surprisingly common—especially if you’re juggling a multi-monitor setup, dealing with driver quirks, or wrestling with the ever-shifting world of Windows updates.
This guide walks you through real, no-nonsense solutions to get that second display up and running. Whether you’re on a Windows 10 or Windows 11 machine, we’ll break it down in plain English—no geek-speak overload. Let’s fix it, yeah?
So, Why Won’t My Second Monitor Work?
Here’s the thing: there’s no single reason. It could be the HDMI cable. Or maybe your graphics driver decided to nap. Sometimes, Windows itself just forgets to talk to your external monitor.
Let’s run through the top culprits:
Faulty HDMI/DisplayPort/VGA cable
Display settings not configured properly
Outdated or corrupt display drivers
Windows update reset your display settings
Your second monitor is in sleep mode or not powered on
And yes, it can also be that your PC is set to extend the display—but it’s still stuck thinking you’ve only got one screen.
Step-by-Step Fixes (That Actually Work)
Check Your Connections First
Start with the basics. Is the cable actually plugged in properly? Sounds dumb, but loose ports happen—especially with bulky monitor plugs that wiggle out over time.
Try:
Unplugging and re-plugging both ends
Switching to another HDMI or DisplayPort cable
Plugging the monitor into a different port if your GPU has more than one
Also, test your second monitor on another PC/laptop to rule out hardware failure.
Force Windows to Detect It
Sometimes Windows needs a little push. Head over to:
Settings > System > Display
Scroll down and click Detect under “Multiple Displays”
Still no luck? Let’s dig deeper.
Update Display Drivers (Seriously, This Works)
If your dual monitor setup isn’t working, it’s probably a driver issue. You can update manually or let Windows try its luck.
Right-click Start > Device Manager
Expand Display Adapters
Right-click your graphics card > Update Driver
Or better yet, head to your GPU manufacturer’s website (NVIDIA, AMD, or Intel) and grab the latest driver directly. This helps especially when external monitor isn’t recognized but everything else seems fine.
Set Correct Display Mode
Press Windows + P and choose the correct mode:
PC screen only
Duplicate
Extend
Second screen only
Weirdly, switching to “Extend” and then “Duplicate” again often fixes the issue. It’s like shaking the Etch A Sketch of your display config.
Roll Back a Windows Update
Sometimes your monitor detection issue starts after a Windows update. Coincidence? Nope.
You can try rolling back:
Settings > Update & Security > Recovery
Click Go back to the previous version if available
And yes, SmartPanels plays well with both newer and older Windows builds. If you’re using it, you’ll probably avoid these annoyances in the future.
Adjust Resolution and Refresh Rate
If your screen flashes and then stays black, it might be set to an unsupported resolution or refresh rate.
Go to Settings > System > Display
Scroll down and click Advanced Display Settings
Make sure both monitors have supported resolutions
Common mistake? Setting a 4K resolution on a 1080p monitor. The result? A very confused screen.
Clean Boot Your PC
This one’s underrated. If a third-party app or driver is messing with your display settings, a clean boot helps isolate the problem.
Use msconfig to disable all non-Microsoft services and reboot. If the monitor works now, something you installed is the culprit.
When It’s Definitely a Hardware Issue
Sometimes it’s not software. Maybe the monitor’s power supply is dead. Or the port on your laptop is fried.
Test using another monitor or use your second screen as the primary monitor via Settings. If Windows still can’t detect it? Time to think repair or replacement.
SmartPanels: Your Backup Plan (That Should Be Your Primary Plan)
Let’s be honest—multi-monitor setups can get frustrating real quick. And restarting your PC every time the second screen goes AWOL? Not fun.
SmartPanels helps you save your window positions, remember how apps were spread across your monitors, and restores them with a single click—even after a reboot or cable hiccup. It’s built for people who want their workspace just so and don’t want to keep dragging apps around all day.
Plus, it’s especially handy if you:
Frequently disconnect and reconnect displays
Switch between desks and docking stations
Have specific workflows across screens (design, dev, finance)
Wrapping Up: Fix It and Move On
You’ve got stuff to do. Deadlines don’t care if your second monitor isn’t detected.
So next time Windows acts up, walk through the steps:
Check your cables
Update drivers
Tweak settings
Use SmartPanels
Your dual monitor productivity dreams don’t have to be a nightmare.
Let’s be honest—if you’re anything like me, by midday your taskbar looks like a digital traffic jam. Multiple Chrome tabs, Photoshop, Excel, Zoom… and five more things you forgot you even opened. You hover, hoping to find the right window, but it’s a gamble every time.
Now imagine this: all your app windows tucked neatly under one icon. No clutter. No guessing games. Just a calm, clean taskbar. That’s the promise of modern task bar apps to contain windows in one icon—and it’s exactly what we’re unpacking today.
Whether you’re juggling client calls or switching between design drafts and spreadsheets, managing windows shouldn’t feel like a second job. This article walks training you through smart tools (like SmartPanels), easy fixes, and game-changing habits for keeping your digital workspace organized—without sacrificing productivity.
Why Is Your Taskbar Always Full?
Picture this. You’ve got five Chrome windows, all minimized, but they hog five separate slots. A taskbar window grouping app consolidates them under one Chrome icon. When you hover or click, you see all instances in a tidy view. It’s like putting your messy desktop into a drawer—and knowing exactly where to find everything.
These tools aren’t just cosmetic. They:
Reduce taskbar clutter
Make switching between windows faster
Prevent misclicks when you’re moving fast
Create mental clarity during multitasking
And yes, your laptop battery might even thank you.
Top Apps That Tidy Your Taskbar
Let’s not sugarcoat it. Some of us need more than just what Windows offers. Here are tools that go the extra mile:
1. SmartPanels – The Smart One
If you’re looking for a smarter desktop experience, SmartPanels deserves the top spot. It doesn’t just group windows—it remembers how and where you like them.
Organize apps into profiles
Restore window positions across multiple monitors
Combine apps like Outlook, Teams, and browser tabs into a single workspace
Reduce cognitive load by minimizing the need to re-open and re-arrange daily
SmartPanels taskbar feature is perfect for users who want a cleaner workflow without repetitive clicks.
2. TaskbarX (formerly FalconX) – The Customizer
TaskbarX gives your Windows taskbar a sleek, centered look—while offering animated transitions and taskbar transparency. Not strictly for grouping, but great for visuals and reducing distraction.
3. Groupy by Stardock – The Tab Master
Think of Groupy like Chrome tabs—but for your apps. You can group apps together into tabs under one window. Perfect for those who frequently switch between Excel, Word, and browser tabs.
4. Actual Window Manager – The Power User’s Tool
Loaded with features like virtual desktops, window snapping, and window rules, it’s built for serious multitaskers.
5. Taskbow – Lightweight and Old-School
If you’re on older machines or just need a basic solution, Taskbow replaces your taskbar with color-coded icons for grouped apps. It’s simple and still effective.
Why Grouping Apps Improve Your Workflow
It’s not just about looks.
An organized taskbar:
Reduces the time you spend switching tasks
Lowers chances of clicking the wrong window
Helps with multiple window control during meetings or presentations
Supports taskbar productivity tips that actually work
And let’s be real—who hasn’t embarrassed themselves by sharing the wrong screen during a Zoom call?
How SmartPanels Goes Beyond the Basics
Here’s the thing: most tools stop at grouping. SmartPanels goes further. It actually remembers your setup. Got three monitors? Want your browser always on the left, Slack on the right, and Excel dead center? SmartPanels stores that layout. One click, and your whole workspace is restored.
Whether you’re working from home, hot-desking at a coworking space, or setting up in a cafe, SmartPanels gets you back in the zone instantly.
It also supports app profile saving, which means your “Design Work” layout can be separate from your “Client Calls” setup. No more dragging windows around every morning.
Quick Fixes and Built-In Settings You Can Use
Before installing anything, try these quick tweaks:
Right-click taskbar > Taskbar settings
Turn on “Combine taskbar buttons” to group similar apps
Settings > System > Multitasking
Turn on Snap windows for fast tiling
Use Alt + Tab
Master this shortcut for rapid switching
While these don’t go as deep as third-party tools, they help in a pinch.
Common Pitfalls to Avoid
A few quick warnings:
Avoid installing multiple taskbar apps at once—they can conflict.
Be cautious with experimental beta tools. Some mess with display scaling.
Don’t ignore updates. These tools often improve with feedback.
Final Thoughts: Your Taskbar Deserves Better
You know what? Your desktop setup says a lot about how you work. If your taskbar’s jam-packed with 20 windows and you spend more time finding things than doing them, maybe it’s time for a change.
From lightweight tools to full-featured powerhouses, there’s no shortage of ways to get your taskbar under control. Whether you’re managing reports, writing code, or editing videos, streamlining your taskbar with the right taskbar cleaner tools just makes everything… smoother.
And if you want the smartest option? Give SmartPanels a shot. It doesn’t just clean up—it remembers how you work and meets you there.
Ever feel like your mouse is escaping to the wrong screen every single time? Or maybe your favorite app always opens on the monitor you rarely use. Frustrating, right? Well, here’s the good news: changing your primary monitor is easier than it sounds. And once you do it, your workflow might just breathe a sigh of relief.
Let me walk you through the why, the how, and a few gotchas you might run into along the way.
Wait, What Is a “Primary Monitor” Anyway?
Before we get into the nuts and bolts, let’s clarify what this even means. When you’re working with more than one display, your computer chooses one as the “main” screen. That screen:
Shows your taskbar and system tray
Hosts most of your desktop icons
Often becomes the default launch point for apps
So if your monitor arrangement feels… off, there’s a good chance you need to change which one is the “captain of the ship.”
Why You Might Want to Change It
We all have our quirks. Maybe you prefer your right monitor as the main one because it’s larger. Or perhaps your laptop screen is too cramped, and you’d rather work off that glorious 32-inch external monitor.
Reasons to switch include:
Fixing weird app launch behavior
Enhancing ergonomics and neck comfort
Aligning with a docking station setup
Improving gaming performance (yes, that matters)
Reassigning monitors after an OS or graphics driver update
Whatever your reason, the solution is straightforward.
The Classic Windows Way (Works on Windows 10 & 11)
You’ll see your monitors labeled (usually 1 and 2). If you’re unsure which is which, click the Identify button.
Select the screen you want to make primary by clicking its box.
Scroll down and check the box labeled Make this my main display.
That’s it! Windows might blink or refresh briefly, and you’re good to go.
Quick Tip:
If the option is grayed out, make sure the monitor you’re selecting is actually connected. Some ghost displays hang around when you’ve recently disconnected one.
What If You’re Using a Laptop?
Laptops complicate things just a tiny bit.
When you connect an external monitor to a laptop, Windows usually decides which screen takes the lead. But you can override that easily using the same steps above.
Just remember: your laptop screen will usually be Monitor 1, and your external screen might be 2, 3, or more depending on your setup.
Also, check your Projection Mode (Win + P) and choose:
Duplicate (same thing on both screens)
Extend (acts like a second screen)
Second screen only (great if your laptop lid is closed)
Using NVIDIA or AMD Control Panels
If you’re a gamer or power user, you might be using graphics card software like:
NVIDIA Control Panel
AMD Radeon Settings
These also let you reassign your primary monitor:
NVIDIA:
Open NVIDIA Control Panel
Go to Display > Set up multiple displays
Right-click the monitor you want and choose Make primary
AMD:
Open AMD Radeon Software
Go to Display Settings
Set the desired monitor as primary
Honestly, though, the Windows method is often quicker unless you need granular GPU-level control.
SmartPanels: A Smarter Way to Manage Displays
Changing your primary monitor is just one piece of the puzzle. If you’re constantly rearranging windows, switching between work modes, or sharing screens, you know it can be a hassle.
You could say it’s like hiring a personal assistant for your screens. Worth it? Many users think so.
The Perks of Getting It Right
Here’s what you gain when your primary monitor is exactly where you want it:
Faster, smoother workflow
Reduced visual clutter
Better task-switching
Fewer misclicks and window drags
In short? Less tech headache. More getting-stuff-done vibes.
Common Issues & Fixes
Display option grayed out?
Make sure the monitor is physically connected and detected.
Taskbar not moving?
Sometimes Windows plays tricks. Try setting another screen as primary, then switch back.
Wrong monitor turns on at boot?
That’s BIOS or firmware behavior. You’ll need to set your preferred screen as default in BIOS (usually under Display or Graphics settings).
Final Thoughts
Look, switching your primary monitor isn’t rocket science. But it does make a world of difference when you’re juggling tabs, meetings, and to-do lists.
Whether you’re a work-from-home warrior, a design geek with three screens, or someone who just can’t deal with dragging windows anymore—this small tweak is a big win.
So go ahead, take 30 seconds and fix your setup. Future-you will thank you.
You’re not alone if you’ve ever sat there juggling multiple windows on one tiny laptop screen, squinting while toggling between tabs like it’s a sport. Ever wondered: “Can I just plug in two monitors and make this easier?” You can—and we’re about to break it down for you in a way that actually makes sense.
Why Bother With Dual Monitors?
Let’s be real: one screen just doesn’t cut it anymore. Whether you’re working from home, gaming, designing, coding, or just bingeing productivity hacks on YouTube, the benefits of extending your workspace are massive:
Fewer Alt-Tabs: Keep your Zoom call on one screen, your notes on another.
Smoother Workflow: Drag and drop files across windows. Side-by-side comparison? Yes please.
Better Focus: Dedicate one screen to work, the other to distractions (or productivity boosters, let’s pretend).
First Things First: Can Your Laptop Handle It?
Before you run out and buy two monitors, let’s check if your laptop is even up for the task. Most modern laptops can support at least two displays, but you’ll want to double-check:
Ports: Got HDMI, USB-C, Thunderbolt, or DisplayPort?
GPU Support: Your graphics card must support dual external displays. Even some integrated GPUs (like Intel’s Iris Xe) do.
Operating System: Windows 10 and 11 handle multiple displays like a champ.
The Setup Options (Simple to Fancy)
1. Plug-and-Play (If You’re Lucky)
If your laptop has two video output ports (say, an HDMI and a USB-C with DisplayPort support), you’re golden. Just plug each monitor in and Windows should detect them instantly.
2. Use a Docking Station
Docking stations aren’t just for fancy corporate desks—they’re lifesavers. One USB-C cable to your laptop can power two (or more) external monitors, USB accessories, ethernet, even your coffee machine (okay not that).
Recommended for:
Laptops with only one video output
Clean desk aesthetics
Power users
3. USB Display Adapters
No fancy ports? No problem. USB-to-HDMI adapters (especially USB 3.0 and above) work surprisingly well. They use software drivers to simulate display outputs.
Caveat: Slight lag for high-motion stuff (not ideal for gaming).
4. Daisy-Chaining via DisplayPort MST
This is more niche, but if your monitor and laptop support DisplayPort Multi-Stream Transport (MST), you can chain one monitor to the next—one cable into the laptop, and a daisy-chain to the second monitor.
Step-by-Step: Connecting Two Monitors
Check your laptop’s ports.
Plug in the monitors. Use HDMI, USB-C, or adapters.
Right-click on your desktop > Display settings.
Scroll to ‘Multiple displays.’
Click ‘Detect’ if it doesn’t auto-recognize.
Arrange screens (drag boxes to match physical layout).
Choose if you want to Extend, Duplicate, or use a single display.
Only one monitor works? Try swapping cables or ports.
Monitors flicker or disconnect? Could be a bandwidth issue—try using a powered hub.
Wrong resolution? Update GPU drivers.
Black screen on second monitor? Sometimes it’s set to ‘Show only on 1’ in Display settings. Fix that.
What About Laptops With Only One Port?
You can still join the dual-screen gang:
Docking station (USB-C to HDMI x2)
USB Display Adapter
External GPU (eGPU) for the performance enthusiasts
Best Monitor Arrangement Hacks
Keep primary monitor directly in front of you.
Use vertical alignment if one monitor is smaller.
Match refresh rates and resolutions for smoother visuals.
Label them. Seriously—makes things way easier.
Bonus: Tools to Supercharge Your Multi-Monitor Setup
Once you’re all set, make your workspace even smarter:
SmartPanels – Save and restore window positions across screens.
DisplayFusion – Deep control over monitor layout, wallpapers, and functions.
PowerToys FancyZones – Windows app to split screens with customized zones.
Use Cases That Make You Wonder Why You Didn’t Do This Sooner
Developers: Code on one, preview on another.
Designers: Photoshop on one, assets library on the second.
Traders: One screen for charts, another for order book.
Writers/Students: Research on one screen, draft on the other.
Wrapping It Up (With Cables, Preferably Neatly)
Connecting two monitors to your laptop isn’t just possible—it’s life-changing for your workflow. Whether you’re aiming for Netflix on the side or mastering complex projects, going dual-screen is one of those rare productivity hacks that feels like cheating.
So grab that second screen, and let your laptop breathe a little. You’ve got more room to think now.
Let’s face it: dealing with monitor settings on Windows can sometimes feel like playing digital Jenga. Especially when you just plugged in a second screen and everything went sideways—literally. Windows icons end up on the wrong display, your taskbar disappears, and your mouse starts wandering into the void.
Sound familiar?
If you’re sitting there wondering how to set your primary monitor so that things just work, you’re not alone. And the good news? It’s easier than you might think.
This guide walks you through the how, why, and what-ifs of assigning your main screen—with no fluff, no jargon, and no YouTube rabbit holes.
Why It Even Matters
So what’s the big deal about a “primary monitor” anyway?
Think of your primary monitor like your home base. It’s where:
Your taskbar lives
Desktop icons appear
Apps usually launch by default
Pop-ups, alerts, and new windows tend to show up
If you’re juggling more than one screen and your setup feels “off,” chances are your primary monitor isn’t set right.
Step-by-Step: How to Set Primary Monitor on Windows 10 & 11
Here’s how to make your main screen actually behave like the main screen.
1. Right-click on the Desktop
Simple, but often skipped. Just right-click anywhere on your desktop background and choose “Display settings.”
2. Identify Your Monitors
Click the “Identify” button to see which screen is which. A big number will pop up on each display.
Monitor 1? Monitor 2? This helps you know what you’re working with.
3. Click the Monitor You Want as Primary
Now, in the diagram of your displays, click on the monitor you want to make primary. It will be highlighted.
4. Scroll Down and Check the Box
Scroll down and find the checkbox that says:
“Make this my main display.”
Tick it. If it’s grayed out, that means it’s already your primary.
Boom. Done.
5. Apply and Enjoy
Hit “Apply” and give it a moment. You’ll see your taskbar and icons jump over to your new main screen.
Real Talk: Things That Can Go Wrong
Let’s not pretend it always goes perfectly. Here are a few curveballs and what to do about them.
The Monitor Doesn’t Show Up
Make sure it’s plugged in and powered on. Try hitting Windows + P and selecting “Extend” or “Duplicate” mode to wake it up.
Settings Don’t Stick After Reboot
This can happen if your graphics driver is outdated. Go to Device Manager and update your Display adapters.
You Have a Laptop and an External Monitor
Windows may favor the built-in display. Just manually set the external as primary and hit “Apply.”
Pro Tips for Power Users
Let’s say you’re not just switching for fun. Maybe you’re a coder, a stock trader, a remote worker, or a YouTube multitasker. Here are some bonus moves:
Use SmartPanels to save layouts for different profiles. Work, gaming, writing—one click restores your setup.
Keyboard shortcuts like Windows + Arrow Keys make moving windows easier.
Use DisplayFusion or PowerToys FancyZones for advanced snapping and positioning.
You Might Also Be Wondering…
Can I have more than one primary monitor?
— Not exactly. Only one monitor gets the title. But you can still use others for full productivity.
Why does my taskbar keep disappearing on the second screen?
— Because Windows loves playing hide and seek. Set the taskbar to show on all monitors under “Taskbar settings.”
Do games always open on the primary monitor?
— Usually, yes. But some games remember your last screen.
Real-World Scenarios: When Switching Helps
The Gamer Setup
You’re gaming on one screen and streaming OBS or Discord on the other. But your alerts keep popping up in the wrong place. Setting the primary monitor fixes that fast.
The Work-from-Home Juggler
Emails on the left, spreadsheets on the right, but apps keep launching on the wrong screen? Primary monitor = control.
The Designer or Editor
You need your toolbars and palettes in the right spot—not scattered. Setting your base monitor gives structure to the chaos.
The Family PC
Got a shared desktop? Everyone can have their own layout. Change the primary screen based on who logs in.
SmartPanels: One Click, All Fixed
Changing monitors manually is fine, but doing it every day? Exhausting.
That’s where SmartPanels comes in. You save your setup—apps, window positions, screen preferences—and restore it in one click. Switch between work and play, day and night, lefty or righty setups without redoing everything.
If you tweak your setup regularly or share your machine, SmartPanels saves you from reconfiguring layouts over and over.
Wrap-Up: It’s Your Desk. Make It Work for You.
You wouldn’t settle for a wonky chair. Why put up with a screen setup that fights you?
Learning how to set your primary monitor means fewer frustrations, smoother multitasking, and more control. And if you want to go even further? Pair it with SmartPanels and turn your workspace into a powerhouse.
So go on—give your display the status it deserves.
Let’s be honest: if you’ve ever connected two monitors and found your mouse sliding in the wrong direction, it’s infuriating. You move right, and your cursor flies left. You try to drag a window over, and it disappears into the void. What gives?
This is where the concept of ” Switch Monitor 1″ and “Monitor 2” comes in. It might sound technical, but it’s actually just about how your computer maps your screens. And yes, you can switch them—easily.
So, if you’re stuck in a screen-swapping nightmare, here’s how to make your monitors behave like civilized digital citizens.
First, What Does “Monitor 1” Even Mean?
Before jumping into settings, let’s clear the air. “Monitor 1” isn’t always the left monitor, and it’s not necessarily the one with your taskbar. It’s just the screen Windows labels as your “main display.”
Why does it matter? Because:
Your taskbar and Start menu live there
Most apps and games launch on Monitor 1
Fullscreen videos default to Monitor 1
So if that’s not the screen you’re actually looking at most of the time, we’ve got work to do.
How to Switch Monitor 1 and 2 in Windows Settings
Alright, let’s get to the fix. Here’s the simplest method to switch your primary and secondary screens:
Right-click on your desktop and select Display settings.
You’ll see two boxes labeled 1 and 2.
Click Identify to see which is which.
Select the display you want to make Monitor 1 (your main screen).
Scroll down and check the box “Make this my main display.”
Click Apply.
Boom. You just swapped them.
Still Confused? Here’s a Quick Visual Tip
If the boxes are reversed compared to your actual setup, drag the display boxes left or right until they match your physical monitor layout. It’s like arranging furniture, but digital.
What If the “Make This My Main Display” Option is Grayed Out?
This usually happens when your primary display is disconnected or when Windows thinks both monitors are mirroring each other. Quick fixes:
Uncheck mirror/duplicate mode in Display Settings.
Try unplugging one monitor and setting the other as primary.
Reboot after making changes.
Sometimes, Windows needs a little nudge.
How SmartPanels Makes This Way Easier
Honestly, if you’re doing this often—like switching between work and gaming layouts—you need a smarter solution.
Enter SmartPanels . This handy tool saves your entire monitor setup, including:
SmartPanels vs DisplayFusion: In-Depth Comparison for a Smarter 2025
In 2025, managing multiple windows is no longer just about quantity; it’s about leveraging smart, efficient systems to optimize your workflow. It’s about more possibilities, more efficiency, and more intelligence in how we manage our digital worlds. SmartPanels takes desktop management to the next level with innovative automation, intuitive restoration features, and robust multi-monitor support. Gone are the days of just snapping windows into place or dealing with cumbersome setups. The future is here, and SmartPanels is leading the charge.
Now, let’s talk about DisplayFusion reliable, sure, but in a world where productivity isn’t just about doing more—it’s about doing it smarter—does DisplayFusion still hold up? While it offers foundational window management features like multi-monitor support and customizable hotkeys, these are features we’ve seen before. However, SmartPanels exceeds expectations by recognizing advanced automation and future-proof design, establishing itself as the best tool for the world in 2025 and beyond.
In this blog post, we will delve deeply into the SmartPanels vs DisplayFusion debate, analyzing each distinct features, performance, and benefits. Let’s explore how SmartPanels redefines productivity for 2025, while DisplayFusion is lagging behind due to its reliance on legacy features.
A Quick Overview – SmartPanels vs. DisplayFusion
SmartPanels offers a complete desktop management solution optimized for multi-monitor setups, browser integration, and advanced automation. It’s not just about organizing windows—it’s about transforming how you work. With SmartPanels, you gain access to new features designed to supercharge your productivity in 2025:
No more manually adjusting your workspace. SmartPanels remembers your windows, apps, and browser tabs, restoring them exactly as you left them.
Revolutionize your workflow with advanced text automation, allowing you to trigger text replacements and execute complex calculations with just a keystroke.
Streamline text editing and coding tasks by expanding shortcuts and performing computations in real time, saving you valuable time on repetitive tasks.
Take complete control over your workflow by creating custom hotkeys for common actions. Whether it’s automating multi-step tasks or triggering specific commands, SmartPanels makes it fast and efficient.
With support for up to 6 monitors, SmartPanels offers an intuitive experience that’s perfect for users with complex workflows, ensuring windows and tasks are arranged seamlessly across multiple screens.
DisplayFusion, on the other hand, is primarily a multi-monitor manager offering basic functionality like customizable hotkeys, taskbar extensions, and monitor splitting. While it covers the essentials, it lacks the advanced automation, seamless integration with modern apps, and forward-thinking design that SmartPanels brings to the table.
Feature-by-Feature Breakdown -SmartPanels vs DisplayFusion
Feature
SmartPanels
DisplayFusion
Auto-Arrange Windows
Instantly restores window layouts with one click, saving time in reconfiguring apps.
Lacks automatic restoration of window layouts. Must be manually reconfigured.
Multi-Monitor Support
Supports up to 6 monitors with full workspace restoration, making it ideal for complex workflows.
Offers multi-monitor support, but no automatic restoration of window layouts.
Multi-Profile Switching
Unlimited workspace profiles for different tasks and work environments, offering unparalleled flexibility.
Limited to a smaller number of profiles, making it less adaptable for diverse workflows.
Computational Text Command
Advanced feature that allows custom hotkeys to trigger text replacements or calculations, boosting productivity.
Lacks computational text support and advanced text automation.
Multi-Browser Tab Restoration
Restores tabs across Chrome, Edge, and Firefox, enhancing workflow efficiency.
No support for restoring browser tabs or advanced browser integrations.
Microsoft Office File Recovery
Automatically restores Microsoft Office files (e.g., Word, Excel) and associated windows with one click.
No native support for Office file restoration, requiring manual re-opening.
Custom Hotkeys
Fully customizable hotkeys for automating complex workflows and multi-step tasks across apps.
Customizable hotkeys available, but lacks advanced automation and integration with SmartText or other features.
User Interface
Modern, intuitive interface designed for ease of use and efficiency.
Outdated interface that may feel less fluid, especially for users who prefer a seamless experience.
Why SmartPanels is the Smarter Choice for 2025?
1. Boost Your Productivity with Custom Hotkeys
SmartPanels introduces Custom Hotkeys for a game-changing productivity boost. By mapping specific keystrokes to critical tasks, SmartPanels executes commands with near-zero latency. Whether you’re a content creator, developer, or project manager, Custom Hotkeys streamline repetitive tasks, automating everything from text entry to complex workflows. You can even automate multi-step actions, enhancing throughput while reducing errors.
Instant Command Execution: Execute key actions in real-time, minimizing delays.
Advanced SmartText Integration: Automate dynamic, context-sensitive text replacements.
Total Hotkey Flexibility: Tailor hotkeys to suit personal or team-specific needs across applications.
These hotkeys revolutionize how users manage their daily tasks, from writers automating text formatting to engineers compiling projects faster than ever.
2. Instant Profile Sharing for Seamless Collaboration
Another standout feature of SmartPanels is Instant Profile Sharing. You can share your personalized workspace in a few clicks, whether you’re working solo or collaborating with a team. Profiles are synced in real-time, ensuring smooth collaboration and eliminating version mismatches. What’s more, these profiles are compatible across multiple devices, so you can take your optimized workspace anywhere, whether on desktop, laptop, or mobile.
Seamless Cross-Platform Compatibility: Sync your SmartPanels profile across all your devices for a unified experience.
Granular Profile Management: Share specific settings, tools, or files without compromising privacy.
This feature ensures that users and teams alike can maintain a consistent workflow across multiple platforms, improving both productivity and collaboration.
3. SmartText App: Revolutionizing Text Processing
SmartPanels also integrates with the SmartText App, which takes text processing to the next level. It allows you to bind custom shortcuts for common text entries, formulas, and phrases, streamlining workflows that involve repetitive text entry. Plus, with Computational Text Commands, you can automate complex calculations or text replacements with a single keystroke.
Custom Text Expansion: Speed up data entry and content creation with personalized shortcuts.
Hotkey Automation: Trigger multi-step tasks with hotkeys to save time and avoid errors.
For professionals who constantly enter data or generate reports, SmartText eliminates the manual overhead, boosting efficiency.
4. Scene Restoration for Effortless Workflow Management
One of the key features that set SmartPanels apart is Scene Restoration. This feature allows you to save entire workspace layouts, including window sizes, positions, and browser tabs. Whether you’re switching between tasks or resuming a project, SmartPanels brings back everything exactly where you left off.
Designers can reopen their graphic design tools with all layers and windows in place.
Professionals in any industry can seamlessly pick up where they left off.
While DisplayFusion focuses on window snapping and basic organization, SmartPanels takes it a step further by offering full scene restoration that ensures your workspace is fully restored to exactly how you left it, without any manual adjustments.
5. Future-Ready Design: Scalability and Adaptability
SmartPanels is built with the future in mind, featuring a scalable and adaptable design that supports everything from small home offices to large-scale enterprise environments. With support for up to 6 monitors, seamless integration with Windows 11, and the ability to adapt to new features as they emerge, SmartPanels ensures that users are always ahead of the curve.
Scalability: Whether you’re working with a single monitor or a six-monitor setup, SmartPanels grows with you.
Cross-Platform Potential: Although currently optimized for Windows, future updates could expand SmartPanels to other platforms, making it even more versatile.
SmartPanels
Restore Browser Tabs with SmartPanels. It maintains an active tab history and restores browser size as well as display position on one screen or many.
Conclusion:
SmartPanels represents the next generation of window management. Its innovative features, such as Custom Hotkeys, Scene Restoration, SmartText, and Instant Profile Sharing, make it a powerful tool that can supercharge productivity across industries. While DisplayFusion offers basic multi-monitor support, it lacks the smart automation, comprehensive app integrations, and forward-looking design that SmartPanels provides.
The difference is clear: SmartPanels is designed for a smarter, more efficient 2025—with automation, customization, and advanced integrations that make it the perfect choice for professionals looking to optimize their workflows.
Don’t let outdated systems hold you back—transform your workflow with cutting-edge automation and multi-monitor support.
For a more efficient, smarter 2025, SmartPanels is the clear choice. Take control of your workspace today with SmartPanels and experience productivity like never before.
So, here is the the all information you’re looking for about SmartPanels vs DisplayFusion.
As modern professionals juggle multiple projects, deadlines, and communications, keeping your digital workspace organized and efficient is more important than ever. With an increasing number of browser tabs, applications, and windows to manage, it’s easy for your workflow to become fragmented and chaotic—leading to wasted time and reduced productivity.
SmartPanels offers a sophisticated solution to this issue by enabling seamless management of multiple web browsers, applications, and windows. This all-in-one multi web browsing tool allows you to restore, organize, and arrange your workspace with just a few clicks, eliminating the stress of constantly switching between open tabs and programs. Whether you’re handling large-scale projects or daily tasks, SmartPanels ensures that your digital environment remains efficient, streamlined, and fully optimized for productivity.
In this article, we’ll explore how SmartPanels works as a powerful multi web browsing tool, its core features, and how it leverages IoT integration to enhance your overall productivity.
How SmartPanels Transforms Your Digital Workspace
At its core, SmartPanels acts as a tool that simplifies the way you manage your windows, apps, and browser tabs. By offering an organized, customizable, and efficient workspace, it eliminates the clutter of having too many browser windows open, multiple tabs to switch between, and the frustration of manually arranging everything.
It’s designed to provide an intuitive user experience for professionals, remote workers, and even casual users. Whether you’re working on a single monitor or multiple screens, SmartPanels adapts to your needs, ensuring your work is always accessible, organized, and efficient.
Key Features of SmartPanels as a Multi Web Browsing Tool
Auto-Arrange and Organize Your Windows:
A fundamental feature of SmartPanels is its ability to auto-arrange browser windows and apps. When you have multiple tabs open across different browsers, SmartPanels can quickly position and resize them on your screen or across multiple displays. No more manual resizing or shuffling through open windows—SmartPanels keeps everything organized and within easy reach.
Seamless Multi-Monitor Support:
Whether you’re working on a dual-monitor setup or even three or more displays, SmartPanels provides advanced multi-monitor support that boosts productivity. You can organize your workspace in a way that makes sense for your workflow, whether you’re handling data, content creation, or communication. Switch between monitors effortlessly and let SmartPanels remember your preferred layout and sessions for each screen.
Restore Your Multi-Web Sessions Instantly:
One of the most powerful features of SmartPanels as a multi web browsing tool is its ability to restore browser sessions. Imagine working on a project with several browser windows and tabs open, each containing valuable information. With SmartPanels , you can save these sessions and restore them with a single click. No more manually opening tabs or looking for that important document or webpage you had open hours ago. SmartPanels brings your entire browsing session back exactly how you left it.
Customizable Profiles for Different Workflows:
With SmartPanels, you can create customizable profiles tailored to different work environments or tasks. This means you can have separate work, entertainment, and personal profiles, each with its own set of open browser tabs, apps, and display settings. Whether you need to switch between work-related sessions or take a break to browse social media, it keeps everything organized and efficient. The ability to quickly toggle between profiles enhances productivity and reduces distractions.
Device Integration:
Task and Window Grouping Another notable feature is the ability to group and categorize windows and tabs. For instance, if you’re working on a project, SmartPanels can automatically group all related apps and browser tabs into a single cluster, making it easier to manage multiple tasks. Switching between work-related tasks or personal sessions is just a click away, and your workspace remains organized with minimal effort.
Synchronization Across Devices:
SmartPanels isn’t limited to just one computer. It also allows you to sync your workspace across multiple devices. Whether you’re switching from your desktop to a laptop, or using multiple screens throughout the day, SmartPanels ensures that your profiles, settings, and browser sessions are consistently maintained. This cross-device functionality makes it easy to work from anywhere while maintaining a consistent and organized environment.
Advanced Browser Management:
For power users, SmartPanels provides advanced browser management tools. You can create custom layouts that group multiple browser windows together, and when you switch between tasks, these layouts are restored automatically. This is especially useful for users who need to access several websites at once, such as digital marketers, developers, or content creators, without the chaos of having to manage countless browser tabs.
SmartPanels as the Ultimate Multi-Web Browsing Tool for Professionals
The true power of SmartPanels shines in its ability to optimize work across multiple platforms and environments. Professionals in a variety of fields can use it to organize their daily tasks and workflows with ease. Here are a few ways SmartPanels benefits specific professions:
Programmers and Developers: For those who need to switch between multiple coding platforms, documentation, and testing environments, SmartPanels offers a seamless way to organize and restore these sessions instantly. Keep your code editor, browser, and console open on separate screens, or group them into profiles for quick access.
Digital Marketers: Manage multiple ad campaigns, analyze website traffic, and monitor social media across different platforms—SmartPanels lets you create specific profiles for each task, keeping everything organized and easy to navigate.
Content Creators and Designers: Whether you’re working with multiple graphic design tools, writing content, or researching information for your next project, SmartPanels helps organize your digital workspace by grouping related windows and keeping your browser sessions restored.
Remote Workers and Teams: SmartPanels boosts team collaboration by enabling each team member to maintain separate profiles for different projects. This makes it easier to switch between tasks and monitor multiple projects at once.
Troubleshooting Tips:
Browsers are the gateway to the vast world of the internet. If you are facing any concern while using these multi web browsing tools, below are some tips to overcome such issues.
Browser Tabs Not Restoring Correctly
Check Session Settings: Ensure your browser session or profile is set to save tabs. SmartPanels relies on session data to restore your workspace.
Update Your Browser: Outdated browser versions may not support the restoration process fully
Verify Permissions: Confirm SmartPanels has the necessary permissions to access and restore browser tabs.
Performance Issues or Lag
Close Unnecessary Applications: Running too many applications can drain system resources, causing lag.
Adjust Browser Settings:
Limit extensions: or disable resource-heavy plugins.
Check Hardware Limitations: Ensure your system meets the recommended specifications for multi-web browsing.
Display Configuration Problems
Ensure Correct Monitor Setup: Verify that your monitors are properly connected and detected by your system.
Set Default Display Profiles: Use SmartPanels to save specific display layouts for quick restoration.
Update Graphics Drivers: Outdated drivers can cause display issues or inconsistent positioning.
Issues with Multi-Browser Support
Check Compatibility: Ensure SmartPanels supports the browsers you are using. It works best with mainstream browsers like Chrome, Edge, or Firefox.
Log Into Profiles: For workspaces tied to browser profiles, ensure you are logged into the correct account before restoring.
5. Unexpected Crashes
Clear Cache and Cookies: Overloaded browser caches can lead to crashes.
Reinstall the Tool: If the issue persists, reinstall SmartPanels or the browser to ensure a clean setup.
Monitor System Health: Check for hardware issues or malware that could interfere with system stability
SmartPanels
Restore Browser Tabs with SmartPanels. It maintains an active tab history and restores browser size as well as display position on one screen or many.
Wrapping Up!
In conclusion, when talking about the best multi web browsing tool, SmartPanels will streamline browsing experience while increasing productivity. It makes sure that your workspace is organized and optimized by restoring tabs across multiple browsers, managing multi-monitor setups and maintaining separate profiles for different tasks.
SmartPanels brings you everything into one connected ecosystem, improving efficiency, and dedication. It is one of the ultimate tools for those who want to work on multi web browsers. Google Chrome, Mozilla Firefox and Microsoft are the main multi web browsing tools we are using for SmartPanels. So, if you are looking to make your work smarter and more efficient download our app to access unique browser from just one application!
It is not uncommon to come across a folder with the name “AppData” on your PC and be left to wonder at its contents. In fact, most Windows users tend to give that hidden folder a wide berth, but it is doing some important work in the background. The AppData folder is where all the settings are kept ensuring your applications run without a hitch; your browser bookmarks and game files you have put in are just some of the preferences it has stashed away for you in one spot. Learning how to access the AppData folder brings real benefits.
To start with, we will set out what the folder is and the way Windows maps it. From there we demonstrate a few expeditious means of opening it under Windows 10 or 11. We also get into the nitty gritty of modern trends and safe cleanup, as well as how SmartPanels might figure into your routine.
What Is the AppData Folder?
Every Windows user account contains an AppData folder (for Application Data). Think of it as a kind of private storeroom for your programs. The apps put their settings, caches, profiles, and the like in there, along with any temporary files. That is how your software can recall your preferences when you go to use it.
So, what is AppData folder activity about behind the scenes? Per-user data is kept apart and in order. On a PC that is shared, every account has its own copy of the files so that your settings remain just yours.
Windows will have the folder hidden as a matter of course; there is a sound reason for it, to stop any unintended alterations to the kind of files your applications rely on. That does not mean you cannot get at it, however. Should you need to make a backup or do some troubleshooting, the option is there.
Local, LocalLow, and Roaming Explained
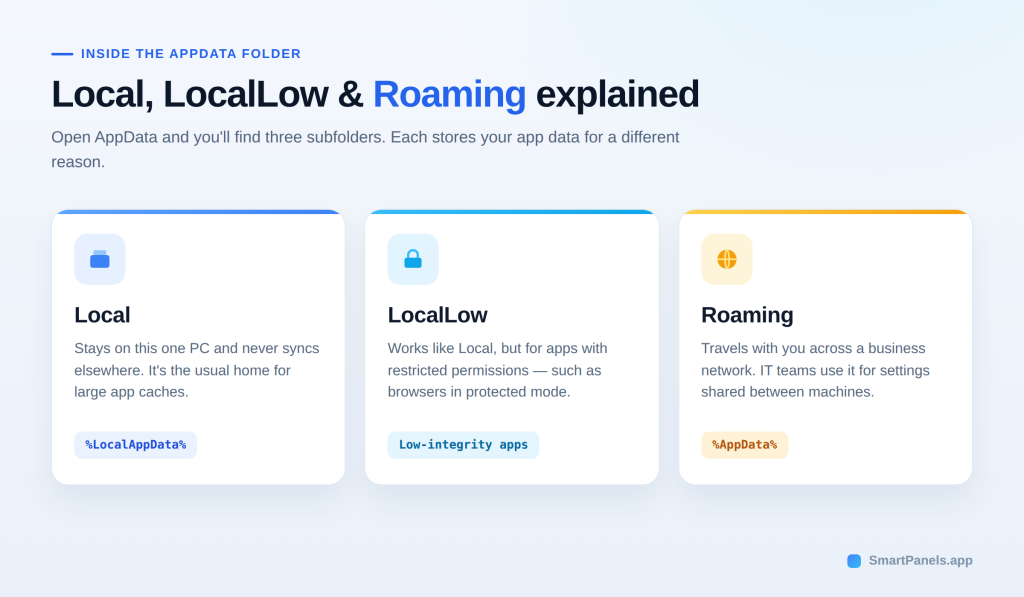
Inside, you will find three subfolders. Here is a quick breakdown:
Data in the Local folder is confined to a single PC and will not be synced to other devices; it is a common spot for apps to put their sizeable caches.
Then there is LocalLow, which is much the same as Local in operation but is for applications with restricted security permissions, such as certain browsers running in a protected mode.
Roaming is where you will find data designed to travel with you on a business network, so IT departments tend to use it for shared settings on the accounts they manage.
How Windows Maps AppData Behind the Scenes
To find these folders, Windows makes use of environment variables. You can think of a variable as a shorthand for the full path; %AppData% is the one for the Roaming folder and %LocalAppData% for the Local.
Underneath are what are known as official markers or “known folders,” which developers put in place to ensure their software will navigate to the proper directory on any machine. The upshot is that even an account rename will not cause an app to fail.
It is also the reason for a frequent point of confusion: running %AppData% will take you to Roaming rather than the root. If one wants to see for oneself, it only takes a few seconds. Fire up a Command Prompt and enter “echo %AppData%”, and Windows will display the precise Roaming location. Do the same with `echo %LocalAppData%`, and the Local path comes up. Such a quick verification is useful when a reference gives nothing more than the variable.
How to Access the AppData Folder Quickly
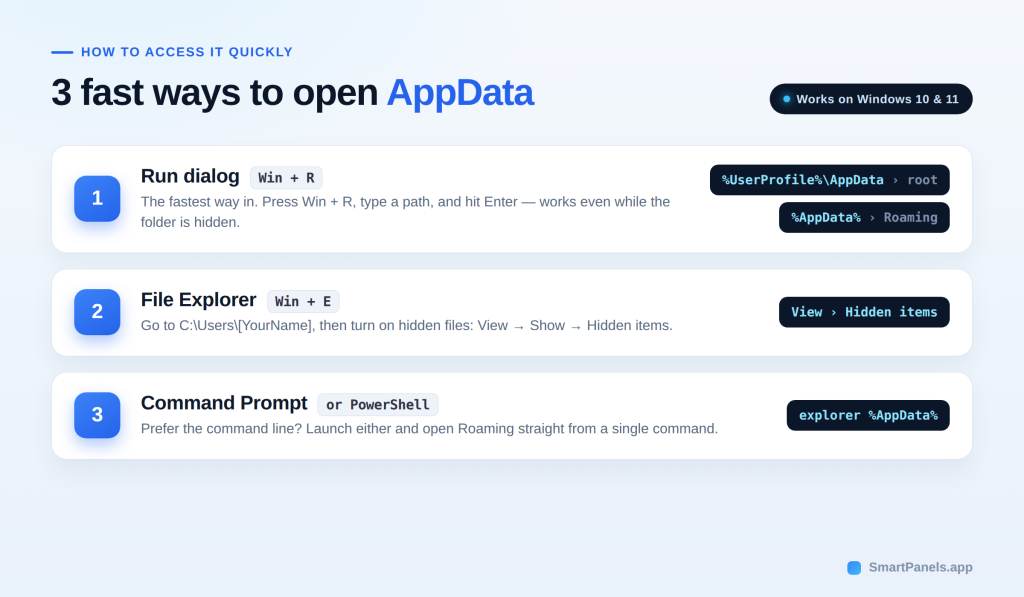
Now for the practical part. These steps show you how to access the AppData folder on any PC. Below, we cover the fastest options first. Each method works on both Windows 10 and 11.
Method 1: Use the Run Dialog
For the fastest way in, use the Run box. Hold down the Windows key and hit R, enter a command of your choosing, and you can press Enter. To get to the top level, put in %UserProfile%\AppData; that will bring up the main folder and its three subfolders. If one wants to go directly to Roaming, %AppData% does the job, as does %LocalAppData% for the Local folder.
There is a point to be made about the %AppData% entry: it takes you to Roaming rather than the root. Should you need to step up a level, a click on “AppData” in the address bar will do it. The nice thing is this works regardless of the folder being hidden.
Method 2: Show Hidden Files in File Explorer
For those who would rather do a manual search, you can use File Explorer to get to the AppData files. Start by hitting Windows and E to bring up a window and make your way to C:\Users\[YourUsername]. You will have to unhide some items depending on which version is in use.
If running Windows 11, select Hidden items from the Show option under View. With Windows 10, it is a matter of going to the View tab and putting a check in the box for Hidden items. The folder will then be visible in the user directory, albeit with a fainter look. A double click is all it takes to see what is inside.
Method 3: Use the Address Bar, Command Prompt, or PowerShell
If File Explorer is up and running, one can simply click on the address bar and put in %UserProfile%\AppData before hitting Enter. The bar will take %AppData% or %LocalAppData% as well.
For those who prefer the Command Prompt, there is an alternative: open it and enter explorer %AppData% to have the Roaming folder appear. PowerShell will handle the command in much the same way. Windows has no shortage of ways to accommodate how you like to work.
Where Microsoft Store Apps Hide Their Data
Data is not stored in a uniform fashion by all applications. Take the modern offerings from the Microsoft Store, for instance; they are built on an MSIX format and operate within a light container to enhance security. Windows will divert any AppData writes from such an app to a private spot, which one can locate in the Packages subfolder of Local (C:\Users\[YourUsername]\AppData\Local\Packages). There, every app has a folder bearing its package family name.
Within that you will see a LocalCache containing the Roaming and Local data that has been redirected. The point of this setup is to ensure isolation so that an app has no access to the files of another. It also means uninstalling a Store app is a tidy process, with Windows erasing the folder in question. Should you need to track down a particular package, a quick Get-AppxPackage command in PowerShell will give you the package family names.
The same principle applies to the registry. A packaged app is given its own virtual view of it, meaning its activity seldom affects the system at large. This approach minimizes clutter and conflict when the time comes to remove the software. In the end, these newer apps are much better at cleaning up after themselves.
Why Managing the AppData Folder Matters
Opening the folder is only half the story. Knowing how to access the AppData folder is a great start, yet managing it well matters more. A well-run system is a matter of good management, one that safeguards your storage and data alike. You will find that applications have a way of accumulating caches and logs in this folder over time, and before long it can become quite sizable. There are programs that will unobtrusively put down several gigabytes of detritus. While a routine check is necessary to ensure the system runs without a hitch, it is not just about cleaning house; how you handle things with care is of equal import.
Back Up Your App Data Safely
Should your PC give out, a backup is what will safeguard your settings. There is no need to make a copy of the whole system; concentrate instead on the folders that matter. Browser profiles, game saves, and the like are good candidates for this.
To do it, open the folder in question by one of the means described above and copy over the subfolders you want. From there, put them on an external hard drive or in the cloud. It would be wise to put a reminder in your calendar to do so every few weeks or so; that way you can be sure of having an up-to-date version at hand.
Clean Up Without Breaking Things
There is value in a good cleanup, but it is the exercise of caution that will keep your applications in good standing. Do not go about deleting the whole of the AppData folder; both Windows and the software you run have a need for it. The better course of action is to let the Disk Cleanup utility do its work on any temporary files that are safe to discard, or to clear out what is in the Temp folder under Local. You might also want to get rid of any folders left behind by programs you have uninstalled.
Move Bloated Folders the Safe Way
It is not uncommon for one cache folder to bloat to several gigabytes. An advanced user might elect to relocate it to a different drive to keep the apps running as they should. The way to do it is with a junction, a sort of special link from one folder to another. Start by copying the folder in question over to your other drive. Next, put in place a junction via the mklink /J command that Windows provides; this will let the application continue to reference the old path. But be sure to make a backup and take your time. And under no circumstances should you try to move the entire folder in this manner, as Windows has a need for it.
Where SmartPanels Fits into Your Workspace
Think of it this way: the AppData folder and SmartPanels are at odds with one another in their function. The former is where Windows 11 keeps your app’s insides—settings, caches, and tokens. For those who have upgraded from Windows 10, you will find the new AppData folder in its usual place.
SmartPanels is concerned with the arrangement of things. It is what puts your browser tabs and window positions back in order, restoring them in a matter of seconds and one click. If you are working on multiple screens, the software can accommodate as many as six displays. There is also support for hotkeys to get to a workspace without delay, and should you wish to pass a profile along to a colleague over email, that is an option as well.
In short, let AppData look after the data while SmartPanels takes care of your workflow. Tired of having to put your desktop back together each morning? Put in for a free trial over at SmartPanels.app and have your workspace up and running right away.
Final Thoughts
Managing your files does not have to feel confusing. Once you know how to access the AppData folder, you gain real control over your Windows experience.
Consider an upgrade to be the right time for a bit of housekeeping. Clear out the old caches to free up space and back up your important settings. You should be cautious with the folder, though, as the apps depend on it. In most cases you will want to back up subfolders individually rather than the whole directory.
Organization is another thing to attend to. While AppData is concerned with app settings, SmartPanels gives you a view of the larger workspace layout that the other cannot. It can put your monitors, tabs, and windows where they belong in seconds, sparing you the chore of putting everything in order every day.
For those who prefer to work smarter, there is a 14-day trial available at no charge from SmartPanels. A good way to get a firm grip on both your data and your desktop. 2
We use cookies on our website to provide you with a better experience, improve performance, personalize ads, and analyze our traffic. We may share your information with our analytics, social media, and advertising partners to provide tailored adverts. By using our website, you agree to the use of cookies. Privacy Policy
This website uses cookies to improve your experience while you navigate through the website. Out of these, the cookies that are categorized as necessary are stored on your browser as they are essential for the working of basic functionalities of the website. We also use third-party cookies that help us analyze and understand how you use this website. These cookies will be stored in your browser only with your consent. You also have the option to opt-out of these cookies. But opting out of some of these cookies may affect your browsing experience.
Necessary cookies are absolutely essential for the website to function properly. This category only includes cookies that ensures basic functionalities and security features of the website. These cookies do not store any personal information.
Any cookies that may not be particularly necessary for the website to function and is used specifically to collect user personal data via analytics, ads, other embedded contents are termed as non-necessary cookies. It is mandatory to procure user consent prior to running these cookies on your website.