What is Microsoft Windows Desktop Runtime? The Complete Guide

Microsoft Windows Desktop Runtime

As a Windows user, you might have encountered a program called Microsoft Windows Desktop Runtime in the Programs and Features tab in your Control Panel. Most users don’t know what this program does and are confused about whether to keep it or remove it.

Realizing this, we have written a guide that explains what Microsoft Windows Desktop is and all the details you need to know about it.

What is the Microsoft Windows Desktop Runtime?

Have you heard of the Microsoft.NET Framework? It is a.NET library that contains shared codes for developers. These codes allow them to build functions without ever needing to write a code from scratch. Also, any program that is written in.NET needs to have.NET runtime installed.

Known as a redistributable package or end-user runtime in earlier versions, Microsoft Desktop Runtime is a feature that helps you run existing desktop applications built on the .NET framework. It lets a computer program interact with the computing resources it needs to work properly.

Also, whenever you start your application on your PC, runtime also works. Thus, when a program is running on your PC, it is the runtime for that program. The.NET core builds command-line applications, websites, and other services.

Which Microsoft Windows Desktop Runtime version should you download?

The most confusing aspect for users is figuring out which version of .NET they need. If you need an older version, you can get .NET 6.0. If you want the latest version, you can get .NET 8.0.

Moreover, .NET Desktop Runtime shouldn’t be confused with .NET Framework, which comes pre-installed with Windows. The runtime includes .NET runtime but doesn’t include ASP.NET Core Runtime installed separately.

How do I check which Microsoft Windows Desktop Runtime version is installed?

You can check the version of the Microsoft Windows Desktop Runtime running on your device in the following ways.

If you want to check the Desktop Runtime Version, open the command prompt and type the following command.

dotnet --list-runtimes

If you want to check both the SDK and the runtime versions, you can do so with the command dotnet--info. You can also get environmental-related information such as operating system version and runtime identifier.

How can you uninstall the Windows Desktop Runtime?

If you don’t see the point of installing Windows Desktop Runtime on your computer and want to uninstall it, you can do this via the Windows Control Panel.

  • Open the Control Panel from the start menu
  • Go to Programs and Features
  • Select the version you want to uninstall by right-clicking on the version and selecting “Uninstall”
  • Afterwards, reboot your PC, and the uninstallation process will be complete

SmartPanels

Restore Browser Tabs with SmartPanels. It maintains an active tab history and restores browser size as well as display position on one screen or many.

Conclusion

There you have it. This is how you can check the version of your Microsoft Desktop Runtime in three different ways. Microsoft Desktop Runtime is an important program, and should you wish to uninstall it, do it only if you know what you are doing. If you don’t know, then uninstalling it would cause some of your apps and programs to not function properly.

Why does your PC boot into BIOS instead of Windows

It does not take much for a routine morning to become trying. One moment you are at the power button, anticipating your desktop to appear, the next you are faced with a stark firmware screen. If that is the case, know that you are in good company; plenty of Windows users have been there. When your PC boots into BIOS instead of Windows, the computer is warning you.  

What has happened is the firmware has run its self-test but failed to make the transition to a bootloader. In some instances, it is something as minor as a SATA cable out of place, in others it is a sign of a drive on its last legs or boot records that have been compromised. But for the most part the solution is not hard to come by.  

We have put in our time troubleshooting these kinds of startup problems with Windows and the culprits tend to be the same ones repeatedly. This blog is meant to cut through any guesswork and set out how to remedy the situation in a straightforward manner, including the specific commands and settings that are of consequence. 

What it means when your PC boots into BIOS instead of Windows 

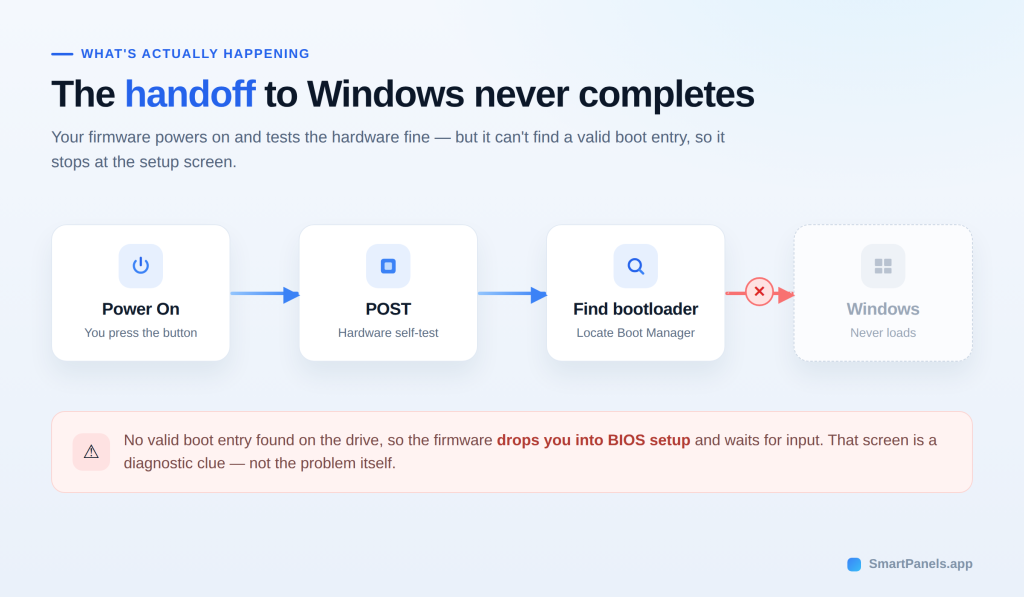
When you switch on a computer, the BIOS is the initial firmware to come to life. These days one will find UEFI on most contemporary systems, but it serves the same purpose. The job of this firmware is to carry out the power on self-test and get the hardware initialized before it can seek out a bootloader.  

Under normal circumstances a system will have no trouble launching the Windows Boot Manager and ceding control to Windows. However, when your PC boots into BIOS instead of Windows, that final handoff fails. What we are seeing here is that the firmware has been unable to locate a proper boot entry on the drive.  

So, it halts at the setup screen and puts in for some input. So, if your computer keeps booting to bios, treat it as a diagnostic clue. Something broke the chain between the firmware and your operating system. 

Common reasons your PC boots into BIOS instead of Windows 

Several distinct faults can trigger this behavior. Below are the most common ones we see in the field. 

  • Wrong device in the boot priority list 

At startup the firmware will run through a prescribed sequence of devices; what is known as the bios boot order. Should an empty slot or a USB stick be given priority, it is not uncommon for the system to revert to setup. For that reason, one would want the Windows Boot Manager to remain at the top of the list. 

  • Your drive is not detected 

Sometimes the pc goes to bios instead of windows because the drive vanished from the list. There are other culprits as well. A poor connection on the M.2 or SATA can be the cause, as can an incorrect storage mode like VMD or RAID in place of AHCI. When that happens, the disk with Windows on it is invisible to the recovery tools and the firmware. 

  • Recent hardware changes 

Any chance you have put in a new GPU, some extra memory or a second drive of late? Adding fresh hardware can alter the way the firmware enumerates devices on boot and cause an entry to move or vanish. Put the part back and run a test to be sure. 

  • A dead or loose CMOS battery 

Then there is the matter of the CR2032 battery that maintains the clock and your settings. Once it gives out, the system will revert to factory defaults with each restart. The storage mode and boot order are reset, and you find yourself in setup again. 

  • A stuck boot menu key 

Manufacturers assign a key like F2, Del, Esc or F12 to get into setup. But if the key is uncooperative the firmware will interpret it as a call for the BIOS. A bit of dust or debris from a spill under the key is often enough to do that. 

  • Fast Startup and hybrid shutdown conflicts 

There is the matter of Fast Startup, which caches a partial system state in hiberfil.sys to speed up the boot process. The problem is that such a hybrid state is prone to conflict with certain drivers or firmware and can bring startup to a halt. One way to sidestep this is to turn it off and have the machine do a proper cold boot. 

  • Corrupted or missing boot files 

Then there is the BCD, or Boot Configuration Data, which Windows relies on. In the case of UEFI systems, this is found on the EFI System Partition. Should an update go awry, or the system be forced to shut down, the BCD can become corrupted, resulting in errors such as 0xc000000f or 0xc0000098 and sending you back to setup. 

  • An outdated or failed BIOS or storage mode mismatch 

Firmware can be another source of trouble. An older version might not be compatible with an NVMe drive or the CPU at hand, while a flash that is left unfinished will render the firmware unstable. A UEFI drive configured for Legacy or CSM mode will simply not boot. Make sure Secure Boot and the GPT partition scheme are in line with the installation. 

How to fix pc booting to bios 

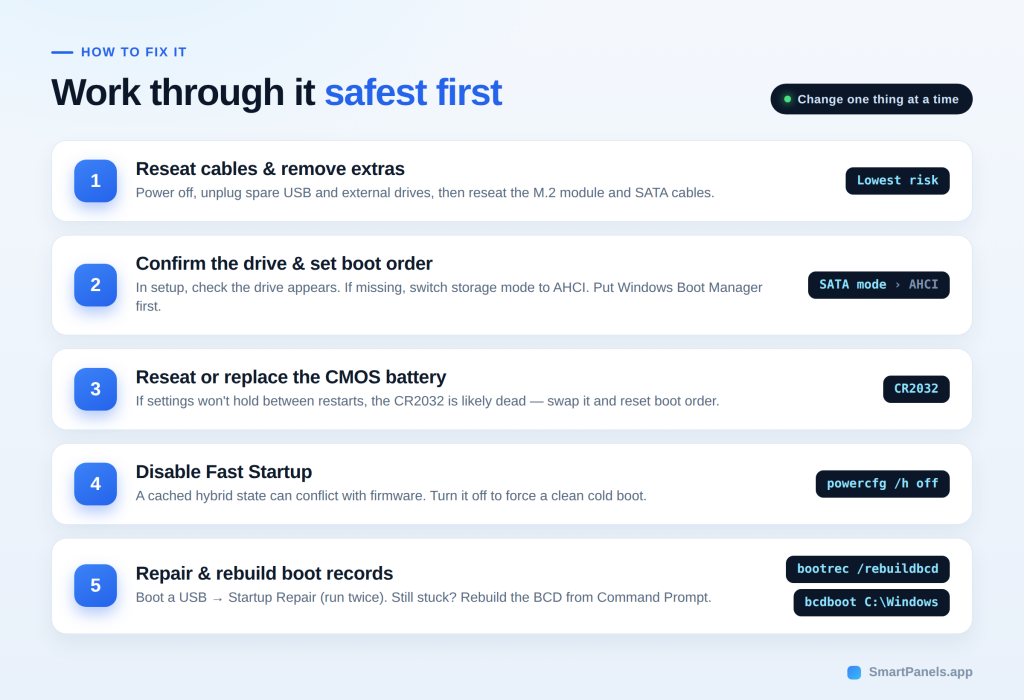
Now that you know the causes, work through the fixes below. Try them in order, since the early steps carry the least risk. 

1. Reseat cables and remove extra devices 

To begin, power down the computer and disconnect it from the wall outlet. Take this opportunity to unplug any external disks or spare USB drives as well. Once that is done, reseat the M.2 module and its screw, along with the SATA data and power cables. Go ahead and turn the machine on to see if Windows comes up without issue. 

2. Confirm the drive and set the boot order 

Proceed to open the setup and verify the drive is listed in storage. Should you not find it there, change the SATA mode over to AHCI and look again. Put the Windows Boot Manager at the head of the priority list, save your work and restart. 

3. Reseat or replace the CMOS battery 

In the event the settings are not holding, have a look at the CR2032 battery. After reseating it, restart and get back into setup. You will need to reset the boot order and SATA mode since the defaults may have been altered. If the problem of the settings resetting persists, the battery should be replaced. 

4. Disable Fast Startup 

In the Control Panel of Windows, go to Power Options and disable Fast Startup in the power button settings. One can also do this by way of an elevated prompt with the command powercfg /h off. After a restart, put the boot to the test. 

5. Run Startup Repair from WinRE 

Should Windows refuse to load, it is necessary to make a bootable USB from a different machine. Boot off that drive and select Repair your computer. From there, head into Troubleshoot and run the Startup Repair. It is best to let it run two times over, as a single pass may not be enough to complete the job. 

6. Rebuild the boot records 

When Startup Repair fails, open Command Prompt in the recovery menu. Advanced users can rebuild the boot data with these commands: 

  • bootrec /fixmbr 
  • bootrec /fixboot 
  • bootrec /scanos 
  • bootrec /rebuildbcd 

On UEFI systems, recreate the store with bcdboot C:\Windows. Also run chkdsk /f and sfc /scannow to catch file damage. If you feel unsure, stop and get help. 

7. Update the BIOS or load defaults 

The last step is to get the proper firmware off your maker’s website and put it on a FAT32 USB for flashing; be sure not to break the power connection in the process. One might also opt for Load Optimized Defaults as a way of wiping out any poor settings. Do check that Secure Boot and UEFI mode are in line with your install. 

When to call a professional 

For the most part, the remedies outlined here are straightforward and harmless. Yet they can sometimes mask a more serious problem like a drive on its last legs. Should the SMART data turn up errors or the flash seem like a risk, it is best to hold off. A qualified technician will have the means to do a more thorough test of the drive than is possible at home and can safeguard your data from an expensive error. 

Get back to your setup faster with SmartPanels 

A PC that boots into BIOS instead of Windows interrupts your whole day. And then there is the matter of time spent putting your workspace back together once the fix is in place. SmartPanels is designed to handle that. A single click will have it reconstitute your window layouts as soon as Windows has finished loading. It puts your browser tabs and screen positions right where they should be, whether you are using a single monitor or several. In short, when the system has booted up properly, you can be at work again in a matter of seconds. 

Final thoughts 

Fixing a PC that boots into BIOS instead of Windows rarely needs an expert. The trouble is usually to be found in a loose cable, an incorrect boot order or a CMOS battery that has run its course. The best approach is to begin with the straightforward hardware checks before you get into firmware and boot record remedies. Be patient about it; alter one thing at a time to know for certain what did the trick. 

When the system is finally booting without issue, the aim is to be up and running in no time. SmartPanels is of help there. With a click it will put your browser tabs and window layouts back where they were, sparing you the chore of doing it by hand. A clean boot should put you right back in a workspace you are accustomed to. If the idea of not having to set things up from scratch on every start up appeals, give SmartPanels a try. Download it and have your workspace reassembled in a matter of minutes. 

Frequently asked questions 

Why does my pc boot into bios every time I start it? 

In most cases, you are looking at firmware that is unable to locate a proper boot entry. The cause is typically an incorrect boot order, a cable that has come loose, or the storage mode having been reset. Start by making sure the drive is present in setup and put the boot priority right. 

Can a dead CMOS battery cause boot problems? 

Then there is the matter of a flat CR2032 battery. When it is no good, the firmware will revert to its defaults on every restart, which can have the effect of changing the SATA mode and boot order until it is stuck in setup. A new battery will normally take care of that. 

Is it safe to update my BIOS myself? 

As for flashing, it is perfectly safe so long as one adheres to the manufacturer’s instructions. But should the process be interrupted, the firmware becomes useless. It is best to have a steady power supply and consult with a technician if any doubt arises. 

What do boot errors like 0xc000000f mean? 

Should these codes appear, it is because the Boot Configuration Data is either gone or corrupt; the Windows Boot Manager simply cannot access its store. Running Startup Repair or a bootrec /rebuildbcd will do the trick. 

How do I know if my drive is failing? 

Do run a free utility to check the SMART status of the drive. Be on the lookout for anything amiss in setup, unusual sounds or crashes. If the diagnostics turn up read errors or bad sectors, the drive needs to be replaced. 

How to Resolve Screenshots Not Saving in Windows 11?

Resolve Screenshots Not Saving in Windows 11

Does your work require you to take a lot of screenshots? If yes, then you might have faced the issue of your screenshots not saving at your desired location. This can happen due to a few reasons, most commonly a change of destination folder.

But sometimes, it can be a bit more serious than that, and you might have to dig into the Windows registry settings to set it right.

In this blog post, we will look into the reasons why your screenshots are not saving into the default Pictures folder and how you can fix that issue with a few simple fixes.

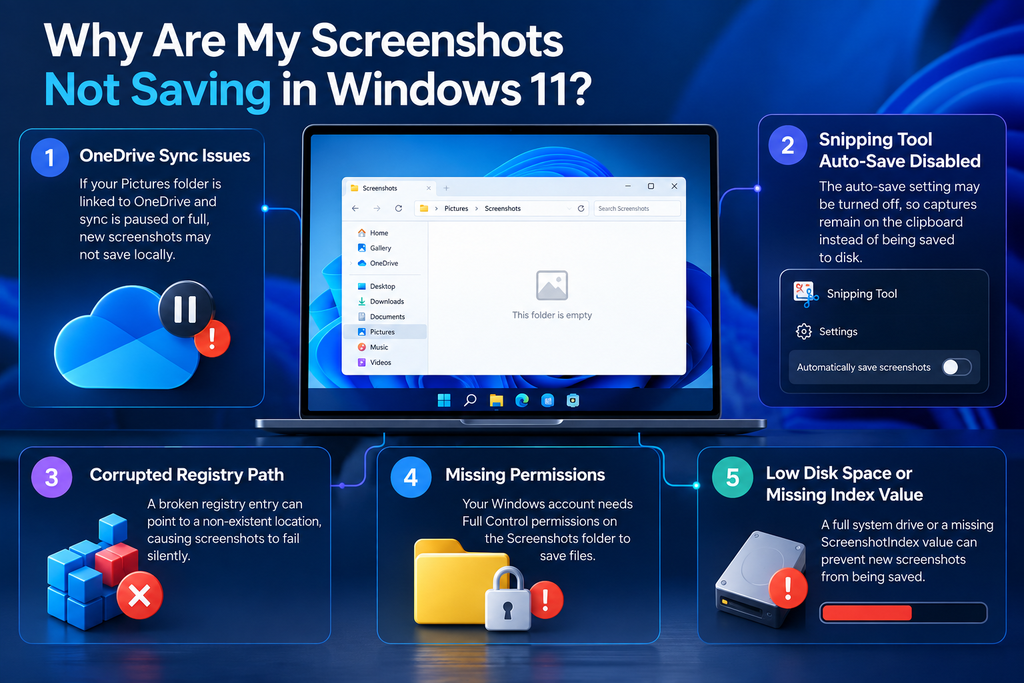
Why are my screenshots not saving in Windows 11?

A simple reason why your screenshots are not being saved in the Pictures folder is that your default folder has been changed. You can check where your screenshots are saved by right-clicking on the image and clicking on the Properties option.

But if your images are still not saving in your desired folder, then it might be that your registry files are corrupted. But if you go about fixing it without knowing what you are doing, then you can do more harm than good and might disturb other registry settings.

How can I save my screenshots in Windows 11?

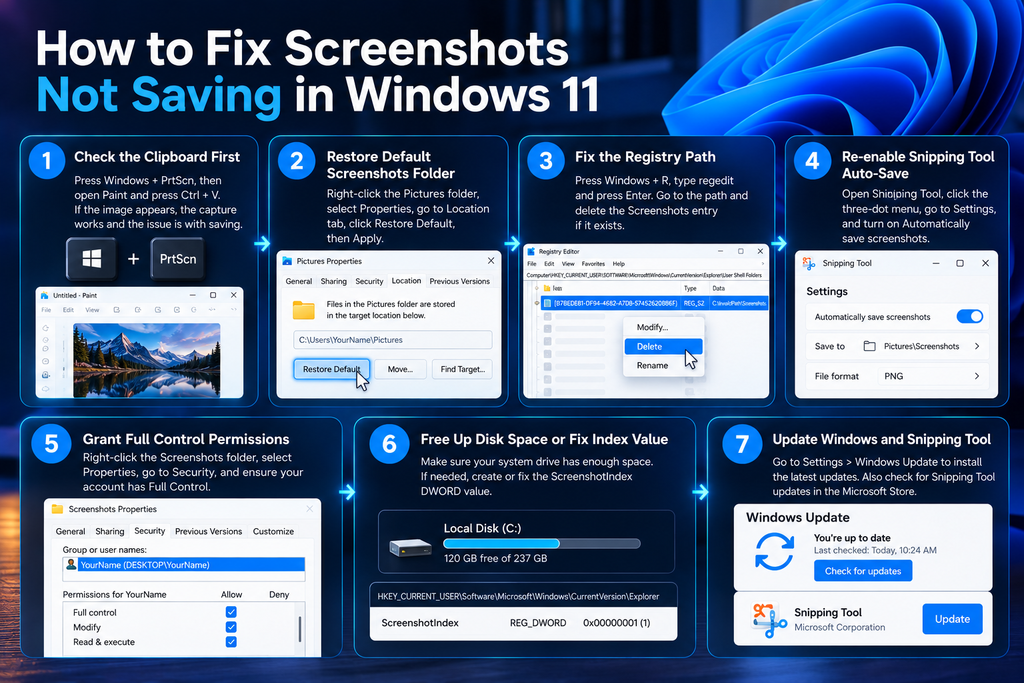
If your registry files are corrupted, which is causing your screenshots to not save in your desired folder, then you can implement the following fix to resolve the issue:

  • Press Win+R to open the Run dialogue box.
  • In the dialog box, type regedit
  • Navigate to Explorer in HKCU.
  • Right-click on it and create a new DWORD (32-bit) value.
  • Rename it ScreenshotIndex.
  • Select the decimal option by double-clicking on it.
  • Enter the data value of 695.
  • Save these settings by clicking OK.
  • Navigate to the User Shell folders.
  • After that, click on the following {B7BEDE81-DF94-4682-A7D8-57A52620B86F}
  • Enter the following user profile: %USERPROFILE%\Pictures\ Screenshots
  • Save the it and reboot your PC

Here’s a bit more detail on these steps:

Before changing your registry settings, make sure to create a system restore point. Subsequently,  press the Windows + R keys to open the Run dialog box. Type regedit in the dialog box to open the Registry Editor.

Afterward, navigate to the following location:

HKEY_CURRENT_USER\Software\Microsoft\Windows\CurrentVersion\Explorer

Once you navigate to the aforementioned location, look for ScreenshotIndex. You will not find this DWORD in your registry editor. This is the reason why your screenshots aren’t being saved in the default folder. You have to create this word yourself.

Start by right-clicking on the right window pane and create a new DWORD value. Double-click on the word to modify its decimal value to 695.

The next step is to point out this word in the correct user profile settings. You can do this through the User Shell Folders entry inside the Registry Editor. Start by navigating to the following location:

HKEY_CURRENT_USER\Software\Microsoft\Windows\CurrentVersion\Explorer\User Shell Folders

In the right pane, click on the following entry:

 {B7BEDE81-DF94-4682-A7D8-57A52620B86F}

Make sure that the entry points to the following value data:

%USERPROFILE%\Pictures\Screenshots

After setting the value data, close the Registry Editor and reboot your PC. Now, try to take screenshots. You’ll see that your screenshots are saved in your desired folder.

How can you change where your screenshots are saved in Windows 11?

If you don’t want to use the default screenshot folder and want to change it, you can do it through the Registry Editor. After changing the default location through the Registry Editor, your computer will automatically start saving your screenshots to your new provided location.

SmartPanels

Restore Browser Tabs with SmartPanels. It maintains an active tab history and restores browser size as well as display position on one screen or many.

Conclusion

There you have it. With the steps mentioned in this guide, you can successfully resolve your screenshot-saving issues by just tweaking a few Registry Editor settings. But, before you change any settings in the Registry Editor, ensure that you first create a restore point. Because if the registry settings are wrongly changed, you can face serious issues with your PC.

That’s why you can save and restore your app positioning, display settings, and Registry Editor settings with SmartPanels. SmartPanels is a top-notch Windows utility tool that lets you become highly productive by allowing you to create multiple profiles for your Windows for multiple users and various tasks.

How Many Times Can You Use A Windows 10 Key?

There is a legitimate question to be asked when one purchases a Windows 10 product key: will it be of any use down the road? Be it a new PC build or a Windows reinstallation, you should have a straight answer.  

But the truth of the matter is dictated by your license. While certain keys are portable from one machine to another, some are permanently tied to a single computer. That is why the type of license you hold is of consequence before you do any upgrading or reinstalling. 

We have put together this guide to lay out the rules in no uncertain terms. It starts with an explanation of how the different licenses operate and what is required to transfer a key properly. We also take the time to dispel the usual myths and seller talk, run through some quick checks and touch on the latest changes to Windows 10 support.  

How Many Times Can You Use a Windows 10 Key? The Short Answer 

There is a straightforward answer to the question of how often one can make use of a Windows 10 key: it is all a matter of the license. With the several types of licenses in play for Windows 10, the rules for reuse are dictated by which one you have. 

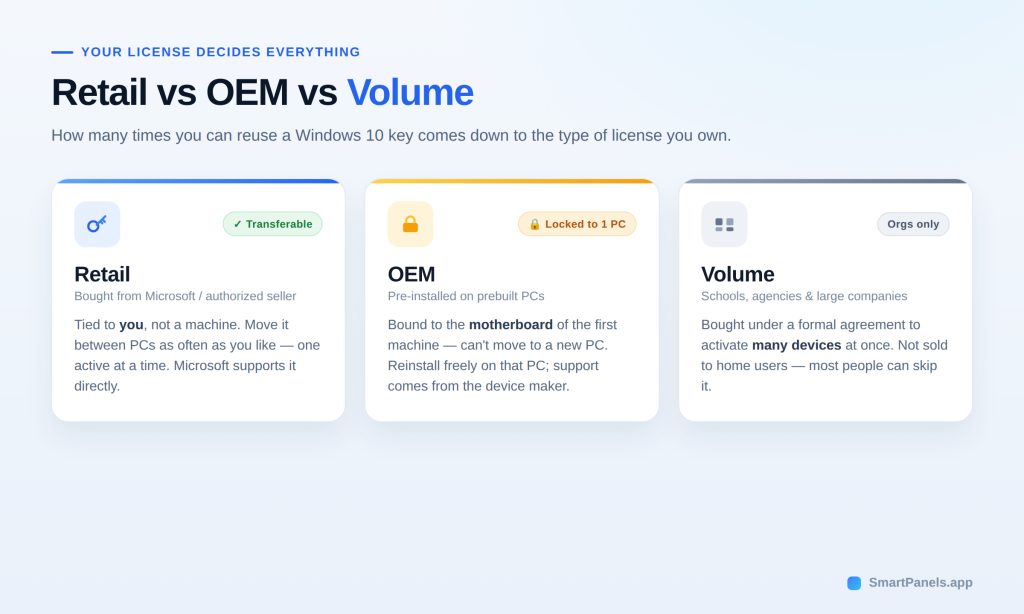
A retail key affords the greatest latitude; it may be transferred from one computer to another on an ongoing basis, provided only a single PC is running it at any given moment. The OEM variety is quite another story. Once activated on a machine, that key is bound to it and there is no legal way to put it on a new system. Then there are volume keys, which are the province of businesses rather than the home user. 

In short, your answer to how many times can you use a Windows 10 key depends on your key. Below, we explain each type clearly. That way, you can check your own key with confidence. 

Windows 10 OEM vs Retail License Explained 

Your license type decides everything about reuse. So let us compare the Windows 10 OEM vs retail license options side by side. Each one comes from a different source. Each one carries different rights. Understanding both helps you avoid costly mistakes. 

OEM License 

You will find an OEM key on any prebuilt computer, having been put in place by the manufacturer prior to purchase. In some cases, those putting together a custom PC might procure one on their own. It is a more economical proposition than retail, but there is a caveat to that savings. The license is tied to the motherboard of the initial system and will not be moved to another machine. While you are free to do as many reinstalls of Windows on that PC as you want, do not expect Microsoft to offer you direct support with an OEM key; that is left to the maker of the device.  

Retail License 

You will find a retail key at an authorized seller or the Microsoft Store. It is the version with the most to offer in terms of flexibility. The key is tied to you rather than a machine, so you are free to activate it and then take it over to another PC after deactivating it on the first one. Of course, it is limited to a single computer at any given time. Then there is the matter of support; Microsoft handles retail keys directly and for that reason many opt for them. If one is in the habit of upgrading often, the retail option is plainly the way to go. 

Volume License 

Volume keys serve schools, agencies, and large companies. Organizations buy them under a formal agreement with Microsoft. These keys can activate many devices at once. However, they are not sold to individual home users. So most readers can skip this option entirely. 

Can I Use a Windows 10 Key on Multiple Computers? 

Many people ask, can I use Windows 10 key on multiple computers at the same time? The answer is no. The license is for one active installation and that is the end of the story. It holds true for retail as well as OEM keys.  

While you can take a retail key off one PC and put it on another, it is only good for a single machine at any given time. An OEM key will not transfer once it has been activated for the first time. You may come across sellers who say their key is good for ten devices simultaneously; do not be taken in by such talk, it is nothing but a myth.  

Microsoft links activation to your hardware and account, so to have the same key on two running PCs is to violate the terms of the license. The proper course is to purchase an individual key for every additional machine. In this way each device remains genuine and there are no issues with updates. 

Transfer Windows 10 License to a New PC 

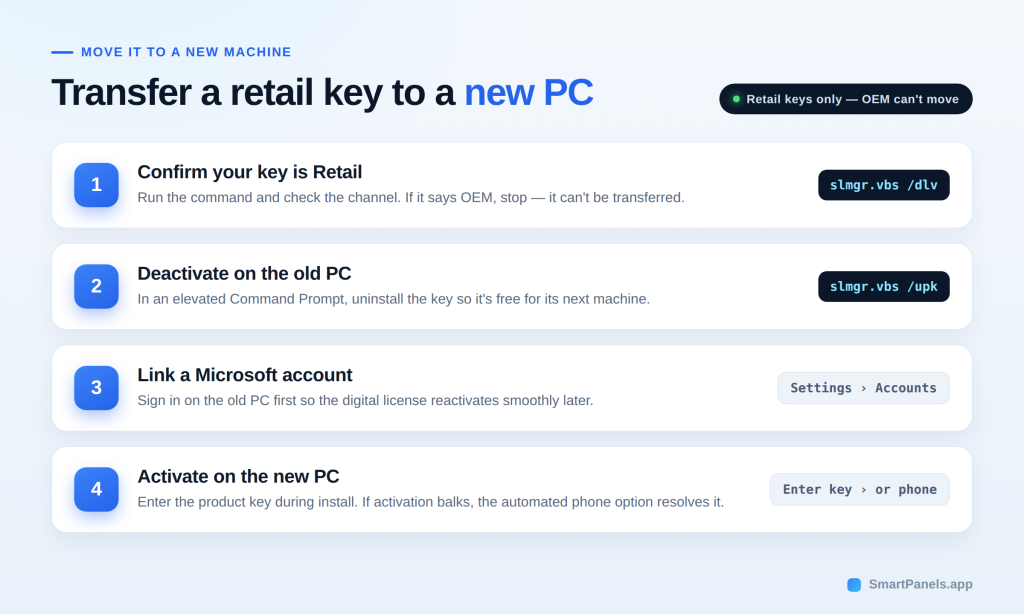
You can transfer Windows 10 license rights only when you hold a retail key. The process stays simple once you know the steps. Follow them carefully to avoid activation errors. 

Step 1: Confirm Your Key Is Retail 

Before getting started, take a moment to see what kind of license you have. It is a time saver to do this up front since OEM keys are not transferable. 

Step 2: Remove the Key From the Old PC 

To put the license at ease for its next host, you will need to deactivate Windows on the present computer. Launch an elevated Command Prompt and type in slmgr.vbs /upk; that will uninstall the key. 

Step 3: Link a Microsoft Account 

It is also advisable to log into your Microsoft account on the old PC first so that the activation process goes without a hitch down the line. 

Step 4: Activate on the New PC 

When you are ready to put Windows on the new hardware, simply input the product key as part of the installation. Should you run into any trouble with activation, the phone option is available. An automated call of it should be enough to resolve the matter. 

How to Reuse a Windows 10 Product Key Safely 

You can reuse Windows 10 product key licenses many times on the same hardware. A Windows reinstallation on a single PC is rarely an issue. One might run into trouble after a string of quick reactivations, at which point Microsoft could put in a request for phone verification to make sure the key is not being shared. It is prudent to have your product key on file in a secure location like a password manager. If you can, tie it to your Microsoft account as well; the digital license will handle reactivation on its own once you have done a clean install. 

Then there is the matter of where you get the key. Stick with Microsoft or other reputable sources. You do not want to end up with a gray-market bargain that gets blocked out of nowhere. An authentic key will stand up to repeated reinstalls. Having an account linked means Windows has no trouble identifying the device and takes care of the manual activation work, so you are spared any uncomfortable calls for verification down the road. 

How to Check Which License You Own 

Determining the type of license you have is a matter of seconds.  

  1. Simply go to the Start menu and put in “command prompt.”  
  2. From there, right-click on it and select the option to run as administrator.  
  3. Enter slmgr.vbs /dlv and hit the Enter key.  
  4. There will be a brief pause before a window comes up; check the channel listed within.  
  5. If it says “Retail,” the key is transferable to a different PC, whereas an “OEM” designation indicates it is bound to the device at hand.  

          What About Windows 10 End of Support? 

          As of October 14, 2025, Microsoft has put an end to free support for Windows 10 and with it the routine security updates. The key itself will still do its job and activate the OS as usual, but for those wanting an added measure of protection there is the Extended Security Updates program from Microsoft. That will see consumers get their essential patches until October of 2027. 

          One can also take the free route by making a backup of one’s settings and moving on to Windows 11, which is an option for most licensed Windows 10 machines. In any event, the reuse rights attached to your current key remain in effect. 

          Keep Your Workspace Safe with SmartPanels 

          A Windows reinstall or a new PC will do more than put your mind at ease; it has a way of erasing the open tabs and window arrangements you have put in place. To put things back the way they were is a daily time sink.  

          SmartPanels for Microsoft Windows takes care of that. The application memorises your app layout and the precise position of every window, then with one click it is all restored. Tabs in Chrome, Firefox and Edge are no exception. Those who work with multiple monitors will find it accommodating, as it handles up to six displays. There are custom hotkeys for an immediate profile change, and should the need arise to get a team up and running, a profile can be shared over email.  

          In short, your workspace is back in seconds following any kind of reinstallation.  

          Final Thoughts 

          So, how many times can you use a Windows 10 key? It all comes down to the type of license you have. A retail key will go with you from one computer to another over the years, though it is limited to a single active PC. An OEM key is a different matter; it is bound to that first machine for good. Then there are volume keys which are for the organization, not the home user. 

          Make it a practice to run a quick command and check your channel prior to an upgrade or reinstall. It is the best way to avoid wasting time on setup and dealing with activation issues. And do not forget to source your keys from Microsoft or a seller you can trust so the license remains in good standing. 

          Your key is an asset worth protecting, as is the work that a new install can put in jeopardy. With SmartPanels, one click is enough to save and then restore your whole workspace.  

          If you want to get back some of the time lost to configuration, put the free trial to use at SmartPanels

          Frequently Asked Questions 

          1. Can I use one Windows 10 key on two computers at once?  

          The answer is no. A single license is good for one active installation only. While a retail key can be transferred from one PC to another, you are limited to running it on a single machine at any given time. 

          2. Does reinstalling Windows use up my product key?  

          As for reinstallation, that is not an issue. You are free to do so on the same PC as many times as you see fit; the system will re-activate of its own accord following a clean install. 

          3. Can I move an OEM key to a new PC?  

          An OEM key is a different matter. It remains bound to the computer on which it was first used, so a retail key would be required to put it on another machine in good standing. 

          4. Will my Windows 10 key still work after end of support?  

          It will work fine and the key will activate Windows as expected. Do note though that Microsoft has stopped issuing free security updates unless you sign up for their Extended Security Updates program. 

          5. How do I keep my apps and layout when I reinstall Windows?  

          For your workspace, I would recommend SmartPanels. With a single click after a reinstall it puts everything back in order, from browser tabs to window layouts. 

          How Many Monitors Can Windows 10 Support?

          How many Monitors Can Windows 10 Support

          Do you need to attach more monitors to your PC for work, study, or even gaming? Also, do you run Windows 10 on your PC and find it difficult to effectively set up the monitors running the same OS? 

          In this guide, we will be suggesting fixes that can help you to fix these issues.

          How many monitors can Windows 10 support?

          Windows 10 supports a maximum resolution of 5120 x 2880. So you can set up, in addition to your primary monitor, up to ten 1080p and four 4K monitors. However, there are some issues that can prevent you from connecting additional monitors to your PC.

          Monitor limit set

          Windows 10 is able to support ten additional monitors due to the default setting in Applet, however, some users can only attach up to three monitors. This is because there is a set limit by the Display Properties Applet, which doesn’t allow the configuration of monitors exceeding four or more.

          Exceeded graphic card limit

          Another reason why your Windows 10 might not support additional monitors is due to your PC’s graphics card. Usually, typical graphics cards support two additional monitors. When the limit of the graphics card exceeds, it becomes impossible to configure additional monitors.

          Compatibility issues

          Sometimes a monitor isn’t compatible with Windows 10. If the Windows 10 OS doesn’t recognize a monitor it will not be able to support any external monitors.

          Limited USB and HDMI ports

          If your PC has a limited number of USB and HDMI ports and all are used up, then you cannot attach any other external monitors unless an external source is attached to them.

          Graphic cards and motherboard compatibility issues

          Usually, graphic cards can support up to two monitors, but it is still possible that your graphics card isn’t compatible with your motherboard. So, you have to update the motherboard or the graphics card.

          How can you fix the Windows 10 support issue?

          To fix these issues, you can follow the following steps:

          Check the maximum configurable limit

          By changing the default settings of the Display Properties Applet in Windows 10, you can attach multiple monitors. Also, you can change the limit on how many monitors you want to attach. Here’s how:

          • Go to the Control Panel.
          • Search for Display Properties Applet
          • Click on the Customize button.
          • Configure more than ten monitors by customizing the Display Properties Applet
          • Turn off your PC and attach the additional monitors.
          • Turn on your PC, and your monitors will be set up.

          Check the graphic card limit.

          If you cannot configure your computer with more than four external monitors, then check the limit of monitors a graphic card can support. Usually, it depends on the model of the graphic card, but a graphic card usually supports up to two monitors.

          You can check the limit of your graphic card by checking the settings of your graphic card.

          Check the compatibility of your monitors with Windows 10.

          Another thing you need to check before attaching a monitor is whether or not it is compatible with Windows 10. Check with the manufacturing company to see if it is compatible with Windows 10. Your screen will not boot if you don’t check its compatibility.

          Check the total number of USB and HDMI ports.

          Before you attach your monitors to your PC, check how many USB and HDMI ports are on the motherboard. If your computer has only a few USB ports, it can only attach and support only those monitors attached to them. You can attach an additional CPU or a USB hub to attach additional monitors.

          Use a graphic card that is compatible with the motherboard.

          Last but not least, you can try changing your graphics card to one that is compatible with your motherboard. 

          Set up your monitors with SmartPanels!

          Here you have it! Windows 10 can support up to 10 monitors by just customizing the Display Properties applet. Moreover, you should check the compatibility of your graphics card with both Windows 10 and your PC.

          Also, check the USB and HDMI ports on your motherboard. This will also give you an idea of how many monitors you can attach to your PC.

          If you want to boost your productivity, you can use SmartPanels! SmartPanels is a Windows utility app that lets you improve multi-screen productivity by prioritizing app positioning and snap layouts on up to six displays.

          SmartPanels

          Restore Browser Tabs with SmartPanels. It maintains an active tab history and restores browser size as well as display position on one screen or many.

          FAQs

          Is it possible to attach multiple monitors to a laptop?

          Yes. You can attach multiple monitors to a laptop that has Windows 10 installed. Moreover, even if the laptop has a single USB or HDMI port, a setup of two or more monitors However, to save the laptop from any extra load, it is recommended to use a USB hub or additional GPUs.

          Can you use HDMI cables to attach monitors to a PC?

          Yes. It is necessary to use HDMI cables to attach monitors to a PC. Otherwise, the PC will not be able to detect the additional monitors.

          Can Windows 10 support seven monitors or more?

          Windows 10 can support up to ten monitors via the Display Applet. Therefore, it is possible to attach seven monitors or more to a PC.

          How to Arrange Multiple Windows in Windows 11 – Useful Tips

          Arrange Multiple Windows in Windows 11

          The latest version of Windows, Windows 11, offers new features that facilitate multitasking, making it more convenient for users. Seamlessly orchestrating a symphony of windows on your desktop is now at your fingertips, courtesy of the ingenious snap layouts. These fresh alternatives transcend the familiar territory of the time-honored Alt and Tab shortcut. In this blog, we’ll discuss how to arrange multiple Windows in Windows 11. So, let’s get started! 

          Snap Your Windows to Increase Productivity 

          The Snap feature is the best to boost your productivity. It lets you put multiple app windows together on one screen. There are multiple layout options available, each with varying sizes. You can access and use your preferred apps easily with this feature while focusing on your tasks. Let’s look at how you can get advantages from the Snap feature.

          Snap Layouts

          Windows’ Snap feature brings a handful of ready-to-use layouts that let you easily organize all your open windows.

          Using Snap with a mouse in Windows 11 is straightforward:

          To access Snap layouts:

          • Press the Windows Logo Key + Z to open the layout options in the window you want to snap.
          • To snap a window, simply hover over that window’s Minimize or Maximize button. This will trigger the layout options to appear.

          Depending on your screen size, you might come across various predefined layouts designed specifically for your display dimensions.

          Snap Assist

          Once you’ve snapped your initial window, the Snap Assist tool steps in automatically. It presents thumbnails of all your other open windows, allowing you to cherry-pick which ones you’d like to incorporate into the chosen layout.

          Here’s how to make the most of Snap Assist in Windows 11:

          Snap Assist comes to your aid when you need to tweak the size of the layout boxes. Pick a dividing line, drag it, and voila, your window sizes readjust. If you resize one window, the neighboring one adapts to fit snugly, eliminating any wasted screen real estate.

          Keep in mind that Snap Assist only works with two app windows at a time on Windows 11 SE.

          Snap Groups

          As soon as you opt for a layout and Snap all the designated windows into their respective spots, it magically transforms into a Snap group. This handy feature is particularly useful when working on multiple tasks within different applications. Even if an interruption prompts you to open a new app, don’t worry; revisiting your Snap group is a breeze. Just hover over any open apps within the group, and like a breadcrumb trail, it guides you back to your cherished Snap group.

          Snap with the Keyboard

          In Windows, there are two methods to Snap using your keyboard:

          Using the keyboard to open the Snap layout box

          • Use Windows Logo Key + Z to access the layout box.
          • Key in the number corresponding to your desired layout. Then, type the number for the spot where you want your window to fit in that layout.
          • You can also use your mouse to pick your preferred layout.
          • Click to choose your preferred layout.

          It’s as simple as that when you’re Snap-ing with your keyboard in Windows 11.

          Using keyboard arrows for Snap layout

          • Hold down the Windows Logo Key + Arrow to Snap the app you’re currently on. You can keep juggling Snap positions using your keyboard arrows.
          • Left Arrow: The app aligns to the left side of your screen.
          • Right Arrow: The app takes its place on the right side.
          • Up Arrow: The app snugly fits on the upper side.
          • Once you’ve landed on your desired Snap spot, release the Windows Logo Key.

          You can still use Snap Assist to populate your layout with additional windows or apps you wish to Snap together on your screen. The key is to ensure that your space meets your needs!

          Snap with the Mouse

          There are multiple ways to work with your mouse when using Snap in Windows.

          Maximize Your Space with a Hover

          • To Snap an app, simply hover your cursor over the Minimize or Maximize button. This will prompt the Snap layout box to appear automatically.
          • Select the Snap layout you prefer from the choices in the layout box.

          Arrange Apps by Dragging to Screen Sides

          • To Snap a window or app to the side or edge of your screen, simply click and drag it. The Snap layout box will appear.
          • Choose the layout you want to use and release the app accordingly.
          • Snap Assist can also help you fill your layout with other windows or apps to Snap together.

          To create a side-by-side Snap, simply drag an app toward your screen’s middle right or middle left.

          Arrange Apps by Dragging to Screen Sides

          • To use the Snap feature, simply move the window or app you want to Snap to the upper middle of your screen by clicking and dragging it. The Snap layout box appears.
          • Release the app into the layout you desire.

          Making the most of these mouse-driven Snap techniques empowers you to arrange your workspace efficiently. It’s all about tailoring your screen to suit your needs!

          SmartPanels Restores Preset Display Arrangements and Snap Layouts on Windows 10 and 11

          Have you experienced your display settings or ‘Snap Layouts’ on Windows 11 being disrupted by system changes or glitches? SmartPanels is the ultimate solution for easily restoring display arrangements and Snap Layouts configurations.

          SmartPanels is your trusty tool that understands the value of your workspace layout. With it, you can swiftly reclaim your carefully organized Windows and application placements on Windows 11 and easily harness the power of ‘Snap Layouts’ on Windows 11.

          Gone are the days of fretting over unintentional window shifts or layout distortions. Whether you’re a meticulous multitasker, a creative professional, or someone who takes your workspace arrangement seriously, SmartPanels offers the peace of mind you deserve. Restore your display settings easily and return to being productive in just a few clicks.

          SmartPanels

          Restore Browser Tabs with SmartPanels. It maintains an active tab history and restores browser size as well as display position on one screen or many.

          Does Multi Monitor Affect Performance – Explained

          Does Multi Monitor Affect Performance

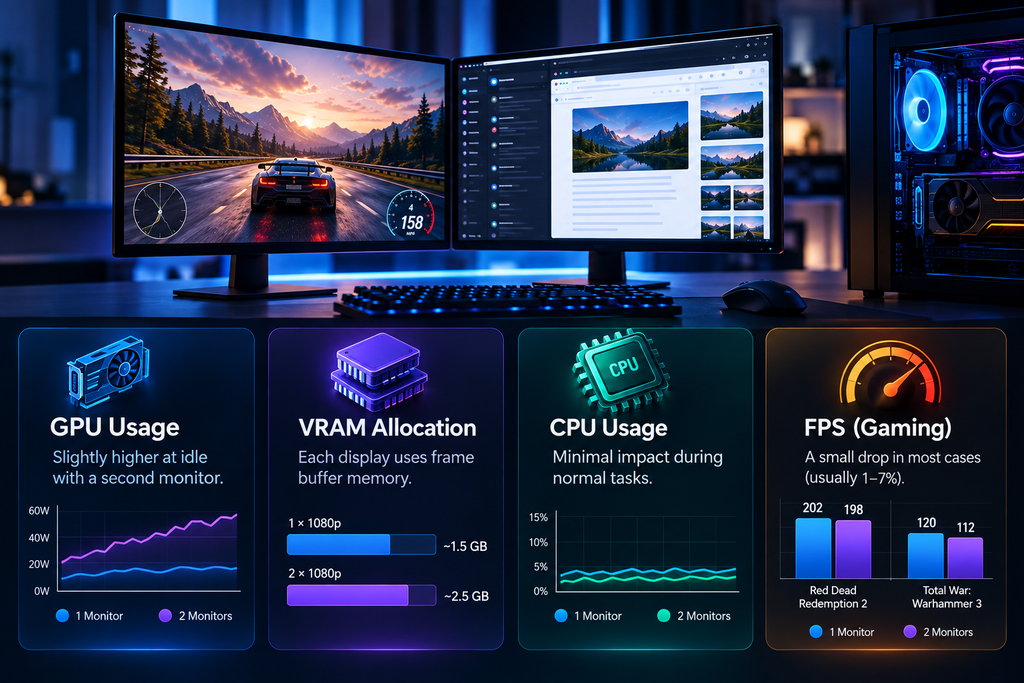
          Investing in a multi-monitor has become essential for modern computer enthusiasts. There are endless advantages to having an additional screen, no matter who you are. From streaming to gaming, productivity to entertainment, networking to studying, a multi-monitor revolutionizes your user experience, especially if you’re a natural multitasker. The more monitors you add to your setup, the more your computer has to work to keep the display quality high on each screen. This leads to the inevitable question: does dual monitor affect fps? It’s a valid concern that we’ll thoroughly explore in this article. So, let’s get started! 

          Does Having Multi Monitors Slow Down Your Computer?

          The impact of a multi-monitor setup on computer speed depends on various factors, but with modern advancements in graphics cards, it generally shouldn’t significantly affect performance. These sophisticated cards can process stunning images at impressive speeds, making dual monitors a viable option for most users.

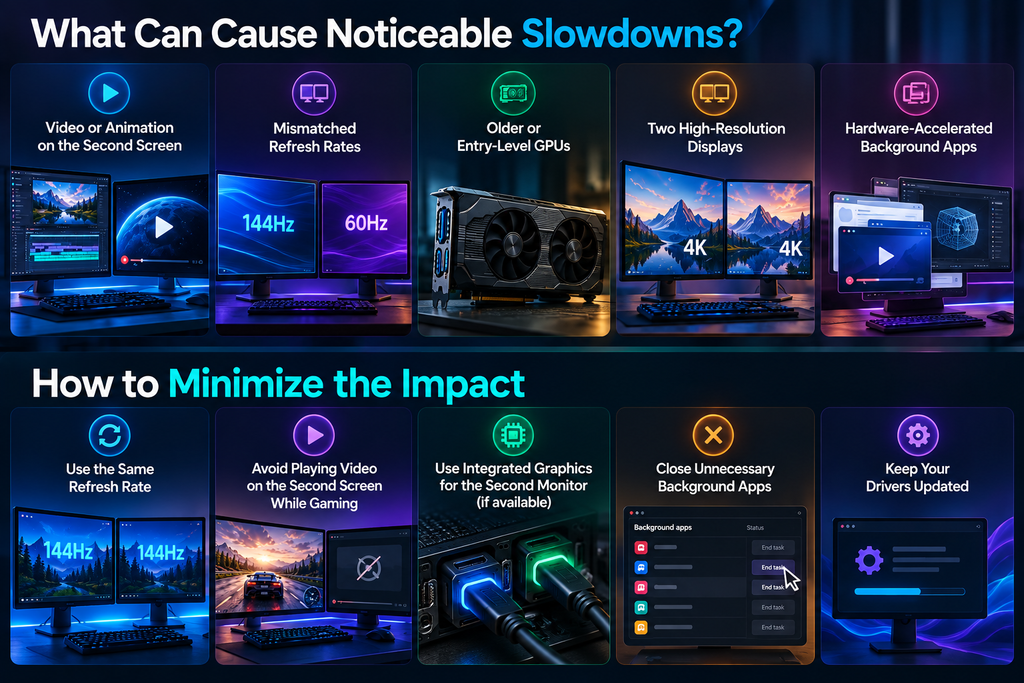
          Does having two monitors affect performance? However, it’s important to consider how you utilize the two screens. Running resource-intensive applications, such as demanding games or playing videos on both screens simultaneously, can exert additional strain on your computer. In such cases, your processing system and graphics cards will naturally work harder to support the activity across both displays, potentially leading to a noticeable slowdown.

          Activities like live gaming, video streaming, and large downloads can exacerbate these performance issues further. There are several ways to address and minimize this problem.

          • One option is to ensure your computer’s hardware meets or exceeds the requirements for handling multiple screens efficiently. Upgrading your graphics card and processor can enhance your system’s capabilities, reducing the impact of using dual monitors.
          • Another solution involves adjusting the settings of resource-intensive applications to allocate more resources to your primary screen, thereby lightening the burden on the secondary monitor. Also, keeping your computer’s software and drivers up to date can optimize its performance and ensure compatibility with a dual monitor setup.
          • If you are experiencing lagging or slow response times, consider closing unnecessary background programs or processes that may consume system resources. Moreover, features like GPU acceleration and hardware acceleration incompatible applications can help offload some processing tasks to your graphics card, boosting overall performance.

          Enhancing Multi-Monitor Performance

          To optimize your computer, ease the workload while maintaining a seamless UI. Fear not, for we unveil a collection of ingenious methods to tackle the challenges of managing multiple monitors. By embracing these techniques, you’ll unlock a world of boundless benefits linked to dual screens without any pesky disruptions or annoying lags.

          Change Monitor Settings for Seamless Performance

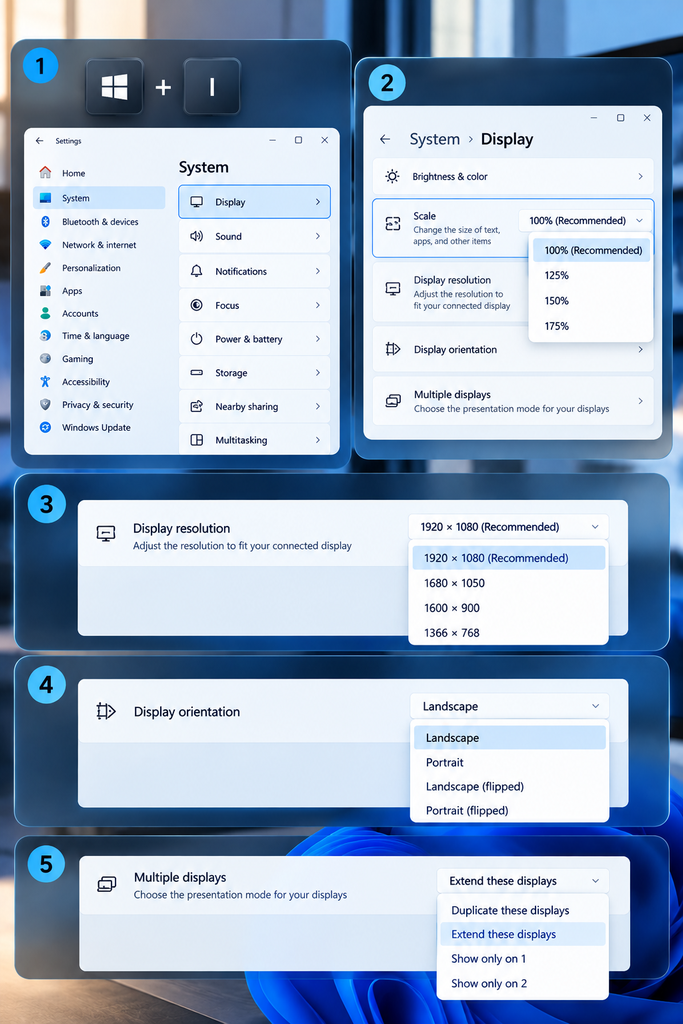
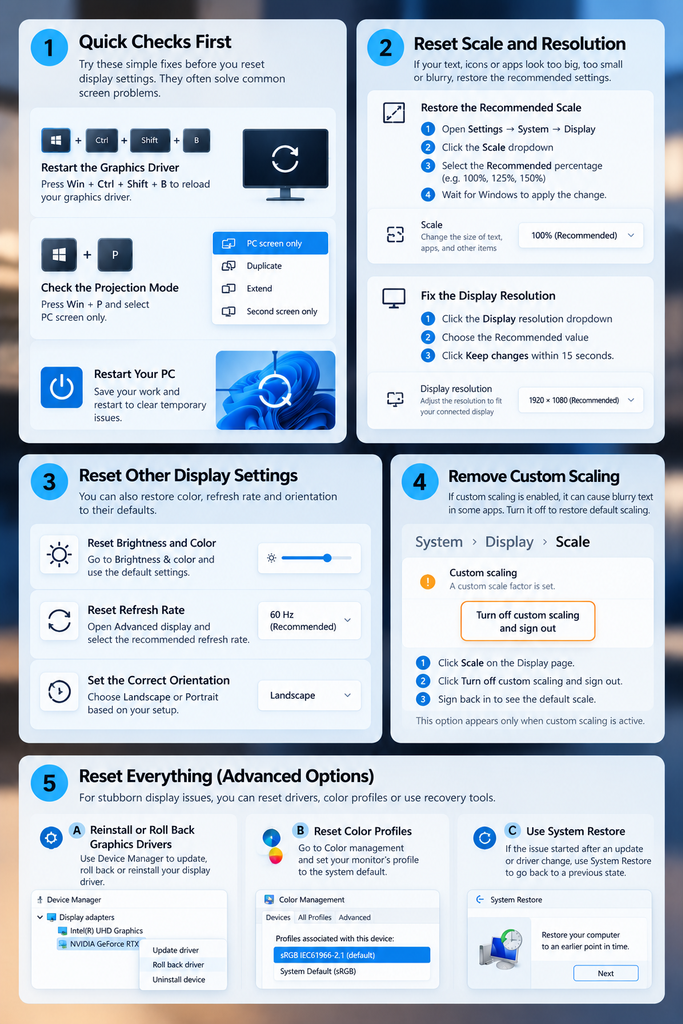
          Ensure both monitors have matching settings in Windows, such as resolution, color settings, and refresh rate. This synchronization minimizes lag and creates a smooth, uninterrupted user experience.

          Keep Your Drivers Up to Date

          Regularly update your software and graphics drivers, and if necessary, perform a complete reinstallation. This process resolves any corrupted or outdated files that might be hindering your computer’s performance.

          Streamline Active Programs

          Be mindful of running unnecessary background programs, as they can drain your computer’s processing power. Close any idle programs and focus only on those essential for your current tasks to optimize performance.

          Optimize Storage Space

          Check your storage capacity and remove temporary and unused files to free up valuable space for real-time processing. This allocation can significantly enhance your computer’s overall performance.

          Is Your Muti-Monitor Still Lagging? 

          While the methods shared usually sufficed to optimize performance, there might be instances where more drastic measures are required. Your computer or component needs replacement if you’re still grappling with lags. Software-related issues can often be resolved within Windows with relative ease. If your hardware lacks the power to handle demanding activities or support multiple monitors, a replacement becomes the most viable solution.

          Generally, the older your computer or its components are, the less likely they’ll perform optimally with a second monitor. In rare cases, certain older models may be incompatible with a dual-monitor setup, even if their components function perfectly for other tasks.

          To check if your computer can support a second monitor, right-click on your desktop background, select ‘Display Properties’, and look for ‘Multiple Displays’. If it’s there, your computer can support a second monitor. If not, you’ll need to get a new one.

          Unleash Your Productivity with SmartPanels

          Are you tired of juggling multiple tasks and craving a seamless work experience? Look no further than SmartPanels, the game-changer in multi-screen productivity! Whether you’re a busy professional, a creative genius, or a multitasking wizard, SmartPanels empowers you with support for up to 6 displays. 

          Say farewell to cluttered screens and welcome a seamless, intuitive interface that amplifies your efficiency. With SmartPanels, elevate your productivity to unprecedented heights and experience the ultimate synergy between work and creativity. Try SmartPanels today!

          SmartPanels

          Restore Browser Tabs with SmartPanels. It maintains an active tab history and restores browser size as well as display position on one screen or many.

          Conclusion 

          Nowadays, most modern computers boast the ability to handle multiple displays seamlessly. If your computer is slow after connecting a second monitor, it’s probably because of your computer or one of its parts, not the monitor. S0, it does dual monitor affect fps.

          Good news: fixing this is easy and worth it. By addressing the underlying performance issue, you can fully embrace the productivity, flexibility, convenience, and functionality that a second monitor brings to the table. Install SmartPanels for efficient multi-monitor performance! 

          FAQs

          Does dual monitor affect fps?

          Using 3 monitors can impact your computer’s performance, ranging from minor to significant. If you encounter issues, consider upgrading hardware or adjusting settings to optimize performance.

          Does having a second monitor affect gaming performance?

          Using dual monitors does consume more GPU resources, including power and VRAM for frame storage. However, you need not fret, as this typically has no adverse impact on your computer’s gaming performance or FPS. Your system will continue to deliver an enjoyable gaming experience even with the added load of multiple monitors.

          Do multiple monitors decrease productivity?

          According to a 15-year survey by Jon Peddie Research, the use of dual monitors has been found to boost productivity by an impressive 42%.

          Is it better to have 2 or 3 monitors for gaming?

          Regardless of your interests, be it gaming, content consumption, productivity, or editing, a 3 monitor setup offers numerous benefits that can enhance your overall experience.

          Do multiple monitors use more RAM?

          Running two monitors doesn’t consume additional RAM, as it’s managed by your graphics card or chip. In fact, the dual monitor setup typically requires only about 1/4 of a GB of RAM to function smoothly.

          For More Related Information: how to reopen closed tabs | appdata | snipping tool shortcut | windows 10 key 

          How to Keep Windows in Focus

          Multiple Display in Windows

          Do unnecessary notifications and pop-ups annoy you?

          Most of the time we feel distracted by redundant notifications that steal our focus from the window we are working on. The loss of focus is one of Windows users’ most annoying issues. This happens when the user switches on the PC and Windows starts loading various startup programs in the background. The programs start showing up pop-ups on the screen distracting the user from work. You might be looking for some solutions to prevent the focus stealing issue. 

          This article discusses some ways that you can use to keep windows in Focus.

          Avoid Distractions & Focus on Window

          Now don’t lose focus on Windows 10 apps as well as on Windows 11. Follow the following methods to prevent distractions.

          Method 1: Clean Up the Start Menu

          Our Start Menu has many apps that use Live Tiles to show updates and the latest news on what’s happening in the world. These animations could be very distracting so it is better to turn them off. 

          • Go to the Start Menu. 
          • Go to the tile and right-click. 
          • Select ‘More’ and click on Turn Live Tile off.

          Method 2: Focus Assist 

          Focus Assist is a function in Windows 10 that allows you to choose the times and activities that you don’t want to be disturbed. You can select the timings and notifications for when you want to see or hear notifications so you can stay focused. 

          You can limit the notifications under the ‘Automatic rules’ section. Select the rule, start, and end time to keep the notifications off. You can also set what types of notifications you would like to hear and see at certain times.

          Method 3: Minimize the Visual Distractions 

          The very first method is to minimize the visual distractions on your PC. For this, turn off all the background images and animations. 

          • Go to the Start Menu.
          • Select Settings.
          • Go to ‘Ease of Access’ and select ‘Display’.
          • Turn off the options under the ‘Simplify and Personalize Windows’ section.

          Enable or disable the notifications on Windows 10 according to your concern.

          Method 4: Clear the Taskbar 

          The second most important way to prevent loss of focus is to clean up the taskbar to keep only apps that you are currently using. Turn off or close the apps you do not require to clear the cluttered taskbar and focus on the individual window.  

          • Go to the Start Menu.
          • Select Settings.
          • Go to ‘Personalization’ and select ‘Taskbar’. 
          • Under the ‘Notification area’, you will see two options. ‘Select which icons appear on taskbar’ and ‘Turn system icons on or off’. Select both options one by one and switch them according to your convenience. 

          This will help you keep the icons of apps that you use on a regular basis and turn off the ones you do not need at the moment. A clear taskbar helps you keep the focus on the window. 

          Keep the window on top in Windows 10 and stay focused on the tasks you are working on. Follow the tips shared above to prevent the maximum distractions.

          How SmartPanels Helps you Keep the Window in Focus?

          SmartPanels is a Windows productivity tool for Windows 10 and 11 that allows you to remember the screen configuration and settings. You can save and restore the display arrangement with one click to save time and maximize productivity at work.

          SmartPanels

          Restore Browser Tabs with SmartPanels. It maintains an active tab history and restores browser size as well as display position on one screen or many.

          Arrange Apps on the Screen

          To keep your focus on one window at a time, SmartPanels allows you to arrange the apps’ windows on the screen according to your work preferences. Open the apps you work on and position them on the screen. You can keep the primary window in front to focus on it completely.

          Save Profile

          Once done, you can save your SmartPanels profile. It will save the arrangement and positioning of apps the same way. 

          Restore the Profile

          The next time when you restore the profile, the display settings will be restored. The apps will auto-arrange themselves in the same display position and window size. 

          SmartPanels eliminates the need of opening and arranging apps on the screen every time. Instead of overlapping multiple windows, you can arrange the window of the app in front you are using the most. In this way, you save time and maximize productivity at work. Avoid distractions by arranging the apps that suit your work needs. 

          Download the app now!

          How to use Multiple Display in Windows

          Whether you are a researcher or a programmer, a writer or a project manager, you must be facing the constraints of having one monitor where you can not access everything. A dual monitor setup somehow assists you to open the most used apps and work on them simultaneously, but it also has some limitations. When it comes to multitasking, you must have multiple displays that help you view, access, and work on multiple apps at the same time. They not only eliminate the overhead of switching between multiple apps but also allow you to quickly navigate to the app or file you want to work on.

          In this blog, we will look at the ways of setting up the display configuration that could split your screen into multiple displays as well as have a multiple display setup to view various apps on multiple screens. 

          Split Screen

          To view multiple apps on one desktop screen, you can configure the display settings according to your choice. 

          Follow the steps below to split your desktop screen into two.

          1. Right-click on the desktop and select “Display Settings”.
          2. In the “System > Display” menu, click on “Advanced Display Settings”.
          3. Set the orientation of displays and multiple display settings.
          4. Customize your displays and the changes will be saved automatically.

          Other than this, you can use Windows Snapping feature to snap the apps’ windows in different locations on the screen and can access multiple apps on one desktop screen at the same time.

          Snap with Snap Assist

          Snap Assist works when you have snapped the window of an app and have empty space available on your screen. In the empty space, you will see thumbnails of all the other apps. To use Snap Assist, just click the thumbnail of the app that you want to work on and it will open up in the empty space. When both the windows are opened, you can adjust their window size by selecting and dragging them and can position them on the screen according to your convenience. Moreover, when you resize one window, the other will adjust its size accordingly.

          Snap with a Keyboard

          Another option is to snap your windows using a keyboard. For this, first, select the window that you want to snap on the screen. Press the “Windows Key”  + “Left Arrow” or the “Windows Key”  + “Right Arrow” and your window will snap on the side of the screen. You can drag the window on the screen according to your choice. 

          All these methods are used to snap multiple windows on one desktop screen. Other than that, if you work on multiple screens, you can make your multi-monitor setup more powerful. Open different apps on each screen to get a visually clean interface and access apps at a click of a button. For this, you do not need to aggressively switch between apps all the time. Reduce the number of clicks and get a unified interface of apps on multiple screens.

          Multi-Monitor Setup

          To set up multiple monitors, follow the steps below.

          1. Before running to buy multiple monitors, first, make sure you have the support of graphic cards. If your PC has enough ports, you can easily set up a number of monitors. If not, you would have to purchase additional graphic cards to get the support of multiple monitors. 
          2. The second step is to choose the monitors. A 24-inch or 21.5-inch screen monitor is ideal for you. Select two, three, or four as per your need.
          3. The third and last step is to set up your PC. Configure Windows to efficiently make use of multiple monitors. For this, right-click on your desktop, select display settings, and then “Screen Resolution”. With this, you can configure options for multiple monitors.

          After you have set up your multiple monitors, you can open and position the apps on screens accordingly for easy access. It will save time and allow you to multitask. Moreover, you would be able to work efficiently instead of messing up the screen with a number of apps.

          How does SmartPanels Work?

          SmartPanels is the ultimate solution to maximize productivity at work. If you are a Windows 10 or Windows 11 user, you can use SmartPanels on your desktop to efficiently restore the display configurations with one click. One of the best things about SmartPanels is its support for multiple displays in Windows

          SmartPanels supports up to 6 displays. It means you can set up 6 monitors, open your favorite apps, arrange the display settings on each monitor, and save them for future use. This is exactly what SmartPanels does. Create a one-time screen setup for each monitor, arrange the apps on the display and save the settings using SmartPanels . The app remembers the display position and window size of each app on each monitor and helps you automatically rearrange the apps on the screen with a single click.

          Not only this, it gives multi-browser support to help you reopen the closed tabs automatically on one or many browser windows. SmartPanels remembers an active tab history and restores all your tabs in exactly the same order you saved last time. 

          Benefits of using SmartPanels

          SmartPanels is a Windows productivity app with the following benefits.

          • It helps you save time opening and rearranging apps every time before getting started to work.
          • It helps you use smart displays by giving the auto-restoration capability to apps on each display.
          • It allows you to create customized work zones, and save and restore them anytime.
          • It allows you to work on multiple displays and create separate profiles for different projects to work efficiently on one PC.
          • It helps you view and access multiple apps on a multi-monitor setup in a smarter way.

          So what are you waiting for?

          Give your multi-monitor setup more wings with SmartPanels!

          Download the app now…

          How SmartPanels saves you from being lost in too many applications?

          5 Signs You Need Dual Monitors

          For any business professional, IT expert, programmer, or designer who works on more than one app to develop games, apps, software or to design illustrations, it might be very exhausting to reopen all the same projects and apps on a daily basis. 

          The first task before starting work is to open up the desktop apps, resize their windows, and arrange them on the screen based on work preferences. It is a time-consuming routine activity that consumes energy and leaves the user with a bit of boredom. 

          Organize Multiple Applications & Browser Windows

          Do you need to work on more than one app to complete your tasks? Do you get lost in multiple browser tabs and apps while working on a project? Does it tire you to maintain records of browser tabs by bookmarking them and manually opening them every time you work on the project? If you are facing these same issues, then SmartPanels is a one-stop solution for you. 

          SmartPanels promotes smart work solutions that prevent users from getting lost in so many apps while setting up multiple desktop apps and browser tabs.  

          Smart Work is the Key to Productivity

          The work should be started in an exciting and energetic manner that sets the mood for the remainder of the day in its best productive spirits. 

          To eliminate the regular tasks of setting up screens with projects and apps, SmartPanels brings smart solutions that can be applied by professionals to maximize the outcomes while automating routine tasks. 

          SmartPanels – Get Organized With One Click!

          SmartPanels is productivity software that brings smart solutions to your work goals. With its many features, it enables users to multitask and maximize productivity. With just one time effort, you can create multiple interfaces and save them. Next time, when you start up your PC, you do not need to manually organize apps again. Save time!

          SmartPanels is a suitable app for people from all professions. It makes users productive at work by eliminating the hassle of setting up apps and projects on a daily basis. Dedicated displays and profiles allow users to open and arrange different desktop apps to perform certain tasks. Auto-arrangement and auto-restoration capability in each profile and display enable users to get started on work immediately.

          Multiple Work Zones

          You can set up multiple work zones for your multiple projects. A user can make multiple profiles in SmartPanels to separate their official and personal work documents, files, entertainment apps, etc. 

          SmartPanels enables its users to create unlimited profiles on up to 6 displays to better arrange and organize their tasks. Users can arrange and restore the apps on one or many screens with a single click. It’s like you have all the presets available and can restore them anytime. 

          How to save your screen configuration? 

          To save the window screens, 

          • Open your apps and projects that you work on. 
          • Arrange those screens and apps in the order you would like to use them.
          • After the arrangement of your screens, right-click on the SmartPanels icon and it will display a list of options to choose from. 
          • Click on the ‘Create Profile’ button.

          It will automatically store your screen setup with the same window sizes and positions, while also creating your profile. Name your project what you want. In case you make any changes in the screen arrangement, click the ‘Save Profile’ button to save the changes. 

          To restore a profile,

          • Right-click on the SmartPanels icon.
          • Click on the ‘Restore Profiles’.
          • Select the profile you want to restore.

          One-click will restore your profile. SmartPanels memorizes the window screens in their display sizes and locations and restores the profile, in the same manner, it was saved. It makes it seamless for you to start your work without spending a bracket of time daily to set up the screens.

          You can restore your profile whenever you seem fit. Whether immediately after closing it or before starting work daily or after an extended period; your profile will be restored as it was saved. Moreover, if you are working on your project and by day end you save those changes in your profile, the next day when you restore it, it will restore the updated version.

          Support For Multiple Browsers & Tabs

          You might be using multiple browsers or there might be a specific browser that you use regularly. SmartPanels supports Windows 10 and 11 and enables its users to restore multiple browser windows and tabs of Microsoft Edge, Google Chrome, and Mozilla Firefox. SmartPanels makes it handy for users to keep working on their favorite browser without remembering the tab restoration steps. 

          With SmartPanels you can restore your browser tabs in the same display size and position of the browser window you saved. Tabs restoration that otherwise requires effort can be restored with just one click.

          Support For MS Office Documents

          We use MS Office for creating documents, PowerPoint presentations, and Excel sheets. SmartPanels supports all such documents, including WordPad, OneNote, and Notepad files, making it easier for you to restore window sizes and positions as you saved. 

          Supports Multiple Displays

          In today’s fast-paced world, not only professionals but juniors are also competing against time constraints and working on multiple tasks at the same time to meet deadlines.

          SmartPanels comes to the rescue again with its support for ‘Multiple Displays’. It allows users to set up six different monitors, align separate tasks on them and arrange apps for an organized and cleaner working interface. Organized displays make it easy for users to access each app and work on all of them simultaneously. SmartPanels boosts multitasking by giving its users more hands at work.

          Support for Windows 10 & 11

          SmartPanels supports Windows 10 and 11, making it possible for the users of Windows 10 to benefit from its many productivity features. 

          Windows 11 is already packed with productive elements such as Snap Layouts and Snap Groups, that enable multitasking. However, using SmartPanels you can enhance its productivity by restoring these Snap Layouts and Groups with one click. 

          Hence, with all these capabilities, SmartPanels enables its users to maximize productivity to a certain level. So when will you be moving towards smart work? 

          Get the app now!

          https://smartpanels.app