What to Do When Your Computer Is Not Detecting a Second Monitor 

Fix not detecting Monitor

A second screen gives you room for spreadsheets, chat apps, and design tools side by side. So, it feels frustrating when you plug in a new display and nothing happens. The main screen keeps working, while the extra monitor stays dark. Fortunately, a second monitor not detected problem rarely means broken hardware. In most cases, the cause is a loose cable, a wrong setting, or an outdated graphics driver. 

This guide will take you through every fix. You will start with how Windows locates a new display. From there it is a matter of checking the cables and ports as well as the settings. After that comes the driver and graphics card remedies, not to mention the steps particular to NVIDIA. When you are done, you will have an idea of where the problem lies. And in the process your dual-screen arrangement will be put back in working order at no cost for those expensive repairs.

How Display Detection Actually Works 

Upon the connection of a monitor, the graphics card and screen will engage in a brief digital handshake. The monitor provides an EDID file in the process, a small data set that contains the resolutions and refresh rates it is capable of. Windows takes the information from there to put the display in order. 

However, a weak cable or a glitchy driver can interrupt the handshake. As a result, Windows may show a “Generic PnP Monitor” or nothing at all. In other words, a computer not detecting second monitor usually points to a failed handshake rather than a dead screen. 

Common Reasons a Second Monitor Not Detected Issue Happens 
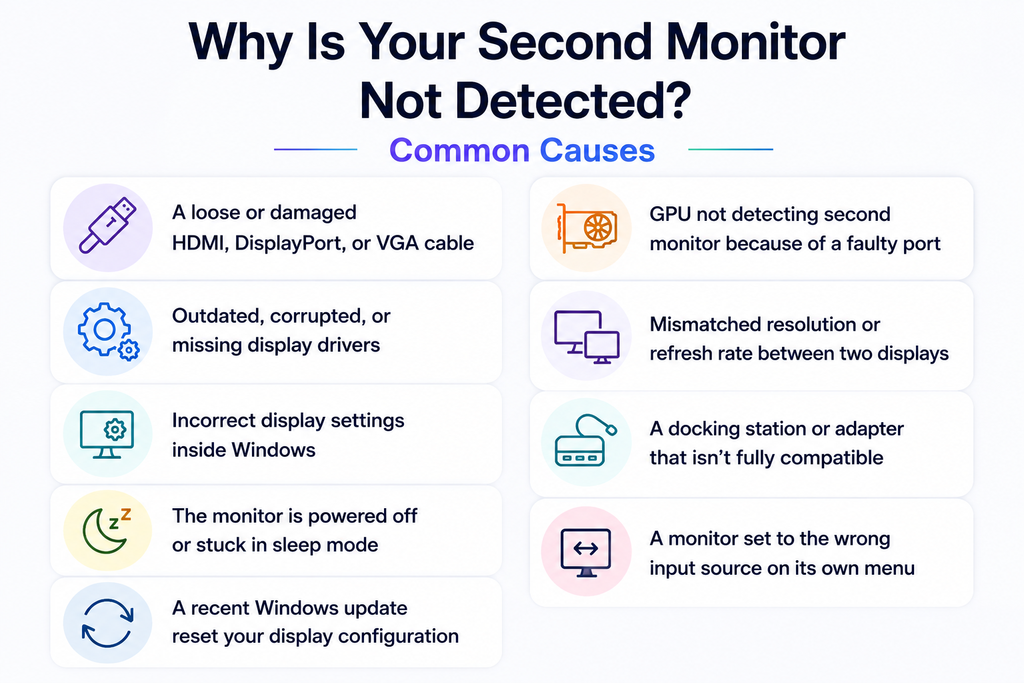
Lose or Faulty Cables 

When a cable is not firmly in place, it will do more than ruin the picture. The handshake and bandwidth check between the graphics card and the screen are also broken. Such a worn cable is what causes the display to flicker. 

Wrong Display Mode 

Windows offers four projection modes. If your PC sits on “PC screen only,” Windows sends zero signal to the extra port. This single setting can make a second screen not detected problem look like a hardware fault. 

Outdated or Corrupted Graphics Drivers 

The graphics driver is in charge of all display output but can be thrown off by a bad update or some files left over from an older card. An inspection of Device Manager might turn up Code 43 or 12 errors on the adapter. 

Bandwidth and Port Limits 

A given port version has its own data capacity. HDMI 1.4 will do some 10.2 Gbps, for instance, as opposed to the 18 Gbps of an HDMI 2.0. With HDMI 2.1 the figure is 48 Gbps. Should the cable or port not have the bandwidth to support the resolution you have selected, the connection will simply fail without any fanfare. 

Quick Fixes for Second Monitor Not Detected on Windows 
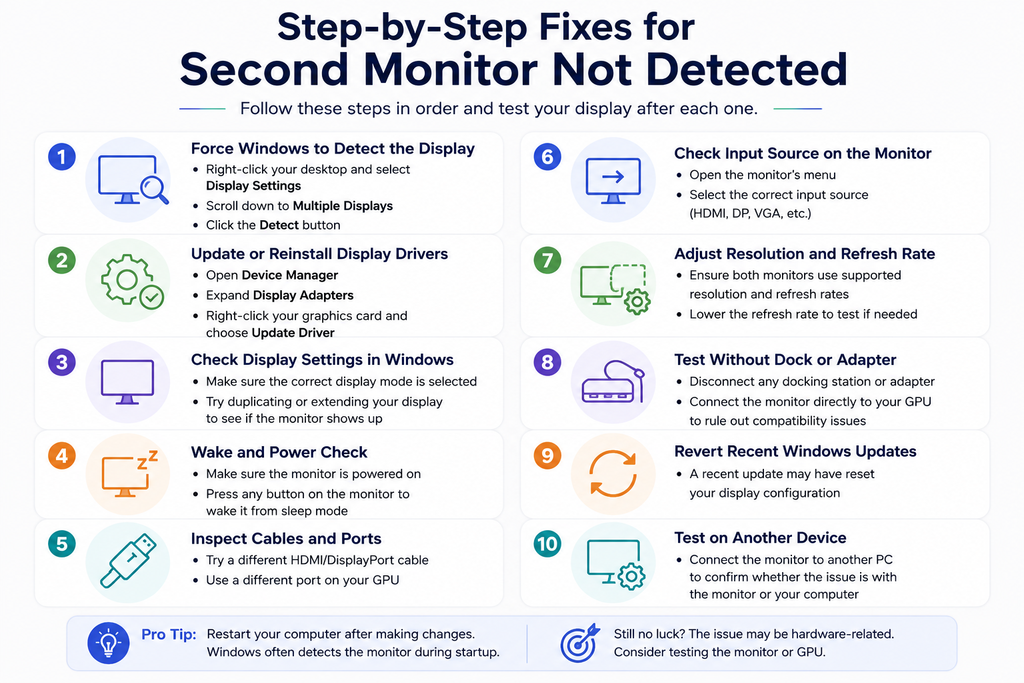
Force Windows to Detect the Display 

To have Windows re-scan all video output, open Settings and make your way to System > Display. From there put in an expansion on Multiple displays and select Detect. 

Use the Extend Shortcut 

Hit Windows key + P and select Extend to make sure the output is active and your desktop can be displayed. 

Restart the Graphics Driver 

Then do Windows key + Ctrl + Shift + B. The screen will give a momentary blink as Windows reboots the graphics driver. A full restart is not needed for this kind of quick reset to put an end to any short-term hiccups. 

Windows Not Detecting Second Monitor After an Update 

Windows Update has been known to replace a driver that is in good order with one that is not compatible, and it will at times reset display settings as well. Should any problems arise in the wake of an update, have a look at Settings > Windows Update > Update history. 

After that, go into Device Manager and put Display adapters in view. Right-click on the graphics card and from Properties select Driver and then Roll Back Driver. A clean reinstall is called for if the button is grayed out; we go over how to do that in the GPU section further down. 

How to Fix External Monitor Not Detected Issues 

Check Power and Input Source 

First, confirm the monitor has power and uses the correct input. Press the monitor’s Input or Source button. Then select the exact port you used, such as HDMI 2 or DisplayPort. 

Troubleshoot HDMI and DisplayPort Connections 

Most connection faults sit in the cable or port. Work through these checks in order: 

  1. Reseat both ends: Push each plug in firmly. DisplayPort plugs should click as the latch locks. 
  1. Swap in a certified cable: For 4K at 60 Hz over HDMI 2.0, use a Premium High-Speed cable. For HDMI 2.1, choose an Ultra High-Speed cable. For DisplayPort, pick a VESA-certified cable. 
  1. Try another port: Move the cable to a different HDMI or DisplayPort slot. A single damaged port can block the signal. 
  1. Lower the resolution or refresh rate: Test at 1080p and 60 Hz. If the screen appears, your cable lacks bandwidth for higher settings. 
  1. Power-cycle the monitor: Unplug its power cord for 30 seconds, then reconnect. This step resets a stuck handshake. 
  1. Turn off deep sleep: Some DisplayPort monitors sleep too deeply to wake up. Disable deep sleep in the monitor’s on-screen menu. 
  1. Use the right adapter: An HDMI output feeding a DisplayPort monitor needs an active adapter. Passive adapters only work from DisplayPort to HDMI. 

Isolate Docking Stations and Adapters 

A dock will be running on a DisplayLink chip or do a direct video passthrough. In the case of DisplayLink, one must have the proper driver, so put that in order before anything else. Connect the monitor directly to the computer; should it function as it ought to, then the problem is with the dock. 

Second Display Not Detected? Check Your GPU Settings 

  1. Update Graphics Card Drivers Properly 

To update the driver, go to Device Manager and under Display Adapters right-click on the GPU to choose Update Driver. One can get a more complete solution by forgoing Windows Update in favour of the full package from the manufacturer; it is better to download that directly, as the control panel utilities for handling multi-display setups tend to be more dependable. 

  1. Perform a Clean Driver Reinstall 

When an update is not the answer, there is always the option of a clean reinstall. Running Display Driver Uninstaller (DDU) from Safe Mode will get rid of the sort of driver and registry debris that a conventional uninstall leaves behind. It is a sure way to put an end to those stubborn ‘second display not detected’ issues that a routine driver update has failed to fix. 

  1. Check Event Viewer for Driver Timeout Errors 

To check for any Display or GPU warnings, one can go to the System log under Windows Logs in Event Viewer and apply a filter. Should a TDR (Timeout Detection and Recovery) event show up on a regular basis, it is a sign that the driver is crashing and having to reset when put under load. This will from time to time cause a connected display to be dropped, notwithstanding its initial detection. 

Second Display Not Detected? Check Your GPU Settings

Update Graphics Card Drivers 

As for the drivers, get the complete package from NVIDIA, AMD, or Intel. They come with control panels to handle multi-monitor configurations in a more dependable fashion than what Windows Update provides. 

Perform a Clean Driver Reinstall 

Put the system in Safe Mode and use Display Driver Uninstaller (DDU) to remove any old driver files and registry entries. After that, do a clean install of the newest driver. A regular update will not get rid of some of the more recalcitrant faults, so this is necessary. 

Check Event Viewer for Driver Crashes 

In Event Viewer, navigate to Windows Logs and then System. Any “Display” warnings that keep appearing are an indication of a driver crashing and rebooting; every time it does, a screen that is attached can be lost. 

How to Fix NVIDIA Not Detecting a Second Monitor 

If you use a GeForce or RTX card, a few NVIDIA-specific steps often solve an NVIDIA not detecting second monitor problem. Try them in this order: 

  1. Use NVIDIA Control Panel detection: Right-click the desktop and open NVIDIA Control Panel. Go to Display > Set up multiple displays. Tick the box beside the missing monitor, then click Apply. Can’t find the app? Install the NVIDIA Control Panel free from the Microsoft Store. 
  1. Update or roll back the driver: Use the NVIDIA app to install the latest Game Ready or Studio driver. During setup, choose Custom and tick Perform a clean installation. If trouble began after a new release, install an older driver from NVIDIA’s driver archive. 
  1. Check the GPU output ports: On a desktop, plug every monitor into the graphics card’s ports. These sit lower on the back of the case. The motherboard’s video ports usually switch off once a dedicated card runs. This mix-up causes many GPUs not to detect second monitor reports. 
  1. Test HDMI and DisplayPort separately: If DisplayPort fails, try HDMI, and vice versa. Next, open Display > Change resolution and pick a lower refresh rate. Older GTX cards with DisplayPort 1.4 monitors may also need NVIDIA’s DisplayPort firmware update tool. 

If you still face a graphics card not detecting second monitor issue, test the card in another PC. That test confirms whether the hardware itself has failed. 

Dual Monitors Not Detected: When Hardware Is the Limit 

The number of display engines on a graphics card is set in stone, no matter how many ports it has. A card may have four ports and yet with only three engines be able to put out to three screens at most. Should you encounter errors upon adding a particular screen, the limit has been reached. The answer is an upgrade to the GPU or a dock that has its own chip. One can also make use of DisplayPort daisy-chaining (MST) to connect monitors, though this requires all of them in the chain to be MST compatible. That is something you will have to enable from the menu on each one. 

Why Is My Second Monitor Not Detected on a Laptop or Dock? 

A good number of laptops will put both video and power out over one USB-C port. The bandwidth is divided between the display output and charging, meaning a heavy load may not leave enough headroom for an additional screen. 

It is best to look at the laptop’s specifications before anything else. A few USB-C and Thunderbolt ports are capable of driving only a single external display. Then run a test with the monitor on a different computer; in short order that will tell you if the problem lies with the laptop or the monitor. 

A Quick Troubleshooting Checklist 

  1. Confirm monitor power and the correct input source. 
  1. Reseat or replace the cable with a certified, higher-bandwidth one. 
  1. Press Windows key + P and select Extend. 
  1. Open Settings > System > Display and click Detect. 
  1. Restart the driver with Windows key + Ctrl + Shift + B. 
  1. Check Device Manager for Code 43 or Code 12 errors. 
  1. Enable the monitor in NVIDIA Control Panel or your GPU’s app. 
  1. Perform a clean driver reinstall with DDU. 
  1. Bypass docks and adapters to find the failing link. 

Most pc not detecting second monitor cases resolve within this sequence, usually before the final steps. 

Special Cases Worth Knowing 

The 2nd monitor not detected error is one that can crop up in some circumstances. Windows might have the screen showing in Display settings but it will be blank. The handshake was fine, only Windows is not putting out an image. A way to remedy this is to hit the Windows key + P and select Extend. 

Then there are cases where a monitor is fine on its own but will drop out with the addition of a third. Such behaviour is indicative of a bandwidth or display engine constraint as opposed to a detection bug. 

FAQs: Second Monitor Not Detected 

1. Why did Windows suddenly stop detecting my second monitor? 

A recent Windows Update usually replaced your driver. Roll it back in Device Manager under Display adapters. 

2. My second monitor shows in Display settings but stays black. Why? 

Windows sees it but sends no signal yet. Press Windows key + P and select Extend. 

3. Why does my NVIDIA card only show one monitor? 

Open NVIDIA Control Panel, go to Set up multiple displays, and tick the missing screen. Also confirm both cables plug into the graphics card. 

4. Can a dock cause a second monitor not detected error? 

Yes. Outdated dock drivers or bandwidth limits can block detection. Connect the monitor directly to test. 

5. How do I know if the monitor, cable, or PC is at fault? 

Test the monitor on another computer first. If it works there, check your cable and PC next. 

Final Thoughts 

For the most part, a second monitor not detected can be put down to one of three things. The cable, port or bandwidth is inadequate; the graphics driver has either crashed or been poorly updated; or the card has hit its limit for displays. Do not resort to random guessing but follow the steps in sequence.  

Begin with the cables and settings and from there go on to the drivers and NVIDIA options. As a last step, put the monitor to the test on a different machine to see if there is a hardware limitation before you part with any cash. 

When you have both screens running as they should, make use of that additional space. With SmartPanels you can set up your apps over several monitors and store layouts for quick recall. The Windows application is free to download, no credit card required. It is a way to keep a dual-screen arrangement in order and primed for the day’s work. 

Download SmartPanels!

Best Taskbar Apps to Combine Multiple Windows into One Icon

Best Taskbar

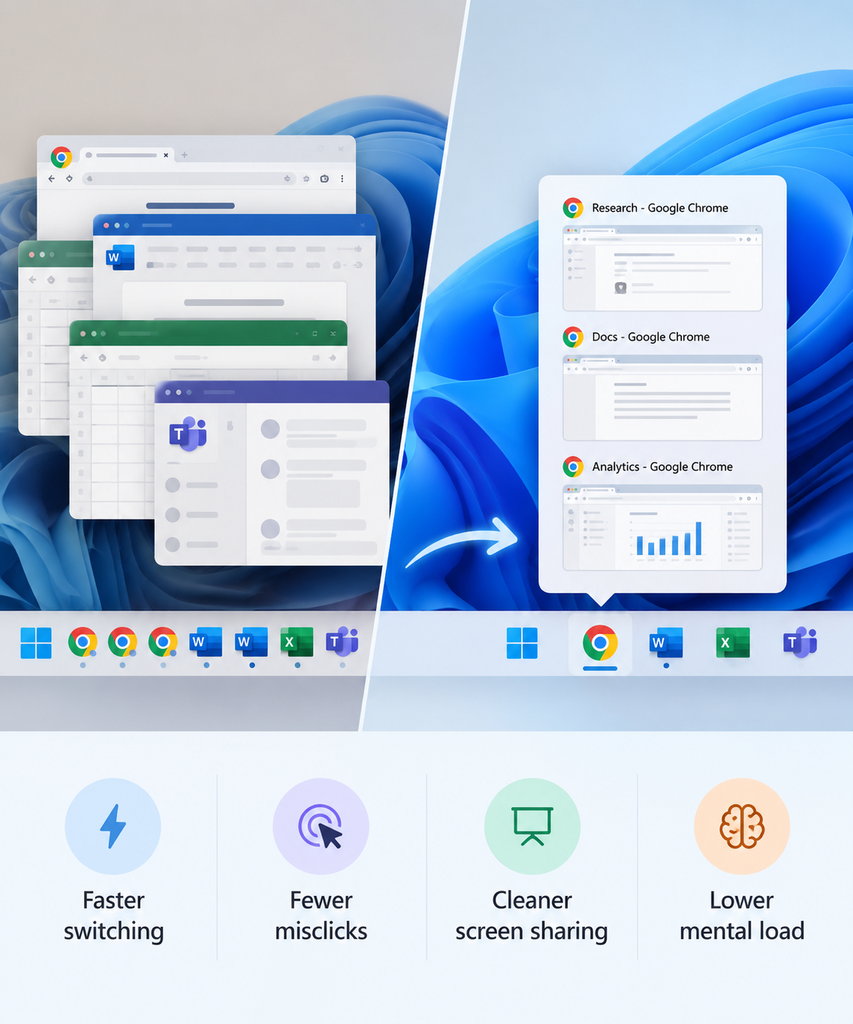
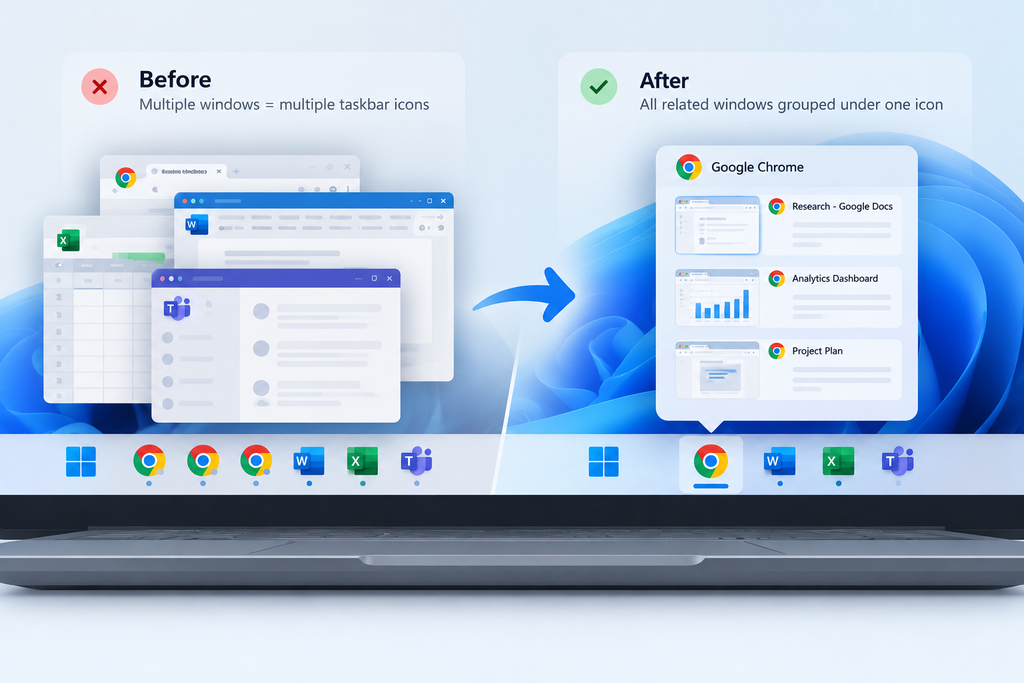
Most people do not appreciate how much a cluttered taskbar can impede their pace. Each superfluous icon is an invitation to waste a split second in the hunt for it, and over the course of a hectic day those seconds mount up. Put a couple of browser windows on top of some Office work and a chat application and the taskbar becomes an impenetrable wall of indistinguishable icons. 

 A best taskbar organizer app for windows can pull every open window under one clean icon. You always know exactly where to click. There is no need to put up with such disarray.  

We have put together this guide to walk you through the built-in settings that are worth a look before anything else. It also puts the best third-party offerings like SmartPanels to the test. You will come away with a clear idea of what serves your workflow. 

What Makes a Windows Taskbar Feel Cluttered 

It is seldom a single large issue that creates clutter; more often it is the result of small habits that accumulate over the course of a day. One puts in a report, opens a reference tab and then a window on the second monitor, and before long there are ten icons in a tight row. 

There is a technical explanation for the disorder. Windows will give every open window an HWND handle and put an AppUserModelID on most applications, so the taskbar knows which icon is in charge. If the ID is consistent from one window to the next, Windows will do the work of grouping them. Should the IDs not align, or if a program has several processes running, the user is left with superfluous icons rather than a single group. 

The situation is compounded using multiple monitors. With enough multitasking, what starts as a minor inconvenience becomes a nuisance. Sifting through a dozen windows take time and increases the likelihood of a misclick during a call. Then there is the matter of screen sharing; a disordered taskbar can be a source of stress when everyone on the line can see the odd window you neglected to shut. Many people start searching for best taskbar apps that promise a tidier layout. They want a cleaner setup without losing any real functionality. 

There is also a mental cost that is easy to overlook. A busy taskbar keeps your brain scanning instead of focusing. Over a full week, that low-level searching adds up. You end up with real fatigue, even if you never notice it happening. 

Why a Best Taskbar Organizer App for Windows Matters for Productivity 

There is more to consolidating windows under a single icon than mere tidiness. It is a matter of efficiency, allowing for faster transitions from one task to the next and reducing the chance of an error that can be expensive to put right. 

  • Faster switching: Fewer icons mean less scanning before every click. 
  • Fewer misclicks: Grouped icons lower the chance of opening the wrong window. 
  • Cleaner screen shares: A tidy taskbar looks more professional during meetings. 
  • Lower mental load: Your brain spends less energy hunting and more energy working. 

Once you notice these benefits, the value becomes obvious. A solid best taskbar organizer app for windows earns a permanent spot on a busy machine. It stops being a one-time trial and becomes daily infrastructure. 

How Windows Groups Taskbar Icons Under the Hood 

For a matter of clarity, a brief technical primer is in order. Take Windows Explorer, the process responsible for your taskbar: it will read two items from any given window. The first is the AppUserModelID we have been talking about, and the second is the process ID of what opened the window. 

You will see that native applications such as Edge or File Explorer put down a consistent ID on each occasion, which is the reason their windows are neatly grouped out of the box. With some custom or older software, however, this step may be ignored altogether and you are left with a haphazard assortment of taskbar slots. 

Third-party utilities have their own means of dealing with the shortfall. A few will step in to intercept the Windows messages before Explorer has a chance to act on them. Then there are those that make use of standard APIs like SetWindowPos to record and later reapply the window coordinates. It is the distinction between these approaches that accounts for why one program might simply put the icons in order while another can put an entire layout back in place. 

Built-In Windows Settings Worth Trying First 

It is worth looking at what Windows has to give you for free before going in with any new installations. For the casual user, the built in settings are often enough to address the issue. 

Turn On Combine Taskbar Buttons 

To make use of them, right click on some open space on the taskbar and select Taskbar settings. From there you will come across the combine option; simply go to the dropdown and set it to “Always, hide labels”. The effect is that Explorer will be more insistent about grouping by AppUserModelID, so all the windows belonging to an app are put under one icon. A fine solution for those who do not multitask heavily, though one should note that it does not remember how you have things arranged after a restart. 

Use Snap Layouts for Faster Switching 

Go to System and from there to Multitasking to enable Snap windows. With this in place, a simple drag of the window to the edge of the screen will have it tile up next to another in one of the preset zones. While the function does not group icons for you, it is a handy way to cut down on your use of the taskbar. 

Master Alt+Tab and Task View 

One might be surprised how quick Alt+Tab can be. Just hold down the Alt key and keep hitting Tab to get from one open app to the next. For a more visual approach there is Task View; press Windows and Tab together for a grid of all your windows, which comes in handy when the icons are hard to distinguish. They are useful workarounds, yet they do not go so far as to recall your particular setup. That gap is exactly where dedicated windows taskbar apps step in. 

Signs You Need a Best Taskbar Organizer App for Windows 

There are telltale signs of a taskbar in disarray. For one, you find yourself hovering over icons in an effort to figure out what window is what. Or perhaps you have put the wrong screen on display for a video call by mistake. Then there is the matter of spending a few minutes every morning putting your layout back together, or running three monitors with no saved configuration to speak of. When such things become all too familiar, it is a good indication that something should be done about it. A best taskbar organizer app for windows can fix every one of these issues at once. 

Best Taskbar Organizer App for Windows: Top Third-Party Picks 

Once built-in settings hit their limit, dedicated tools take over. Below are the taskbar apps worth testing this year. Each pick earned its spot through features, reliability, and everyday practicality, not just marketing claims. 

1. SmartPanels: Best for Remembering Your Whole Workspace 

There is more to SmartPanels than just putting icons in a group. The application will record an entire workspace layout down to the details of window size, position and where they sit on the monitor. These are kept as saved profiles and can be put back in place with a single click via standard window-positioning calls. 

  • Profile-based organization: Save separate setups for client calls, design work, or reporting. 
  • Multi-monitor memory: Every window returns to its exact spot, even across three screens. 
  • One-click restore: Reopen your full morning setup instead of rebuilding it manually. 
  • Reduced clicking: Fewer drags and resizes mean a calmer start to every session. 

When one looks at the field of taskbar apps, SmartPanels is hard to miss. It gets at a technical issue that Windows has a habit of overlooking: the tendency to lose your layout each time you restart. Smart Panels makes a permanent record of that state. Whether for a hot-desker, someone who works in a hybrid capacity or anyone prone to switching tasks often, it is the right tool.  

Visit SmartPanels.App to get it. 

2. 7+ Taskbar Tweaker: Best for Deep Customization 

By way of a small helper file or DLL, this no-cost utility makes an injection into Explorer. The result is the ability to alter taskbar conduct at a very basic system level. With it one can dictate what a middle-click is for and how windows are grouped or put in some personal preference on the hover previews. For those who like to have their finger on every detail, it is well suited. Do not expect it to work with the Windows 11 taskbar out of the box though; support is not there directly, and you would be better off using something like ExplorerPatcher beforehand. 

3. WindowTabs: Best for Tabbed Browsing Across Any App 

With WindowTabs, you can put a browser-like tab bar on nearly any application. The program uses a reparenting method to nest windows visually, so where you might have had five distinct Word windows, there are now just five tabs in a common frame. It is a way of reducing the number of icons on hand without the need to tuck windows away behind a menu. 

4. United Sets: Best Free, Open-Source Option 

With United Sets, any Windows application can be put into tabbed groups in the manner of the old Microsoft Sets feature that was tried and then abandoned. The program is open source, which means developers have the freedom to do their own auditing and make enhancements. There is no charge for it and the community sees to its regular updating. For a tidy arrangement at zero cost, one will find it makes an excellent companion to Snap Layouts. 

5. Groupy by Stardock: Best for Office and Browser Combos 

With Groupy, you can drag windows into one another to form tabbed groups in much the same way you might put browser tabs side by side. It is particularly well suited for those who are switching back and forth between a browser, Word and Excel; the program puts all three in a single, uncluttered frame. 

6. Actual Window Manager: Best for Power Users 

For the more ardent multitasker, there is an array of advanced functionality on offer. The suite includes snapping, window rules, virtual desktops and grouping controls. One can even impose custom rules to dictate how a given program behaves, from its startup position to the size of the window. While it is not as immediately intuitive as some alternatives and requires a bit of time to get used to, it affords a degree of control that dedicated users will find hard to beat with other tools. 

How to Choose the Right Task Bar Apps for Your Workflow 

The right option is a matter of what tends to impede you in the course of an ordinary day. Should icon clutter be your only concern, there is no need for anything more than a free tool; United Sets or the combine setting that comes with it will take care of it. But if one has to put in the work of reconstructing the layout every morning, then there is something more at play. Under those circumstances, a memory-based solution is preferable to basic tabbing. 

Ask yourself these questions before choosing any task bar apps: 

  • Do you work across multiple monitors on a regular basis? 
  • Do you switch between a few fixed setups, like calls versus focus work? 
  • Do you want tabs inside Windows or just fewer taskbar icons? 
  • Do you need something free, or is a small cost worth it? 

Answering honestly narrows the list quickly. Not every tool solves the same underlying problem. 

Common Mistakes to Avoid 

A few habits can undercut even the best setup. 

  • Running two taskbar tools together: Many apps hook into the same Explorer processes. Conflicts are common, so stick to one at a time. 
  • Skipping updates: Windows updates change taskbar behavior often, sometimes at the API level. Outdated tools can break after a major release. 
  • Ignoring built-in options first: Some users install extra software too quickly. Snap Layouts or the combine setting sometimes solve the issue for free. 
  • Choosing looks over function: A tool that only changes taskbar color will not fix a disorganized workflow underneath it. 
  • Forgetting to back up settings: Exporting your profiles saves time if you switch computers or reinstall Windows. 

Quick Comparison at a Glance 

  • SmartPanels: Best overall pick for saved layouts and multi-monitor memory. 
  • 7+ Taskbar Tweaker: Best for advanced, free customization on Windows 10. 
  • WindowTabs: Best for turning multiple windows into simple tabs. 
  • United Sets: Best free, open-source tabbing tool available today. 
  • Groupy: Best for Office and browser-style tabbed grouping. 
  • Actual Window Manager: Best for full, granular window-management control. 

Frequently Asked Questions 

Is there a genuinely free best taskbar organizer app for windows?  

Yes. There is no charge for 7+ Taskbar Tweaker or United Sets, and the same goes for Windows built in combine setting. 

Does grouping windows under one icon slow down my computer?  

No, not usually. The better taskbar utilities are designed to be unobtrusive. They operate as background processes that put minimal demand on the CPU or memory, their work being limited for the most part to relaying a few system messages. 

Can I use more than one taskbar tool at once?  

It is best to steer clear of that kind of setup. When two tools are run in tandem, they will each attempt to hook Explorer, which can lead to the odd icon glitch. 

Which option works best across multiple monitors?  

As for multi-monitor memory, SmartPanels is the superior choice here; it will put windows back in their precise spot on any connected display. 

Do these tools work on both Windows 10 and Windows 11?  

You will find support with most of them, but it is a matter of the tool and its version. The likes of SmartPanels and United Sets work fine with the latest Windows 11 builds, whereas an older program such as 7+ Taskbar Tweaker requires some coaxing to get along with it. 

Final Thoughts 

A clean taskbar is not a luxury; it is a habit. It saves real, measurable time across every single workday. Windows’ built-in settings solve part of the puzzle for free. Try those first before spending money on anything extra. Once you outgrow them, dedicated windows taskbar app options fill the gaps. Some add tabs, others add deep tweaks and controls. For most people juggling monitors and daily routines, one factor matters most: memory. A best taskbar solution built around saving and restoring layouts, like SmartPanels, delivers the biggest time savings. Start with one small change today. Flip a Windows setting, or try a new app. Either way, let your taskbar finally work for you, not against you. 

How to Change Primary Monitor: A Surprisingly Simple Shift 

How to Change Primary Monitor

Ever feel like your mouse is escaping to the wrong screen every single time? Or maybe your favorite app always opens on the monitor you rarely use. Frustrating, right? Well, here’s the good news: changing your primary monitor is easier than it sounds. And once you do it, your workflow might just breathe a sigh of relief.

Let me walk you through the why, the how, and a few gotchas you might run into along the way.

Wait, What Is a “Primary Monitor” Anyway?

Before we get into the nuts and bolts, let’s clarify what this even means. When you’re working with more than one display, your computer chooses one as the “main” screen. That screen:

  • Shows your taskbar and system tray
  • Hosts most of your desktop icons
  • Often becomes the default launch point for apps

So if your monitor arrangement feels… off, there’s a good chance you need to change which one is the “captain of the ship.”

Why You Might Want to Change It

We all have our quirks. Maybe you prefer your right monitor as the main one because it’s larger. Or perhaps your laptop screen is too cramped, and you’d rather work off that glorious 32-inch external monitor.

Reasons to switch include:

  • Fixing weird app launch behavior
  • Enhancing ergonomics and neck comfort
  • Aligning with a docking station setup
  • Improving gaming performance (yes, that matters)
  • Reassigning monitors after an OS or graphics driver update

Whatever your reason, the solution is straightforward. 

The Classic Windows Way (Works on Windows 10 & 11)

Here’s how to do it in just a few steps:

  1. Right-click on your desktop and choose Display settings.
  2. You’ll see your monitors labeled (usually 1 and 2). If you’re unsure which is which, click the Identify button.
  3. Select the screen you want to make primary by clicking its box.
  4. Scroll down and check the box labeled Make this my main display.
  5. That’s it! Windows might blink or refresh briefly, and you’re good to go.

Quick Tip:

If the option is grayed out, make sure the monitor you’re selecting is actually connected. Some ghost displays hang around when you’ve recently disconnected one.

What If You’re Using a Laptop?

Laptops complicate things just a tiny bit.

When you connect an external monitor to a laptop, Windows usually decides which screen takes the lead. But you can override that easily using the same steps above.

Just remember: your laptop screen will usually be Monitor 1, and your external screen might be 2, 3, or more depending on your setup.

Also, check your Projection Mode (Win + P) and choose:

  • Duplicate (same thing on both screens)
  • Extend (acts like a second screen)
  • Second screen only (great if your laptop lid is closed)

Using NVIDIA or AMD Control Panels

If you’re a gamer or power user, you might be using graphics card software like:

  • NVIDIA Control Panel
  • AMD Radeon Settings

These also let you reassign your primary monitor:

NVIDIA:

  1. Open NVIDIA Control Panel
  2. Go to Display > Set up multiple displays
  3. Right-click the monitor you want and choose Make primary

AMD:

  1. Open AMD Radeon Software
  2. Go to Display Settings
  3. Set the desired monitor as primary

Honestly, though, the Windows method is often quicker unless you need granular GPU-level control.

SmartPanels: A Smarter Way to Manage Displays

Changing your primary monitor is just one piece of the puzzle. If you’re constantly rearranging windows, switching between work modes, or sharing screens, you know it can be a hassle.

SmartPanels helps by:

  • Remembering and restoring your window positions
  • Letting you save profiles for different workflows (e.g., writing, coding, Zoom meetings)
  • Supporting multi-browser, multi-display environments seamlessly

You could say it’s like hiring a personal assistant for your screens. Worth it? Many users think so.

The Perks of Getting It Right

Here’s what you gain when your primary monitor is exactly where you want it:

  • Faster, smoother workflow
  • Reduced visual clutter
  • Better task-switching
  • Fewer misclicks and window drags

In short? Less tech headache. More getting-stuff-done vibes.

Common Issues & Fixes

Display option grayed out?

Make sure the monitor is physically connected and detected.

Taskbar not moving?

Sometimes Windows plays tricks. Try setting another screen as primary, then switch back.

Wrong monitor turns on at boot?

That’s BIOS or firmware behavior. You’ll need to set your preferred screen as default in BIOS (usually under Display or Graphics settings).

Final Thoughts

Look, switching your primary monitor isn’t rocket science. But it does make a world of difference when you’re juggling tabs, meetings, and to-do lists.

Whether you’re a work-from-home warrior, a design geek with three screens, or someone who just can’t deal with dragging windows anymore—this small tweak is a big win.

So go ahead, take 30 seconds and fix your setup. Future-you will thank you.

How to Connect Two Monitors to One Laptop (Without the Headache)

Connect Two Monitors to One Laptop

You’re not alone if you’ve ever sat there juggling multiple windows on one tiny laptop screen, squinting while toggling between tabs like it’s a sport. Ever wondered: “Can I just plug in two monitors and make this easier?” You can—and we’re about to break it down for you in a way that actually makes sense.

Why Bother With Dual Monitors?

Let’s be real: one screen just doesn’t cut it anymore. Whether you’re working from home, gaming, designing, coding, or just bingeing productivity hacks on YouTube, the benefits of extending your workspace are massive:

  • Fewer Alt-Tabs: Keep your Zoom call on one screen, your notes on another.
  • Smoother Workflow: Drag and drop files across windows. Side-by-side comparison? Yes please.
  • Better Focus: Dedicate one screen to work, the other to distractions (or productivity boosters, let’s pretend).

First Things First: Can Your Laptop Handle It?

Before you run out and buy two monitors, let’s check if your laptop is even up for the task. Most modern laptops can support at least two displays, but you’ll want to double-check:

  • Ports: Got HDMI, USB-C, Thunderbolt, or DisplayPort?
  • GPU Support: Your graphics card must support dual external displays. Even some integrated GPUs (like Intel’s Iris Xe) do.
  • Operating System: Windows 10 and 11 handle multiple displays like a champ.

The Setup Options (Simple to Fancy)

1. Plug-and-Play (If You’re Lucky)

If your laptop has two video output ports (say, an HDMI and a USB-C with DisplayPort support), you’re golden. Just plug each monitor in and Windows should detect them instantly.

2. Use a Docking Station

Docking stations aren’t just for fancy corporate desks—they’re lifesavers. One USB-C cable to your laptop can power two (or more) external monitors, USB accessories, ethernet, even your coffee machine (okay not that).

Recommended for:

  • Laptops with only one video output
  • Clean desk aesthetics
  • Power users

3. USB Display Adapters

No fancy ports? No problem. USB-to-HDMI adapters (especially USB 3.0 and above) work surprisingly well. They use software drivers to simulate display outputs.

Caveat: Slight lag for high-motion stuff (not ideal for gaming).

4. Daisy-Chaining via DisplayPort MST

This is more niche, but if your monitor and laptop support DisplayPort Multi-Stream Transport (MST), you can chain one monitor to the next—one cable into the laptop, and a daisy-chain to the second monitor.

Step-by-Step: Connecting Two Monitors

  1. Check your laptop’s ports.
  2. Plug in the monitors. Use HDMI, USB-C, or adapters.
  3. Right-click on your desktop > Display settings.
  4. Scroll to ‘Multiple displays.’
  5. Click ‘Detect’ if it doesn’t auto-recognize.
  6. Arrange screens (drag boxes to match physical layout).
  7. Choose if you want to Extend, Duplicate, or use a single display.

Boom. Done.

Troubleshooting Woes (Because Something Always Goes Wrong)

  • Only one monitor works? Try swapping cables or ports.
  • Monitors flicker or disconnect? Could be a bandwidth issue—try using a powered hub.
  • Wrong resolution? Update GPU drivers.
  • Black screen on second monitor? Sometimes it’s set to ‘Show only on 1’ in Display settings. Fix that.

What About Laptops With Only One Port?

You can still join the dual-screen gang:

  • Docking station (USB-C to HDMI x2)
  • USB Display Adapter
  • External GPU (eGPU) for the performance enthusiasts

Best Monitor Arrangement Hacks

  • Keep primary monitor directly in front of you.
  • Use vertical alignment if one monitor is smaller.
  • Match refresh rates and resolutions for smoother visuals. 
  • Label them. Seriously—makes things way easier. 

Bonus: Tools to Supercharge Your Multi-Monitor Setup

Once you’re all set, make your workspace even smarter:

  • SmartPanels – Save and restore window positions across screens.
  • DisplayFusion – Deep control over monitor layout, wallpapers, and functions.
  • PowerToys FancyZones – Windows app to split screens with customized zones.

Use Cases That Make You Wonder Why You Didn’t Do This Sooner

  • Developers: Code on one, preview on another.
  • Designers: Photoshop on one, assets library on the second.
  • Traders: One screen for charts, another for order book.
  • Writers/Students: Research on one screen, draft on the other.

Wrapping It Up (With Cables, Preferably Neatly)

Connecting two monitors to your laptop isn’t just possible—it’s life-changing for your workflow. Whether you’re aiming for Netflix on the side or mastering complex projects, going dual-screen is one of those rare productivity hacks that feels like cheating.

So grab that second screen, and let your laptop breathe a little. You’ve got more room to think now.

For More Related Information: How to Switch Monitor 1 and 2 | How to Switch Screens on Windows | How to Set Your Primary Monitor

How to Set Your Primary Monitor (Without Wanting to Throw Your Mouse)

How to Set Your Primary Monitor

Let’s face it: dealing with monitor settings on Windows can sometimes feel like playing digital Jenga. Especially when you just plugged in a second screen and everything went sideways—literally. Windows icons end up on the wrong display, your taskbar disappears, and your mouse starts wandering into the void.

Sound familiar?

If you’re sitting there wondering how to set your primary monitor so that things just work, you’re not alone. And the good news? It’s easier than you might think.

This guide walks you through the how, why, and what-ifs of assigning your main screen—with no fluff, no jargon, and no YouTube rabbit holes.

Why It Even Matters

So what’s the big deal about a “primary monitor” anyway?

Think of your primary monitor like your home base. It’s where:

  • Your taskbar lives
  • Desktop icons appear
  • Apps usually launch by default
  • Pop-ups, alerts, and new windows tend to show up

If you’re juggling more than one screen and your setup feels “off,” chances are your primary monitor isn’t set right.

Step-by-Step: How to Set Primary Monitor on Windows 10 & 11

Here’s how to make your main screen actually behave like the main screen.

1. Right-click on the Desktop

Simple, but often skipped. Just right-click anywhere on your desktop background and choose “Display settings.”

2. Identify Your Monitors

Click the “Identify” button to see which screen is which. A big number will pop up on each display.

  • Monitor 1? Monitor 2? This helps you know what you’re working with.

3. Click the Monitor You Want as Primary

Now, in the diagram of your displays, click on the monitor you want to make primary. It will be highlighted.

4. Scroll Down and Check the Box

Scroll down and find the checkbox that says:

“Make this my main display.”

Tick it. If it’s grayed out, that means it’s already your primary.

Boom. Done.

5. Apply and Enjoy

Hit “Apply” and give it a moment. You’ll see your taskbar and icons jump over to your new main screen.

Real Talk: Things That Can Go Wrong

Let’s not pretend it always goes perfectly. Here are a few curveballs and what to do about them.

The Monitor Doesn’t Show Up

Make sure it’s plugged in and powered on. Try hitting Windows + P and selecting “Extend” or “Duplicate” mode to wake it up.

Settings Don’t Stick After Reboot

This can happen if your graphics driver is outdated. Go to Device Manager and update your Display adapters.

You Have a Laptop and an External Monitor

Windows may favor the built-in display. Just manually set the external as primary and hit “Apply.”

Pro Tips for Power Users

Let’s say you’re not just switching for fun. Maybe you’re a coder, a stock trader, a remote worker, or a YouTube multitasker. Here are some bonus moves:

  • Use SmartPanels to save layouts for different profiles. Work, gaming, writing—one click restores your setup.
  • Keyboard shortcuts like Windows + Arrow Keys make moving windows easier.
  • Use DisplayFusion or PowerToys FancyZones for advanced snapping and positioning.

You Might Also Be Wondering…

Can I have more than one primary monitor?

— Not exactly. Only one monitor gets the title. But you can still use others for full productivity.

Why does my taskbar keep disappearing on the second screen?

— Because Windows loves playing hide and seek. Set the taskbar to show on all monitors under “Taskbar settings.”

Do games always open on the primary monitor?

— Usually, yes. But some games remember your last screen.

Real-World Scenarios: When Switching Helps

The Gamer Setup

You’re gaming on one screen and streaming OBS or Discord on the other. But your alerts keep popping up in the wrong place. Setting the primary monitor fixes that fast.

The Work-from-Home Juggler

Emails on the left, spreadsheets on the right, but apps keep launching on the wrong screen? Primary monitor = control.

The Designer or Editor

You need your toolbars and palettes in the right spot—not scattered. Setting your base monitor gives structure to the chaos.

The Family PC

Got a shared desktop? Everyone can have their own layout. Change the primary screen based on who logs in.

SmartPanels: One Click, All Fixed

Changing monitors manually is fine, but doing it every day? Exhausting.

That’s where SmartPanels comes in. You save your setup—apps, window positions, screen preferences—and restore it in one click. Switch between work and play, day and night, lefty or righty setups without redoing everything.

If you tweak your setup regularly or share your machine, SmartPanels saves you from reconfiguring layouts over and over.

Wrap-Up: It’s Your Desk. Make It Work for You.

You wouldn’t settle for a wonky chair. Why put up with a screen setup that fights you?

Learning how to set your primary monitor means fewer frustrations, smoother multitasking, and more control. And if you want to go even further? Pair it with SmartPanels and turn your workspace into a powerhouse.

So go on—give your display the status it deserves.

How to Switch Monitor 1 and 2: The Real-World Fix for a Backward Setup

Switch Monitor 1 and 2 on Windows

The cursor goes left when the mouse is moved right. A case of such backwardness can put an end to a productive work session. Fortunately, how to switch monitor 1 and 2 has a simple answer on Windows. Windows labels each screen with a number, and those numbers sometimes land in the wrong order. As a result, your taskbar, apps, and games may open on the wrong display.  

This guide shows how to switch monitor 1 and 2 with clear steps from the Windows Settings app. Next, you will learn quick shortcuts, fixes for stubborn labels, and a smart way to protect your layout. Along the way, you will see why Windows scrambles screens. Whether you use Windows 10 or Windows 11, you can finish every step in about five minutes.  

So, grab your mouse, and let’s put your screens back in order. 

Understanding Monitor Numbers and the Main Display 

To put to rest a common misconception, let’s be clear: Monitor 1 is not fixed in place. It can be on the left or right side of your setup, or even on the laptop itself. The numbering is determined by Windows in the sequence it finds the displays, an order that is frequently at the behest of your graphics driver and cable ports. 

Windows will also designate one screen as the primary display. This is where the taskbar and Start menu reside and where most applications will open of their own accord. 

Therefore, three ideas matter: 

  • The number: the label Windows gives each screen. 
  • The main display: the screen that hosts your taskbar and new apps. 
  • The position: the spot each screen takes in the layout diagram. 

Each method below builds on these three ideas. 

How to Switch Monitor 1 and 2 in Windows Settings 

This method works on Windows 10 and Windows 11, and it usually takes under two minutes. For more detail on the main display itself, read our guide to setting your primary monitor. 

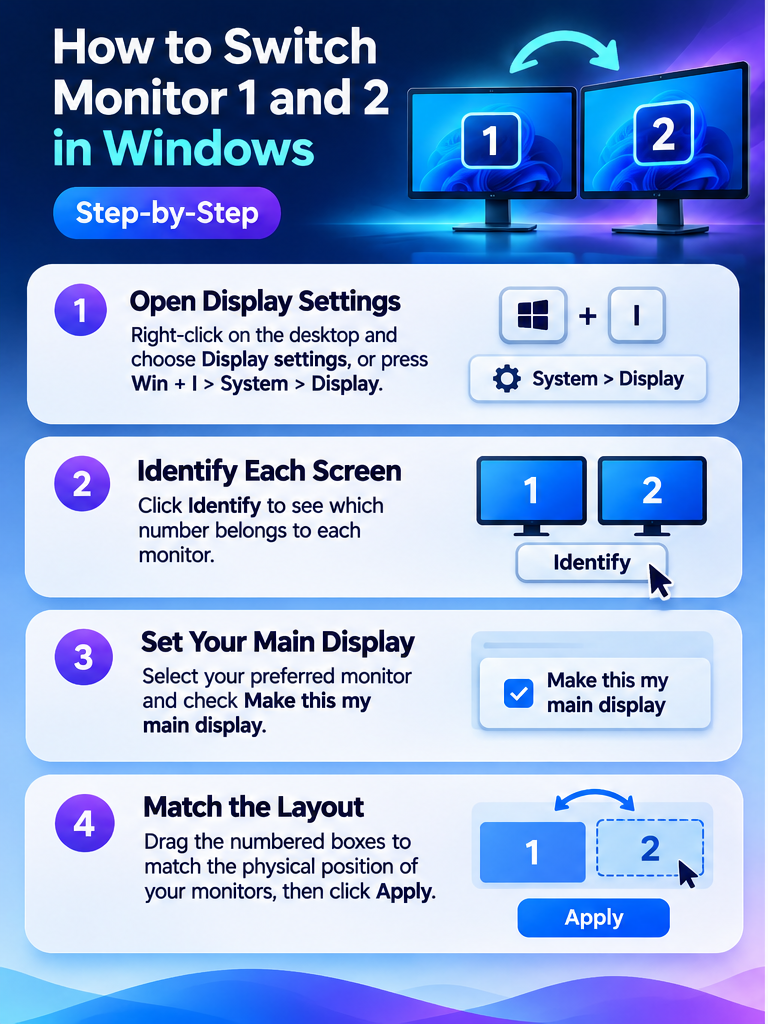
Step 1: Open Display Settings 

To get to the Display settings, right-click on some open space on the desktop and make your selection. One can also do this by hitting Windows key + I and then System before clicking on Display. At the top of the screen Windows will put up a set of numbered boxes. 

Step 2: Identify Each Screen 

Hit Identify and for a short while a big number will be put on every monitor. Jot down the correspondence between the numbers and the actual screens. 

Step 3: Set Your Main Display 

To set a screen as your primary display, click the box for it. Then go to Multiple displays and put a check in Make this my main display; you may have to open up the menu if the checkbox is not in view. Windows will make the change at once and move the taskbar over to that screen. 

Step 4: Match the Layout to Your Desk 

As for the numbered boxes, drag them into positions that correspond with your actual desk. If Monitor 2 is on your right, put it there. Hit Apply and run your mouse over the divide to see if it works. 

Many people also ask how to change which monitor is 1 and 2 when the labels stay put. Windows ties each number to detection order, so the main display setting and layout do most of the work. 

Keyboard Shortcuts That Speed Things Up 

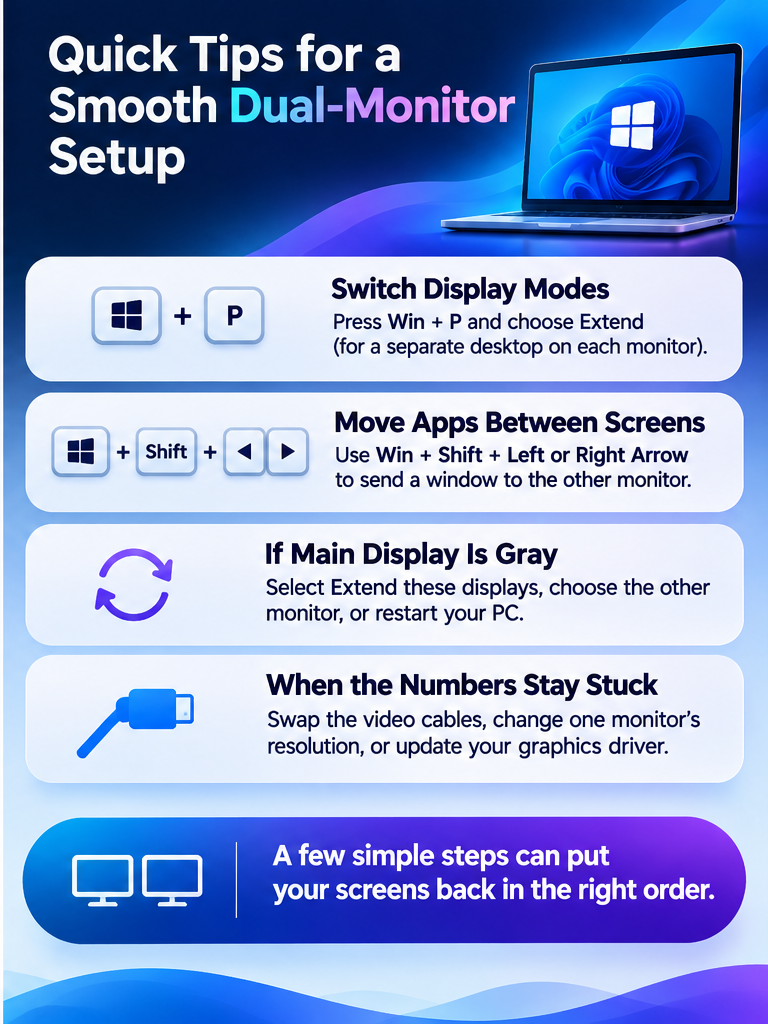
Hit Windows key + P to bring up the menu. There are four modes on offer: PC screen only, Duplicate, Extend and Second screen only. Opt for Extend if you want a separate desktop space on each monitor. A second press of Windows key + P will put you back. 

To transfer a window over to the other display, use Windows key + Shift + Left or Right Arrow. That is a handy way to deal with an app that has ended up on the wrong screen. Such shortcuts are useful for keeping things going over the day, not least when docking and undocking the laptop. 

What to Do When the Main Display Option Is Gray 

The Make this my main display box will be gray at times, an indication that the screen in question is already the primary one. In such a case, put these remedies to work:  

  1. First, go to the Multiple displays dropdown and choose Extend these displays. 
  2. Then in the layout diagram, select the other monitor to activate the checkbox. 
  3. Another option is to unplug a monitor and make the one left over your main before you reconnect the first. 
  4. Or simply reboot the PC for a fresh display list. 

        Once the box works again, repeat the Settings steps for how to switch monitor 1 and 2. 

        Why Windows Reorders Your Screens 

        There is a pattern to the causes: 

        1. A Windows update will reset display settings.  
        2. The detection order is put in flux by docking stations every time a laptop is attached. 
        3. Port order can be changed with a cable swap, say from HDMI to DisplayPort.  
        4. And an update to the graphics driver has the effect of refreshing the monitor list.  

              To put the order right more quickly, one needs to know what set it off. 

              Fixes When the Numbers Stay Stuck 

              Sometimes the numbers stay put after you apply every setting. In that case, your graphics driver likely remembers an old order. If the standard steps for how to switch monitor 1 and 2 fail, try these three fixes. 

              • Swap the Cable Ports 

              Shut down your PC. Then swap the two video cables between the ports on your graphics card. Power on and run Identify again. This move shows how to swap display 1 and 2 at the hardware level. Windows reads ports in sequence. 

              • Nudge the Resolution 

              Change one monitor’s resolution and click Apply. Then return to the native setting. This nudge forces Windows to negotiate with each screen again. It also explains how to switch display 1 and 2 when the usual steps fail. Run Identify one more time to check the result. 

              • Update Drivers and Check Hardware 

              Put in the most recent graphics driver from your GPU manufacturer and do a restart. Also have a look at your adapters, hubs and cables. To be on the safe side, plug the monitor directly into the PC to test it, as a USB-C hub can put things out of order. 

              Fixing Common Side Effects 

              When the screens are in the proper order you may notice some side effects. 

              • The resolution is not right: make sure each monitor is at its native setting. 
              • If the taskbar has ended up on the wrong screen, pick that one and set it as your main display once more. 
              • One monitor will wake before the other if the primary display option in your BIOS needs checking. 

              Setting Up Monitors for Your Workflow 

              There is much debate over whether Monitor 1 should be to the left or right. What is of greater import is the role and position of the screens. Make the one you use most your primary display and arrange the layout in keeping with your desk. 

              If you wonder how to change monitor 1 and 2 for a specific job, think in workflows. 

              A remote worker will have video calls on one screen and spreadsheets on the other. The gamer has the game running on the main display with chat apps on the second. Traders put their charts on one side and the news on the other. 

              Keep Your Layout Intact with SmartPanels 

              Windows settings work well for a one-time fix. However, frequent changes call for a smarter tool. Even after you learn how to switch monitor 1 and 2, your windows can drift again. FiveRivers Technologies built SmartPanels to save your monitor layout on Windows. It remembers which apps belong on which screen. It also stores window sizes and positions. 

              You can restore your workspace instantly with one click. You can also assign a custom hotkey to each profile, such as Work, Gaming, or Trading. Learn more about multi-monitor productivity or see how SmartPanels works. SmartPanels offers a free version that you download and use right away.  

              You can upgrade later on the pricing page. 

              Frequently Asked Questions 

              How do I switch monitor 1 and 2 on Windows 11? 

              Open Settings, go to System, and select Display. Click Identify, pick your preferred screen, and check Make this my main display. Then drag the boxes to match your desk. 

              Why does Windows keep swapping my monitors? 

              Windows updates, docking stations, cable changes, and driver updates can reshuffle the detection order. Saving your layout with SmartPanels restores it quickly. 

              Why is the “Make this my main display” box gray? 

              Windows grays the box when the selected screen already holds the main role. Select the other monitor or switch to Extend mode, and the box becomes active. 

              Does the main display decide which monitor is Monitor 1? 

              The main display controls your taskbar and new apps, while the number follows detection order. Cable changes and driver updates can refresh the numbers. 

              Can SmartPanels remember my layout after Windows reshuffles my screens? 

              Yes. SmartPanels saves app placement, window sizes, and positions as profiles. Restore them with one click or a hotkey. Visit the SmartPanels FAQ or support page for more help. 

              Conclusion 

              Now you know how to switch monitor 1 and 2 with confidence. Start by singling out each of the screens. Then make your selection for the main display and put the layout to suit your desk. Should a label not budge, an update to the driver, a new cable port or a slight resolution change will do the trick. The Windows key + P is there for any quick mode alterations. Do not let the number be more important than the main display.  

              For those who are in the habit of reshuffling windows on a daily basis, SmartPanels are worth a look; with one click the layout is back in order and the screens behave as they should. Such minor adjustments put minutes back in the day. Have this checklist at hand for when a monitor decides to go backward. To have a more tranquil workspace, put the above steps into practice and let us know what fix was most effective.  

              After that, you can put in some time with our other SmartPanels guides and pass this along to a colleague yet to come to terms with a setup that is running backward. 

              [Download Now]