What to Do When Your Computer Is Not Detecting a Second Monitor 

Fix not detecting Monitor

Connect a second screen and get nothing in return. Not a flicker, not so much as a signal, only a blank panel to look at. Such is the nature of one of the more ubiquitous tech headaches out there. It is an affliction for Windows 10 and 11 users of any calibre.  

A “second monitor not detected” error has a way of putting an end to your day, no matter if you need that dual-screen arrangement for your work, to game or for streaming. The odd thing is it can come on without warning from a system that was running perfectly the day before. 

But do not be concerned; with a little know-how the underlying problem is usually easy to put your finger on. In this guide we go over all the probable explanations for why your display will not show itself, followed by straightforward fixes to set things right.  
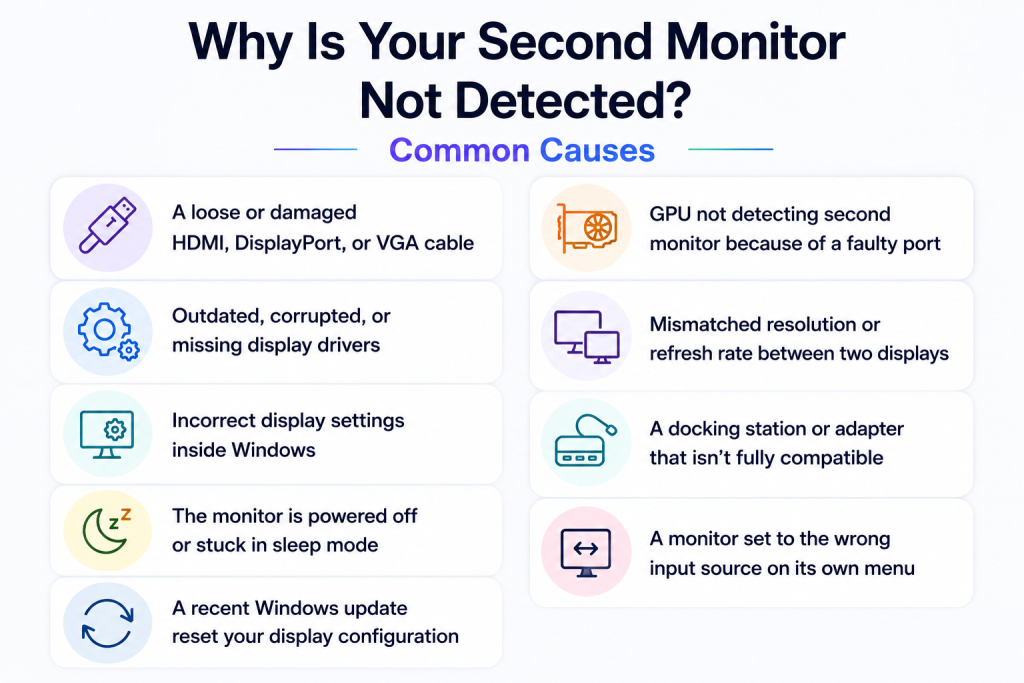
Why Is Your Second Monitor Not Detected? Common Causes 

It is useful to have an idea of what typically causes a second monitor not detected issue before one set about making repairs. Hardly ever is there a single culprit; often, you will find several minor issues compounding on one another. 

Here are the usual suspects: 

  • A loose or damaged HDMI, DisplayPort, or VGA cable 
  • Outdated, corrupted, or missing display drivers 
  • Incorrect display settings inside Windows 
  • The monitor is powered off or stuck in sleep mode 
  • A recent Windows update reset your display configuration 
  • GPU not detecting second monitor because of a faulty port 
  • Mismatched resolution or refresh rate between two displays 
  • A docking station or adapter that isn’t fully compatible 
  • A monitor set to the wrong input source on its own menu 

Having that understanding makes for quicker troubleshooting. In the case of a second display not detected, a complete reinstall of Windows is seldom called for. The right series of checks will generally do the trick. We will start with some of those quick ones and then proceed to the more involved software and hardware remedies. 
Why Is Your Second Monitor Not Detected? Common Causes 

Start with the basics. Many display problems come down to something simple you can fix in seconds. 

  • Confirm Power and Cable Connections 

First, be sure the monitor is connected to an outlet that is in good working order. You should also verify that the video cable is seated properly in the ports at either end; a display not detected error can be put down to a loose HDMI or DisplayPort connection. It does no harm to unplug and reattach each side with a firm hand. And if another cable is on hand, give it a try. One can never tell by looking at a damaged cable whether it will fail to transmit a signal. 

  • Test the Monitor on Another Device 

Try hooking the second monitor up to a different PC or laptop at your disposal. Should it function properly on that machine, you can be sure the monitor is in good order, and the trouble is with your primary computer. On the other hand, if nothing shows up on the screen, then the fault is probably with the monitor or the cable. 

  • Restart Your Computer 

A complete restart will put an end to all manner of temporary glitches, and while that may seem like an easy fix, it is one that works. Users commonly report that a fresh boot resolves the issue of the pc not detecting second monitor. This is particularly true when the device was hooked up with the computer on. After all, Windows tends to do its hardware scan at startup; a restart simply compels it to make another pass. 

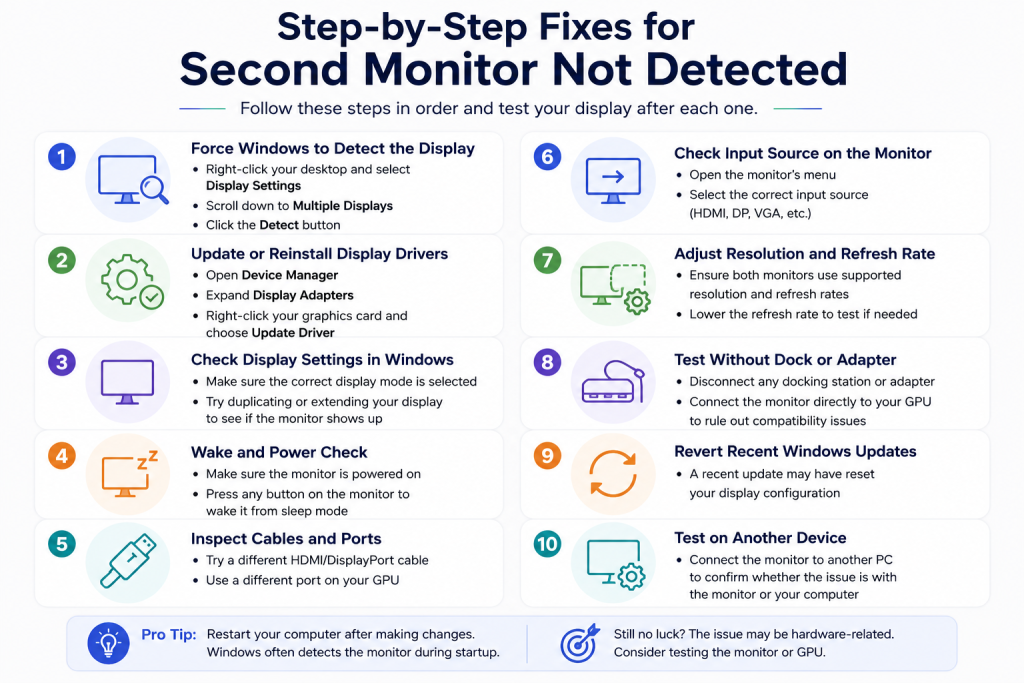
Step-by-Step Fixes for a Second Monitor Not Detected Error 

If the quick checks did not solve anything, work through these fixes in order. Start from the top and test your display after each step. 

Force Windows to Detect the Display 

Windows sometimes needs a manual nudge to notice new hardware. This is one of the fastest fixes for windows not detecting second monitor situations. 

  1. Right-click your desktop and select Display Settings 
  2. Scroll down to Multiple Displays 
  3. Click the Detect button 

      If your screen appears now, arrange the displays and confirm the changes. 

      Update or Reinstall Display Drivers 

      Outdated drivers are a frequent reason behind a computer not detecting second monitor error. Update them directly through Device Manager for a quick fix. 

      1. Right-click Start and open Device Manager 
      2. Expand Display Adapters 
      3. Right-click your graphics card and choose Update Driver 

          For best results, download the newest driver straight from NVIDIA, AMD, or Intel. Manufacturer drivers are often more current than what Windows offers automatically. 

          Switch Display Modes 

          To bring up the display mode menu, hit Windows + P. Go through the options for Extend, Duplicate and Second screen only in turn. At times this kind of back and forth will compel Windows to register a 2nd monitor it has failed to detect and put the signal back where it should be. 

          Check GPU Ports and Cables 

          A GPU not detecting second monitor, this issue usually arises when one port on the card as opposed to the card itself. Try to plug the monitor into another port on the graphics card; if you have the hardware for it, change over from HDMI to DisplayPort or DVI. There are some GPUs that put a cap on the number of displays a given port type can handle simultaneously, so if you have still not resolved the matter by switching ports, it would be prudent to look at the specifications for your card. 

          Roll Back a Recent Windows Update 

          If the trouble started right after an update, that update is a likely cause. 

          1. Open Settings > Windows Update > Update History 
          2. Select Uninstall Updates 
          3. Remove the most recent update, then restart your PC 

              This step often resolves sudden display failures that appeared without warning. 

              Match Resolution and Refresh Rate 

              If one of your screens is not lighting up, it may be down to a discrepancy in the way the two monitors are configured. To check, go to Settings and then System > Display > Advanced Display Settings. You will want to make sure the resolution and refresh rate for each monitor are ones it can handle. There is nothing like trying to force a 4K resolution on an old 1080p panel to create a situation where the second display is not detected. 

              Run a Clean Boot 

              Sometimes a background app or service interferes with your display drivers. A clean boot isolates the issue by disabling non-essential startup programs. 

              1. Type msconfig into the Windows search bar 
              2. Open System Configuration 
              3. Under Services, check Hide all Microsoft services, then disable the rest 
              4. Restart your PC and test the monitor again 

                    If the display works now, re-enable services one by one to find the culprit app. 

                    Try a USB-to-HDMI or DisplayPort Adapter 

                    A USB video adapter is a good option when the GPU ports are either in poor shape or simply at capacity. The device makes do by running the video out of a USB port and around the graphics card altogether. While one would not want to rely on it for any serious gaming, it is perfectly adequate for the sort of day-to-day work that involves presentations, spreadsheets and general multitasking. 

                    Reset the Graphics Driver 

                    A quick way to reset the graphics driver is with the Windows + Ctrl + Shift + B key combination. You will see the screen flicker for a moment as the signal is sent, but it is enough to bring back a display that has gone missing and you can avoid rebooting the whole system. 

                    When It’s a Hardware Problem, Not Software 

                    Then again, no amount of software fixes are going to do any good if the fault is in the hardware. Suppose you have tried every step and your external monitor not detected issue continues. In that case, consider these possibilities: 

                    • The monitor’s internal power supply has failed 
                    • The video port on your laptop or desktop is physically damaged 
                    • The cable itself carries a hidden internal break 
                    • The monitor’s own settings menu is set to the wrong input source 
                    • An aging adapter no longer passes a stable signal 

                    Try making the second screen your primary display in Windows to see if that helps. Should the computer fail to pick it up no matter how you configure things, then you are left with the option of having the hardware repaired or put in a new unit. Any competent local shop will be able to verify the problem in a matter of minutes. It is worth noting that if more than one computer cannot detect the monitor, the issue is nearly certain to be with the hardware and not some software quirk. 

                    Docking Stations and Laptop-Specific Issues 

                    Laptop users often run into a computer not recognizing second monitor problem through docking stations or USB-C hubs specifically. With these additional parts comes another potential point of failure in the chain. To start, make sure the dock can handle the resolution and display count you are after. You should also put in an update to the dock’s firmware; most manufacturers put out compatibility patches on a regular basis for good reason. And as a last step, try a direct connection from the monitor to the laptop port, bypassing the dock altogether. This quick test confirms whether the dock itself is the actual cause of your not detecting second monitor headache. 

                    A Note for Mac and Multi-OS Setups 

                    It is not just Windows that has its share of trouble with external displays. From time to time, a Mac will throw up a “display not detected” error, particularly in the wake of a macOS update or if an older adapter is in use. For those on Apple hardware, the System Settings offer a Detect Displays function under the Displays panel which is the equivalent of the Windows remedy; should the button be missing, one can hold down Option while opening the panel to make it show.  

                    Then there are dual-boot and Linux configurations where detection fails, often on account of graphics drivers and not the monitor. In the end, the logic is the same regardless of the operating system: have a look at the cable, the driver and the settings. 

                    How SmartPanels Keeps Your Multi-Monitor Setup Running Smoothly 

                    Dual monitor use still brings daily friction, even after you fix the display. A reboot scatters your windows, and apps lose track of which screen they belong on. Then you are left to manually drag things back where they should be after reattaching a monitor from a trip.  

                    SmartPanels is the answer to that; it tracks how you arrange your windows on every screen and restores that order with one click, saving real time. For those who work with docking stations or must swap cables often, it is a natural part of the routine. The moment the displays are back online, your workspace is as it should be and you can get on with the job at hand. 

                    Second Monitor Not Detected FAQs 

                    Why does Windows keep saying my second monitor is not detected?  

                    Usually, this points to a loose cable, an outdated driver, or a display mode set incorrectly. Work through the cable checks first, then move on to driver updates and settings. 

                    How do I fix windows not detecting second monitor after an update?  

                    Roll back the most recent Windows update through Settings > Windows Update > Update History. Then restart your PC and test the display again to confirm the fix. 

                    What if my GPU has open ports but still won’t detect my second monitor?  

                    A GPU not detecting second monitor situation often comes from one faulty port rather than the entire card. Try a different port or cable type before assuming full hardware failure. 

                    Can a docking station cause an external monitor not detected error?  

                    Yes, docking stations and USB-C hubs add another possible failure point in your setup. Update the dock’s firmware, then test the monitor connected directly to your laptop. 

                    Is a black screen the same as a display not detected error?  

                    Not always. A black screen with a detected signal usually points to resolution or refresh rate mismatches. A true detection failure means Windows shows no second display at all in Settings. 

                    Wrapping Up 

                    A second monitor not detected problem feels frustrating the moment it happens, but the fix is usually within easy reach. Begin with the straightforward checks and proceed to any driver or setting changes. Do not be quick to replace hardware; let that be a last resort after you have put every software alternative to the test. Also, give each component its due attention, desktop GPUs, docking stations, and laptops all have their own idiosyncrasies. There is no single universal cause to be had, so examine them on their own merits. 

                    When you have the system running as it should, something like SmartPanels can ensure it stays that way. It automatically restores your window layout after a reboot or cable swap, so you don’t have to put your workspace back together. With some good troubleshooting practices, multi-monitor work need not be a chore but an effortless part of the day. 

                    Best Taskbar Apps to Combine Multiple Windows into One Icon

                    Best Taskbar Apps to Combine Multiple Windows

                    Let’s be honest—if you’re anything like me, by midday your taskbar looks like a digital traffic jam. Multiple Chrome tabs, Photoshop, Excel, Zoom… and five more things you forgot you even opened. You hover, hoping to find the right window, but it’s a gamble every time.

                    Now imagine this: all your app windows tucked neatly under one icon. No clutter. No guessing games. Just a calm, clean taskbar. That’s the promise of modern task bar apps to contain windows in one icon—and it’s exactly what we’re unpacking today.

                    Whether you’re juggling client calls or switching between design drafts and spreadsheets, managing windows shouldn’t feel like a second job. This article walks training you through smart tools (like SmartPanels), easy fixes, and game-changing habits for keeping your digital workspace organized—without sacrificing productivity.

                    Why Is Your Taskbar Always Full?

                    Picture this. You’ve got five Chrome windows, all minimized, but they hog five separate slots. A taskbar window grouping app consolidates them under one Chrome icon. When you hover or click, you see all instances in a tidy view. It’s like putting your messy desktop into a drawer—and knowing exactly where to find everything.

                    These tools aren’t just cosmetic. They:

                    • Reduce taskbar clutter
                    • Make switching between windows faster
                    • Prevent misclicks when you’re moving fast
                    • Create mental clarity during multitasking

                    And yes, your laptop battery might even thank you.

                    Top Apps That Tidy Your Taskbar

                    Let’s not sugarcoat it. Some of us need more than just what Windows offers. Here are tools that go the extra mile:

                    1. SmartPanels – The Smart One

                    If you’re looking for a smarter desktop experience, SmartPanels deserves the top spot. It doesn’t just group windows—it remembers how and where you like them.

                    • Organize apps into profiles
                    • Restore window positions across multiple monitors
                    • Combine apps like Outlook, Teams, and browser tabs into a single workspace
                    • Reduce cognitive load by minimizing the need to re-open and re-arrange daily

                    SmartPanels taskbar feature is perfect for users who want a cleaner workflow without repetitive clicks.

                    2. TaskbarX (formerly FalconX) – The Customizer

                    TaskbarX gives your Windows taskbar a sleek, centered look—while offering animated transitions and taskbar transparency. Not strictly for grouping, but great for visuals and reducing distraction.

                    3. Groupy by Stardock – The Tab Master

                    Think of Groupy like Chrome tabs—but for your apps. You can group apps together into tabs under one window. Perfect for those who frequently switch between Excel, Word, and browser tabs.

                    4. Actual Window Manager – The Power User’s Tool

                    Loaded with features like virtual desktops, window snapping, and window rules, it’s built for serious multitaskers.

                    5. Taskbow – Lightweight and Old-School

                    If you’re on older machines or just need a basic solution, Taskbow replaces your taskbar with color-coded icons for grouped apps. It’s simple and still effective.

                    Why Grouping Apps Improve Your Workflow

                    It’s not just about looks.

                    An organized taskbar:

                    • Reduces the time you spend switching tasks
                    • Lowers chances of clicking the wrong window
                    • Helps with multiple window control during meetings or presentations
                    • Supports taskbar productivity tips that actually work

                    And let’s be real—who hasn’t embarrassed themselves by sharing the wrong screen during a Zoom call?

                    How SmartPanels Goes Beyond the Basics

                    Here’s the thing: most tools stop at grouping. SmartPanels goes further. It actually remembers your setup. Got three monitors? Want your browser always on the left, Slack on the right, and Excel dead center? SmartPanels stores that layout. One click, and your whole workspace is restored.

                    Whether you’re working from home, hot-desking at a coworking space, or setting up in a cafe, SmartPanels gets you back in the zone instantly.

                    It also supports app profile saving, which means your “Design Work” layout can be separate from your “Client Calls” setup. No more dragging windows around every morning.

                    Quick Fixes and Built-In Settings You Can Use

                    Before installing anything, try these quick tweaks:

                    Right-click taskbar > Taskbar settings

                    Turn on “Combine taskbar buttons” to group similar apps

                    Settings > System > Multitasking

                    Turn on Snap windows for fast tiling

                    Use Alt + Tab

                    Master this shortcut for rapid switching

                    While these don’t go as deep as third-party tools, they help in a pinch.

                    Common Pitfalls to Avoid

                    A few quick warnings:

                    • Avoid installing multiple taskbar apps at once—they can conflict.
                    • Be cautious with experimental beta tools. Some mess with display scaling.
                    • Don’t ignore updates. These tools often improve with feedback.

                    Final Thoughts: Your Taskbar Deserves Better

                    You know what? Your desktop setup says a lot about how you work. If your taskbar’s jam-packed with 20 windows and you spend more time finding things than doing them, maybe it’s time for a change.

                    From lightweight tools to full-featured powerhouses, there’s no shortage of ways to get your taskbar under control. Whether you’re managing reports, writing code, or editing videos, streamlining your taskbar with the right taskbar cleaner tools just makes everything… smoother.

                    And if you want the smartest option? Give SmartPanels a shot. It doesn’t just clean up—it remembers how you work and meets you there.

                    How to Change Primary Monitor: A Surprisingly Simple Shift 

                    How to Change Primary Monitor

                    Ever feel like your mouse is escaping to the wrong screen every single time? Or maybe your favorite app always opens on the monitor you rarely use. Frustrating, right? Well, here’s the good news: changing your primary monitor is easier than it sounds. And once you do it, your workflow might just breathe a sigh of relief.

                    Let me walk you through the why, the how, and a few gotchas you might run into along the way.

                    Wait, What Is a “Primary Monitor” Anyway?

                    Before we get into the nuts and bolts, let’s clarify what this even means. When you’re working with more than one display, your computer chooses one as the “main” screen. That screen:

                    • Shows your taskbar and system tray
                    • Hosts most of your desktop icons
                    • Often becomes the default launch point for apps

                    So if your monitor arrangement feels… off, there’s a good chance you need to change which one is the “captain of the ship.”

                    Why You Might Want to Change It

                    We all have our quirks. Maybe you prefer your right monitor as the main one because it’s larger. Or perhaps your laptop screen is too cramped, and you’d rather work off that glorious 32-inch external monitor.

                    Reasons to switch include:

                    • Fixing weird app launch behavior
                    • Enhancing ergonomics and neck comfort
                    • Aligning with a docking station setup
                    • Improving gaming performance (yes, that matters)
                    • Reassigning monitors after an OS or graphics driver update

                    Whatever your reason, the solution is straightforward. 

                    The Classic Windows Way (Works on Windows 10 & 11)

                    Here’s how to do it in just a few steps:

                    1. Right-click on your desktop and choose Display settings.
                    2. You’ll see your monitors labeled (usually 1 and 2). If you’re unsure which is which, click the Identify button.
                    3. Select the screen you want to make primary by clicking its box.
                    4. Scroll down and check the box labeled Make this my main display.
                    5. That’s it! Windows might blink or refresh briefly, and you’re good to go.

                    Quick Tip:

                    If the option is grayed out, make sure the monitor you’re selecting is actually connected. Some ghost displays hang around when you’ve recently disconnected one.

                    What If You’re Using a Laptop?

                    Laptops complicate things just a tiny bit.

                    When you connect an external monitor to a laptop, Windows usually decides which screen takes the lead. But you can override that easily using the same steps above.

                    Just remember: your laptop screen will usually be Monitor 1, and your external screen might be 2, 3, or more depending on your setup.

                    Also, check your Projection Mode (Win + P) and choose:

                    • Duplicate (same thing on both screens)
                    • Extend (acts like a second screen)
                    • Second screen only (great if your laptop lid is closed)

                    Using NVIDIA or AMD Control Panels

                    If you’re a gamer or power user, you might be using graphics card software like:

                    • NVIDIA Control Panel
                    • AMD Radeon Settings

                    These also let you reassign your primary monitor:

                    NVIDIA:

                    1. Open NVIDIA Control Panel
                    2. Go to Display > Set up multiple displays
                    3. Right-click the monitor you want and choose Make primary

                    AMD:

                    1. Open AMD Radeon Software
                    2. Go to Display Settings
                    3. Set the desired monitor as primary

                    Honestly, though, the Windows method is often quicker unless you need granular GPU-level control.

                    SmartPanels: A Smarter Way to Manage Displays

                    Changing your primary monitor is just one piece of the puzzle. If you’re constantly rearranging windows, switching between work modes, or sharing screens, you know it can be a hassle.

                    SmartPanels helps by:

                    • Remembering and restoring your window positions
                    • Letting you save profiles for different workflows (e.g., writing, coding, Zoom meetings)
                    • Supporting multi-browser, multi-display environments seamlessly

                    You could say it’s like hiring a personal assistant for your screens. Worth it? Many users think so.

                    The Perks of Getting It Right

                    Here’s what you gain when your primary monitor is exactly where you want it:

                    • Faster, smoother workflow
                    • Reduced visual clutter
                    • Better task-switching
                    • Fewer misclicks and window drags

                    In short? Less tech headache. More getting-stuff-done vibes.

                    Common Issues & Fixes

                    Display option grayed out?

                    Make sure the monitor is physically connected and detected.

                    Taskbar not moving?

                    Sometimes Windows plays tricks. Try setting another screen as primary, then switch back.

                    Wrong monitor turns on at boot?

                    That’s BIOS or firmware behavior. You’ll need to set your preferred screen as default in BIOS (usually under Display or Graphics settings).

                    Final Thoughts

                    Look, switching your primary monitor isn’t rocket science. But it does make a world of difference when you’re juggling tabs, meetings, and to-do lists.

                    Whether you’re a work-from-home warrior, a design geek with three screens, or someone who just can’t deal with dragging windows anymore—this small tweak is a big win.

                    So go ahead, take 30 seconds and fix your setup. Future-you will thank you.

                    How to Connect Two Monitors to One Laptop (Without the Headache)

                    Connect Two Monitors to One Laptop

                    You’re not alone if you’ve ever sat there juggling multiple windows on one tiny laptop screen, squinting while toggling between tabs like it’s a sport. Ever wondered: “Can I just plug in two monitors and make this easier?” You can—and we’re about to break it down for you in a way that actually makes sense.

                    Why Bother With Dual Monitors?

                    Let’s be real: one screen just doesn’t cut it anymore. Whether you’re working from home, gaming, designing, coding, or just bingeing productivity hacks on YouTube, the benefits of extending your workspace are massive:

                    • Fewer Alt-Tabs: Keep your Zoom call on one screen, your notes on another.
                    • Smoother Workflow: Drag and drop files across windows. Side-by-side comparison? Yes please.
                    • Better Focus: Dedicate one screen to work, the other to distractions (or productivity boosters, let’s pretend).

                    First Things First: Can Your Laptop Handle It?

                    Before you run out and buy two monitors, let’s check if your laptop is even up for the task. Most modern laptops can support at least two displays, but you’ll want to double-check:

                    • Ports: Got HDMI, USB-C, Thunderbolt, or DisplayPort?
                    • GPU Support: Your graphics card must support dual external displays. Even some integrated GPUs (like Intel’s Iris Xe) do.
                    • Operating System: Windows 10 and 11 handle multiple displays like a champ.

                    The Setup Options (Simple to Fancy)

                    1. Plug-and-Play (If You’re Lucky)

                    If your laptop has two video output ports (say, an HDMI and a USB-C with DisplayPort support), you’re golden. Just plug each monitor in and Windows should detect them instantly.

                    2. Use a Docking Station

                    Docking stations aren’t just for fancy corporate desks—they’re lifesavers. One USB-C cable to your laptop can power two (or more) external monitors, USB accessories, ethernet, even your coffee machine (okay not that).

                    Recommended for:

                    • Laptops with only one video output
                    • Clean desk aesthetics
                    • Power users

                    3. USB Display Adapters

                    No fancy ports? No problem. USB-to-HDMI adapters (especially USB 3.0 and above) work surprisingly well. They use software drivers to simulate display outputs.

                    Caveat: Slight lag for high-motion stuff (not ideal for gaming).

                    4. Daisy-Chaining via DisplayPort MST

                    This is more niche, but if your monitor and laptop support DisplayPort Multi-Stream Transport (MST), you can chain one monitor to the next—one cable into the laptop, and a daisy-chain to the second monitor.

                    Step-by-Step: Connecting Two Monitors

                    1. Check your laptop’s ports.
                    2. Plug in the monitors. Use HDMI, USB-C, or adapters.
                    3. Right-click on your desktop > Display settings.
                    4. Scroll to ‘Multiple displays.’
                    5. Click ‘Detect’ if it doesn’t auto-recognize.
                    6. Arrange screens (drag boxes to match physical layout).
                    7. Choose if you want to Extend, Duplicate, or use a single display.

                    Boom. Done.

                    Troubleshooting Woes (Because Something Always Goes Wrong)

                    • Only one monitor works? Try swapping cables or ports.
                    • Monitors flicker or disconnect? Could be a bandwidth issue—try using a powered hub.
                    • Wrong resolution? Update GPU drivers.
                    • Black screen on second monitor? Sometimes it’s set to ‘Show only on 1’ in Display settings. Fix that.

                    What About Laptops With Only One Port?

                    You can still join the dual-screen gang:

                    • Docking station (USB-C to HDMI x2)
                    • USB Display Adapter
                    • External GPU (eGPU) for the performance enthusiasts

                    Best Monitor Arrangement Hacks

                    • Keep primary monitor directly in front of you.
                    • Use vertical alignment if one monitor is smaller.
                    • Match refresh rates and resolutions for smoother visuals. 
                    • Label them. Seriously—makes things way easier. 

                    Bonus: Tools to Supercharge Your Multi-Monitor Setup

                    Once you’re all set, make your workspace even smarter:

                    • SmartPanels – Save and restore window positions across screens.
                    • DisplayFusion – Deep control over monitor layout, wallpapers, and functions.
                    • PowerToys FancyZones – Windows app to split screens with customized zones.

                    Use Cases That Make You Wonder Why You Didn’t Do This Sooner

                    • Developers: Code on one, preview on another.
                    • Designers: Photoshop on one, assets library on the second.
                    • Traders: One screen for charts, another for order book.
                    • Writers/Students: Research on one screen, draft on the other.

                    Wrapping It Up (With Cables, Preferably Neatly)

                    Connecting two monitors to your laptop isn’t just possible—it’s life-changing for your workflow. Whether you’re aiming for Netflix on the side or mastering complex projects, going dual-screen is one of those rare productivity hacks that feels like cheating.

                    So grab that second screen, and let your laptop breathe a little. You’ve got more room to think now.

                    For More Related Information: How to Switch Monitor 1 and 2 | How to Switch Screens on Windows | How to Set Your Primary Monitor

                    How to Set Your Primary Monitor (Without Wanting to Throw Your Mouse)

                    How to Set Your Primary Monitor

                    Let’s face it: dealing with monitor settings on Windows can sometimes feel like playing digital Jenga. Especially when you just plugged in a second screen and everything went sideways—literally. Windows icons end up on the wrong display, your taskbar disappears, and your mouse starts wandering into the void.

                    Sound familiar?

                    If you’re sitting there wondering how to set your primary monitor so that things just work, you’re not alone. And the good news? It’s easier than you might think.

                    This guide walks you through the how, why, and what-ifs of assigning your main screen—with no fluff, no jargon, and no YouTube rabbit holes.

                    Why It Even Matters

                    So what’s the big deal about a “primary monitor” anyway?

                    Think of your primary monitor like your home base. It’s where:

                    • Your taskbar lives
                    • Desktop icons appear
                    • Apps usually launch by default
                    • Pop-ups, alerts, and new windows tend to show up

                    If you’re juggling more than one screen and your setup feels “off,” chances are your primary monitor isn’t set right.

                    Step-by-Step: How to Set Primary Monitor on Windows 10 & 11

                    Here’s how to make your main screen actually behave like the main screen.

                    1. Right-click on the Desktop

                    Simple, but often skipped. Just right-click anywhere on your desktop background and choose “Display settings.”

                    2. Identify Your Monitors

                    Click the “Identify” button to see which screen is which. A big number will pop up on each display.

                    • Monitor 1? Monitor 2? This helps you know what you’re working with.

                    3. Click the Monitor You Want as Primary

                    Now, in the diagram of your displays, click on the monitor you want to make primary. It will be highlighted.

                    4. Scroll Down and Check the Box

                    Scroll down and find the checkbox that says:

                    “Make this my main display.”

                    Tick it. If it’s grayed out, that means it’s already your primary.

                    Boom. Done.

                    5. Apply and Enjoy

                    Hit “Apply” and give it a moment. You’ll see your taskbar and icons jump over to your new main screen.

                    Real Talk: Things That Can Go Wrong

                    Let’s not pretend it always goes perfectly. Here are a few curveballs and what to do about them.

                    The Monitor Doesn’t Show Up

                    Make sure it’s plugged in and powered on. Try hitting Windows + P and selecting “Extend” or “Duplicate” mode to wake it up.

                    Settings Don’t Stick After Reboot

                    This can happen if your graphics driver is outdated. Go to Device Manager and update your Display adapters.

                    You Have a Laptop and an External Monitor

                    Windows may favor the built-in display. Just manually set the external as primary and hit “Apply.”

                    Pro Tips for Power Users

                    Let’s say you’re not just switching for fun. Maybe you’re a coder, a stock trader, a remote worker, or a YouTube multitasker. Here are some bonus moves:

                    • Use SmartPanels to save layouts for different profiles. Work, gaming, writing—one click restores your setup.
                    • Keyboard shortcuts like Windows + Arrow Keys make moving windows easier.
                    • Use DisplayFusion or PowerToys FancyZones for advanced snapping and positioning.

                    You Might Also Be Wondering…

                    Can I have more than one primary monitor?

                    — Not exactly. Only one monitor gets the title. But you can still use others for full productivity.

                    Why does my taskbar keep disappearing on the second screen?

                    — Because Windows loves playing hide and seek. Set the taskbar to show on all monitors under “Taskbar settings.”

                    Do games always open on the primary monitor?

                    — Usually, yes. But some games remember your last screen.

                    Real-World Scenarios: When Switching Helps

                    The Gamer Setup

                    You’re gaming on one screen and streaming OBS or Discord on the other. But your alerts keep popping up in the wrong place. Setting the primary monitor fixes that fast.

                    The Work-from-Home Juggler

                    Emails on the left, spreadsheets on the right, but apps keep launching on the wrong screen? Primary monitor = control.

                    The Designer or Editor

                    You need your toolbars and palettes in the right spot—not scattered. Setting your base monitor gives structure to the chaos.

                    The Family PC

                    Got a shared desktop? Everyone can have their own layout. Change the primary screen based on who logs in.

                    SmartPanels: One Click, All Fixed

                    Changing monitors manually is fine, but doing it every day? Exhausting.

                    That’s where SmartPanels comes in. You save your setup—apps, window positions, screen preferences—and restore it in one click. Switch between work and play, day and night, lefty or righty setups without redoing everything.

                    If you tweak your setup regularly or share your machine, SmartPanels saves you from reconfiguring layouts over and over.

                    Wrap-Up: It’s Your Desk. Make It Work for You.

                    You wouldn’t settle for a wonky chair. Why put up with a screen setup that fights you?

                    Learning how to set your primary monitor means fewer frustrations, smoother multitasking, and more control. And if you want to go even further? Pair it with SmartPanels and turn your workspace into a powerhouse.

                    So go on—give your display the status it deserves.

                    How to Switch Monitor 1 and 2: The Real-World Fix for a Backward Setup

                    Switch Monitor 1 and 2 on Windows

                    Let’s be honest: if you’ve ever connected two monitors and found your mouse sliding in the wrong direction, it’s infuriating. You move right, and your cursor flies left. You try to drag a window over, and it disappears into the void. What gives?

                    This is where the concept of ” Switch Monitor 1″ and “Monitor 2” comes in. It might sound technical, but it’s actually just about how your computer maps your screens. And yes, you can switch them—easily.

                    So, if you’re stuck in a screen-swapping nightmare, here’s how to make your monitors behave like civilized digital citizens.

                    First, What Does “Monitor 1” Even Mean?

                    Before jumping into settings, let’s clear the air. “Monitor 1” isn’t always the left monitor, and it’s not necessarily the one with your taskbar. It’s just the screen Windows labels as your “main display.”

                    Why does it matter? Because:

                    • Your taskbar and Start menu live there
                    • Most apps and games launch on Monitor 1
                    • Fullscreen videos default to Monitor 1

                    So if that’s not the screen you’re actually looking at most of the time, we’ve got work to do.

                    How to Switch Monitor 1 and 2 in Windows Settings 

                    Alright, let’s get to the fix. Here’s the simplest method to switch your primary and secondary screens:

                    1. Right-click on your desktop and select Display settings.
                    2. You’ll see two boxes labeled 1 and 2.
                    3. Click Identify to see which is which.
                    4. Select the display you want to make Monitor 1 (your main screen).
                    5. Scroll down and check the box “Make this my main display.”
                    6. Click Apply.

                    Boom. You just swapped them.

                    Still Confused? Here’s a Quick Visual Tip

                    If the boxes are reversed compared to your actual setup, drag the display boxes left or right until they match your physical monitor layout. It’s like arranging furniture, but digital.

                    What If the “Make This My Main Display” Option is Grayed Out?

                    This usually happens when your primary display is disconnected or when Windows thinks both monitors are mirroring each other. Quick fixes:

                    • Uncheck mirror/duplicate mode in Display Settings.
                    • Try unplugging one monitor and setting the other as primary.
                    • Reboot after making changes.

                    Sometimes, Windows needs a little nudge.

                    How SmartPanels Makes This Way Easier

                    Honestly, if you’re doing this often—like switching between work and gaming layouts—you need a smarter solution.

                    Enter SmartPanels . This handy tool saves your entire monitor setup, including:

                    • Which apps go on which screen
                    • Window sizes and positions
                    • Profile-specific layouts (Work, Gaming, Browsing, etc.)

                    With one click or a custom hotkey, everything snaps back into place. No more dragging windows every morning.

                    Why Do Monitors Sometimes Get “Swapped” Randomly?

                    Great question. It happens more often than you think. Common causes include:

                    • Windows updates resetting your display config
                    • Docking/undocking laptops
                    • HDMI/DisplayPort changes
                    • Gaming with multiple display modes

                    SmartPanels actually remembers your preferred setup, even if Windows doesn’t.

                    Pro Tips for Power Users

                    Want more control? Try this:

                    • Windows + P: Instantly switch between duplicate, extend, and second screen-only modes.
                    • Use keyboard shortcuts inside SmartPanels to bind profiles to hotkeys.
                    • Combine with apps like DisplayFusion or PowerToys for next-level control.

                    Common Use Cases (Real People, Real Fixes)

                    1. Remote Workers

                    Switch between Zoom calls and spreadsheets without rearranging windows all day.

                    1. Designers & Creatives

                    Keep your canvas on one screen, toolbars on another—and save the layout forever.

                    1. Gamers

                    Set up game on primary, Discord/stats/streaming controls on secondary.

                    1. Traders/Analysts

                    Charts on left, news feed on right. Every morning. In the right order. Always.

                    Got Multiple Monitors? Here’s When to Use Display Numbers vs. Layout

                    Many folks obsess over whether “Monitor 1” should be left or right. Truth? Doesn’t matter. What matters is position and role.

                    Set the most-used screen as the primary, and drag the displays in Settings to match your desk layout.

                    Forget the numbers—think in workflows.

                    Quick Troubleshooting Guide

                    • Resolution mismatch? Make sure both monitors are set to their native resolutions.
                    • Wrong monitor waking up first? Check BIOS settings (yes, seriously).
                    • Taskbar on wrong monitor? Switch “main display” again or use third-party tools.

                    In Summary: Don’t Let Windows Boss You Around

                    Switching Monitor 1 and 2 isn’t rocket science. But it’s frustrating when you don’t know where to look. Hopefully, you now do.

                    And if you’re someone who juggles layouts frequently, SmartPanels might just be the sidekick you never knew you needed.

                    Try it. Set it once. Enjoy productivity forever.

                    SmartPanels vs DisplayFusion: In-Depth Comparison for a Smarter 2026

                    In 2026, managing multiple windows is no longer just about quantity; it’s about leveraging smart, efficient systems to optimize your workflow. It’s about more possibilities, more efficiency, and more intelligence in how we manage our digital worlds. SmartPanels takes desktop management to the next level with innovative automation, intuitive restoration features, and robust multi-monitor support. Gone are the days of just snapping windows into place or dealing with cumbersome setups. The future is here, and SmartPanels is leading the charge.

                    Now, let’s talk about DisplayFusion reliable, sure, but in a world where productivity isn’t just about doing more it’s about doing it smarter does DisplayFusion still hold up? While it offers foundational window management features like multi-monitor support and customizable hotkeys, these are features we’ve seen before. However, SmartPanels exceeds expectations by recognizing advanced automation and future-proof design, establishing itself as the best tool for the world in 2026 and beyond.

                    In this blog post, we will delve deeply into the SmartPanels vs DisplayFusion debate, analyzing each distinct features, performance, and benefits. Let’s explore how SmartPanels redefines productivity for 2026, while DisplayFusion is lagging behind due to its reliance on legacy features.

                    A Quick Overview – SmartPanels vs. DisplayFusion

                    SmartPanels offers a complete desktop management solution optimized for multi-monitor setups, browser integration, and advanced automation. It’s not just about organizing windows—it’s about transforming how you work. With SmartPanels, you gain access to new features designed to supercharge your productivity in 2026:

                    • No more manually adjusting your workspace. SmartPanels remembers your windows, apps, and browser tabs, restoring them exactly as you left them.
                    • Revolutionize your workflow with advanced text automation, allowing you to trigger text replacements and execute complex calculations with just a keystroke.
                    • Streamline text editing and coding tasks by expanding shortcuts and performing computations in real time, saving you valuable time on repetitive tasks.
                    • Take complete control over your workflow by creating custom hotkeys for common actions. Whether it’s automating multi-step tasks or triggering specific commands, SmartPanels makes it fast and efficient.
                    • With support for up to 6 monitors, SmartPanels offers an intuitive experience that’s perfect for users with complex workflows, ensuring windows and tasks are arranged seamlessly across multiple screens.

                    DisplayFusion, on the other hand, is primarily a multi-monitor manager offering basic functionality like customizable hotkeys, taskbar extensions, and monitor splitting. While it covers the essentials, it lacks the advanced automation, seamless integration with modern apps, and forward-thinking design that SmartPanels brings to the table.

                    Feature-by-Feature Breakdown -SmartPanels vs DisplayFusion

                    FeatureSmartPanelsDisplayFusion
                    Auto-Arrange WindowsInstantly restores window layouts with one click, saving time in reconfiguring apps.Lacks automatic restoration of window layouts. Must be manually reconfigured.
                    Multi-Monitor SupportSupports up to 6 monitors with full workspace restoration, making it ideal for complex workflows.Offers multi-monitor support, but no automatic restoration of window layouts.
                    Multi-Profile SwitchingUnlimited workspace profiles for different tasks and work environments, offering unparalleled flexibility.Limited to a smaller number of profiles, making it less adaptable for diverse workflows.
                    Computational Text CommandAdvanced feature that allows custom hotkeys to trigger text replacements or calculations, boosting productivity.Lacks computational text support and advanced text automation.
                    Multi-Browser Tab RestorationRestores tabs across Chrome, Edge, and Firefox, enhancing workflow efficiency.No support for restoring browser tabs or advanced browser integrations.
                    Microsoft Office File RecoveryAutomatically restores Microsoft Office files (e.g., Word, Excel) and associated windows with one click.No native support for Office file restoration, requiring manual re-opening.
                    Custom HotkeysFully customizable hotkeys for automating complex workflows and multi-step tasks across apps.Customizable hotkeys available, but lacks advanced automation and integration with SmartText or other features.
                    User InterfaceModern, intuitive interface designed for ease of use and efficiency.Outdated interface that may feel less fluid, especially for users who prefer a seamless experience.

                    Why SmartPanels is the Smarter Choice for 2026?

                    1.    Boost Your Productivity with Custom Hotkeys

                    SmartPanels introduces Custom Hotkeys for a game-changing productivity boost. By mapping specific keystrokes to critical tasks, SmartPanels executes commands with near-zero latency. Whether you’re a content creator, developer, or project manager, Custom Hotkeys streamline repetitive tasks, automating everything from text entry to complex workflows. You can even automate multi-step actions, enhancing throughput while reducing errors.

                    Instant Command Execution: Execute key actions in real-time, minimizing delays.

                    Advanced SmartText Integration: Automate dynamic, context-sensitive text replacements.

                    Total Hotkey Flexibility: Tailor hotkeys to suit personal or team-specific needs across applications.

                    These hotkeys revolutionize how users manage their daily tasks, from writers automating text formatting to engineers compiling projects faster than ever.

                    2.    Instant Profile Sharing for Seamless Collaboration

                    Another standout feature of SmartPanels is Instant Profile Sharing. You can share your personalized workspace in a few clicks, whether you’re working solo or collaborating with a team. Profiles are synced in real-time, ensuring smooth collaboration and eliminating version mismatches. What’s more, these profiles are compatible across multiple devices, so you can take your optimized workspace anywhere, whether on desktop, laptop, or mobile.

                    Seamless Cross-Platform Compatibility: Sync your SmartPanels profile across all your devices for a unified experience.

                    Granular Profile Management: Share specific settings, tools, or files without compromising privacy.

                    This feature ensures that users and teams alike can maintain a consistent workflow across multiple platforms, improving both productivity and collaboration.

                    3.    SmartText App: Revolutionizing Text Processing

                    SmartPanels also integrates with the SmartText App, which takes text processing to the next level. It allows you to bind custom shortcuts for common text entries, formulas, and phrases, streamlining workflows that involve repetitive text entry. Plus, with Computational Text Commands, you can automate complex calculations or text replacements with a single keystroke.

                    Custom Text Expansion: Speed up data entry and content creation with personalized shortcuts.

                    Hotkey Automation: Trigger multi-step tasks with hotkeys to save time and avoid errors.

                    For professionals who constantly enter data or generate reports, SmartText eliminates the manual overhead, boosting efficiency.

                    4.    Scene Restoration for Effortless Workflow Management

                    One of the key features that set SmartPanels apart is Scene Restoration. This feature allows you to save entire workspace layouts, including window sizes, positions, and browser tabs. Whether you’re switching between tasks or resuming a project, SmartPanels brings back everything exactly where you left off.

                    For example:

                    Developers can quickly restore their IDE alongside multiple browser windows.

                    Designers can reopen their graphic design tools with all layers and windows in place.

                    Professionals in any industry can seamlessly pick up where they left off.

                    While DisplayFusion focuses on window snapping and basic organization, SmartPanels takes it a step further by offering full scene restoration that ensures your workspace is fully restored to exactly how you left it, without any manual adjustments.

                    5.    Future-Ready Design: Scalability and Adaptability

                    SmartPanels is built with the future in mind, featuring a scalable and adaptable design that supports everything from small home offices to large-scale enterprise environments. With support for up to 6 monitors, seamless integration with Windows 11, and the ability to adapt to new features as they emerge, SmartPanels ensures that users are always ahead of the curve.

                    Scalability: Whether you’re working with a single monitor or a six-monitor setup, SmartPanels grows with you.

                    Cross-Platform Potential: Although currently optimized for Windows, future updates could expand SmartPanels to other platforms, making it even more versatile.

                    SmartPanels

                    Restore Browser Tabs with SmartPanels. It maintains an active tab history and restores browser size as well as display position on one screen or many.

                    Conclusion:

                    SmartPanels represents the next generation of window management. Its innovative features, such as Custom Hotkeys, Scene Restoration, SmartText, and Instant Profile Sharing, make it a powerful tool that can supercharge productivity across industries. While DisplayFusion offers basic multi-monitor support, it lacks the smart automation, comprehensive app integrations, and forward-looking design that SmartPanels provides.

                    The difference is clear: SmartPanels is designed for a smarter, more efficient 2026 with automation, customization, and advanced integrations that make it the perfect choice for professionals looking to optimize their workflows.

                    Don’t let outdated systems hold you back transform your workflow with cutting-edge automation and multi-monitor support.

                    For a more efficient, smarter 2026, SmartPanels is the clear choice. Take control of your workspace today with SmartPanels and experience productivity like never before.

                    So, here is the all information you’re looking for about SmartPanels vs DisplayFusion.

                    12 Tips for Improving Your Slow Laptop’s Speed 

                    Tips to Improve Laptop Speed

                    Is your laptop feeling sluggish and unresponsive? Recognizing common signs like long boot times, slow applications, and frequent crashes is crucial for diagnosing the issue. Various factors, from too many startup programs and insufficient RAM to malware, overheating, and outdated hardware, can slow down your laptop.  

                    Fortunately, there are effective solutions to tackle these problems. In this blog, we’ll explore how to manage startup programs, run antivirus scans, upgrade hardware, clean up disk space, and update software. 

                    What are The Common Signs of a Slow Laptop?

                    A slow laptop can be frustrating, but recognizing common signs can help diagnose and address the issue. Indicators include long boot times, slow application launches, frequent lagging or freezing, slow internet browsing, unresponsive programs, delayed keyboard and mouse response, high disk and CPU usage, memory leaks, overheating, frequent crashes, excessive pop-ups and ads, delayed file operations, outdated software, and low battery life. 

                    Why is My Laptop So Slow?

                    1. Too Many Startups Programs

                    Boot times and general performance can be considerably slowed down by having many apps configured to begin at startup. 

                    2. Malware or Viruses

                    Your laptop may become slower due to the consumption of system resources by malware, viruses, and other dangerous applications. 

                    3. Insufficient RAM

                    Not having enough RAM can cause your laptop to struggle with multitasking and running modern applications efficiently. 

                    4. Fragmented or Full Hard Drive

                    A fragmented or nearly full hard drive can slow down data retrieval times. This particularly applies to conventional hard disks (HDDs). 

                    5. Outdated Hardware

                    New applications and tasks might be challenging for obsolete technology, such as a graphics card that is out of date or a CPU that is sluggish. 

                    6. Overheating

                    Overheating can cause your laptop to throttle its performance to cool down, leading to sluggish behavior. 

                    7. Background Processes

                    Excessive background processes and services can drain system resources, affecting performance. 

                    8. Outdated Software

                    Running outdated operating systems, drivers, and applications can cause compatibility and performance issues. 

                    9. Unnecessary Visual Effects

                    Fancy visual effects and animations can consume resources and slow down performance, especially on older machines. 

                    10. Poor Maintenance

                    Lack of regular maintenance, such as disk cleanups and defragmentation (for HDDs), can lead to slower performance over time. 

                    11. Low Storage Space

                    Running low on storage space can impact system performance, especially if the operating system requires additional space for virtual memory.

                    12. Faulty Hardware

                    Performance can be significantly impacted by malfunctioning hardware, such as a broken RAM module or a hard drive.

                    13. Network Issues

                    Slow internet speeds or network issues can affect online activities, making it seem like the laptop is slow.

                    14. Bloatware

                    Pre-installed software (bloatware) that you don’t need can consume resources and slow down your laptop.

                    How Can I Fix My Laptop from Slowing Down?

                    You may enhance a sluggish laptop’s performance by doing the following:

                    1. Manage Startup Programs

                    Disable any apps that you don’t need to execute at launch by opening Task Manager (Ctrl + Shift + Esc), selecting the “Startup” tab.

                    2. Run Antivirus Scans

                    Use a reliable antivirus program to scan your laptop and remove any detected malware or viruses.

                    3. Upgrade Hardware

                    Performance and multitasking on your laptop may be greatly enhanced by adding more Memory. Additionally, replacing a traditional hard disk (HDD) with a solid-state drive (SSD) may greatly enhance overall speed and startup times.

                    4. Clean Up Disk Space

                    Uninstall programs you don’t use and delete temporary files and other unnecessary data. Utilize pre-installed tools such as Windows’ Disk Cleanup or similar apps for alternative operating systems.

                    5. Update Software

                    Ensure that the newest patches and updates are applied to your operating system. Keep all drivers and applications updated to their latest versions to ensure your laptop keeps running at optimal speeds.

                    6. Reduce Visual Effects

                    To deactivate certain visual effects, go to System Properties > Advanced > Performance Settings on Windows and select “Adjust for best performance” or another option.

                    7. Manage Background Processes

                    In Task Manager, identify which processes are taking extensive resources and end them with the “End Task” command.

                    8. Perform Regular Maintenance

                    Defragment your hard drive if you’re using an HDD. This is not necessary for SSDs. Open your laptop (if you’re comfortable doing so) and carefully clean out dust from the components to prevent overheating.

                    9. Check for Overheating

                    Make sure there is enough airflow on your laptop and that it is not overheated. Use a cooling pad if required. Furthermore, dust accumulation can clog cooling systems and fans, therefore it’s critical to keep them clean.

                    10. Uninstall Bloatware

                    You can also try uninstalling software that came pre-installed with your laptop that you don’t use. This can help clear space in your hard disk and speed up your laptop.

                    11. Optimize Internet Performance

                    Resolve any network issues to ensure smooth online activities. Make sure your network drivers are current as well.

                    12. Advanced Options

                    As a last resort, you can reset your laptop to its factory settings or perform a clean installation of the OS to start fresh.

                    Is There a Software That Can Speed Up Your Laptop?

                    If all these tips don’t work, and you don’t see an improvement in the performance of your laptop, then you can use FastWindows. FastWindows is a windows utility tool that allows users to prioritize their apps and programs so that they can use your laptop resources for a smooth performance.

                    TurboCharger

                    Boost productivity and system performance with TurboCharger. Organize your apps and games and simplify your workflows with TurboChargers’ automatic app prioritization

                    Conclusion

                    Even if a sluggish laptop might be quite annoying, its performance can be recovered with the correct procedures. By managing startup programs, running antivirus scans, upgrading hardware, cleaning up disk space, and updating software, you can address many common causes of sluggishness.

                    Maintaining ideal speed also requires frequent maintenance, regulating background operations, and minimizing visual impacts. If these solutions don’t fully resolve the issue, consider using FastWindows, a utility tool designed to prioritize apps and improve overall performance. By putting these tactics into practice, you may restore your laptop’s functionality and make it operate properly once more.

                    How to Pin a Chrome Window on Top?

                    Pin A Chrome Window on Top

                    With ease-of-use and a plethora of extension support built-in, it’s not surprising that a whopping 2.65 billion people choose Chrome as their choice for a browser.

                    If you are someone who uses Chrome for work, you might want your Chrome windows to be fully visible to you at all times so that you are always productive and efficient in your work.

                    We have compiled a list of 8 ways you can keep your Chrome windows on top of all other windows.

                    How Can You Pin a Chrome Window on Top?

                    Here are a few tools that can help you pin a Chrome window on top of both Windows 10 and 11.

                    • AutoHotKey

                    The first way you can keep a Chrome window on top is by using AutoHotKey. AutoHotKey is a free application that allows you to create scripts. These scripts then allow you to perform several actions with just a few keyboard shortcuts. You can use this tool to create a script that allows a Chrome window to always be on top by pressing the CTRL-Space keyboard shortcut.

                    • DeskPins

                    DeskPins is another great way to keep your Chrome window on top. Here’s how you can use DeskPins:

                    • After downloading and installing DeskPins, you will see the DeskPins icon appear in the system tray. Your cursor will change into a pin once you click on it.
                    • You can then pin your Chrome window using this pin. Just click on the title bar of the Chrome window, and a small red pin will appear over the minimize button.
                    • Microsoft PowerToys

                    Microsoft PowerToys is a utility app that is packed with several features that allow you to boost your productivity. One of these features is the Always on Top feature, which allows you to keep your favorite windows on top of all others.

                    After installing Microsoft PowerToys, press Win+CTRL+T simultaneously. A blue border will appear along the Chrome window, fixing the window on top of all the other windows.

                    • OnTopReplica

                    OnTopReplica is a tool that creates a replica of a specified window. You can create a replica of a window by choosing that specific window. Moreover, you can easily resize the window size and lock its opacity and position on the screen.

                    • WindowTop

                    Another free utility app for Windows is WindowTop. It lets you pin an open window above others so that you have access to it at all times. With WindowTop, you can control the click-through windows, opacity, shrink the applications, and enable dark mode.

                    • OnTopper

                    Another free app that you can use to pin a window on top is OnTopper. It’s best for multitaskers who always need a window open to complete specific tasks.

                    It’s easy to install and has a small installation size. Moreover, it has a simple UI that displays all the options in front of you.

                    • PinMe

                    PinMe is another handy utility app that allows you to pin a window on top of others. You can use this app to pin a Chrome window over the others. Moreover, you can change the transparency of the window and also capture windows.

                    • Window Topmost Control

                    Finally, you can use the Window TopMost Control to stick a Chrome window over others. Here’s how you can use it:

                    • Double-click on the TopMost Control icon on the system tray.
                    • Select a window and use the short key Ctrl+Alt+Space.
                    • Use Windows List in the system tray menu.
                    • Use CMD

                    How Can I Pin a Chrome Tab at the Top of My Chrome Screen?

                    You can pin a Chrome tab by right-clicking on a tab and selecting the “Pin” option. After you do this, you will see the icon of the website appear on the left-hand side of the title bar.

                    You can unpin the website by again right-clicking on the pinned website and selecting the “Unpin” option.

                    SmartPanels

                    Restore Browser Tabs with SmartPanels. It maintains an active tab history and restores browser size as well as display position on one screen or many.

                    Conclusion

                    You can keep your Chrome window on top of all other windows at all times by using these apps. However, if you want to keep saving your preferred Chrome windows, then you can use SmartPanels.

                    SmartPanels is a Windows utility app that lets you create unlimited profiles for your desktops so that you can enhance your productivity and boost efficiency. You can save your profiles with multiple Chrome windows pinned on top of each other.