
Extra screens give you more room to work. They also bring new problems. You have apps that will jump from one display to another, Windows ending up where you do not want them, and a layout that is lost the moment you restart. A proper multi-monitor tool puts an end to that by handling the saving and restoring of your window positions for you.
We put together this guide to cover what such a tool can do and the features worth looking for. It also serves as a place to compare options, whether you are considering free settings built into the system or a paid application.
We have included a straightforward plan for setup and some answers to the usual questions. Feel free to read through from start to finish or go straight to the part you need. When you are done, you should have a clear idea of which tool is right for your habits and your desk.
Why a Multi-Monitor Tool Matters for Daily Work
With Windows, one has the fundamental controls for additional displays at hand. Extending the desktop is simple enough, as is dragging windows from one screen to the next or snapping an app to the side.
For a while these are sufficient, but they can seem wanting once your workspace expands. It is common to put in the same effort each morning to open and position the usual applications in their accustomed places; after a week of that, it shows.
That is where a good multi-monitor tool comes in. It spares you the repetition by recalling where every window should be and putting it there. Switching tasks is made quicker too, allowing for separate layouts when you are writing versus doing some research. In the end, it means less time is wasted shuffling windows around and more is left for the work at hand.
What Does a Multi-Monitor Tool Actually Do?
With a multi-monitor tool, one can dictate how windows perform on an array of displays. In general, such software is tasked with four things:
- To put windows where they need to be.
- To commit those positions to a layout.
- To bring that layout back at the touch of a hotkey or mouse click.
- To carry over elements like the wallpaper or taskbar to all screens.
Not every program does it all; some are specialists in just one area. It is best to view each tool as having its own aptitude. Once you understand what a given piece of software is good at, it is easier to find the right fit for your working style.
The trader will be looking for quick hotkeys, a project manager for a complete restoration of his workspace, and a student for something uncomplicated and free of charge.
How a Multi-Monitor Tool Supports Focus and Comfort
You will find extra screens are of most use when the windows are in order. With a multi-monitor tool, you can have your reference material on one display and what you are working on in front of you on another, doing away with the need to be hunting for tabs all the time. It is a steadier way to work; your eyes have a pattern to follow, and it is less taxing over the course of the day.
Take a writer for instance. He might have his draft in the middle, research to the left and a chat window on the right. Should he need to restart, the tool will put that scene back together in short order so he can get to typing. The same applies to a teacher or designer or anyone working from home. One can save a layout for a given task and call it up with a hotkey.
Then there is the matter of physical comfort. Put the primary screen directly in front of you at a good height and have the flanking ones angled in your direction. Software may take care of the windows, but proper posture is what looks after your neck and eyes.
In the end, having the right tool and the right habits is what makes a long session bearable.
Key Features to Look for in a Multi-Monitor Tool
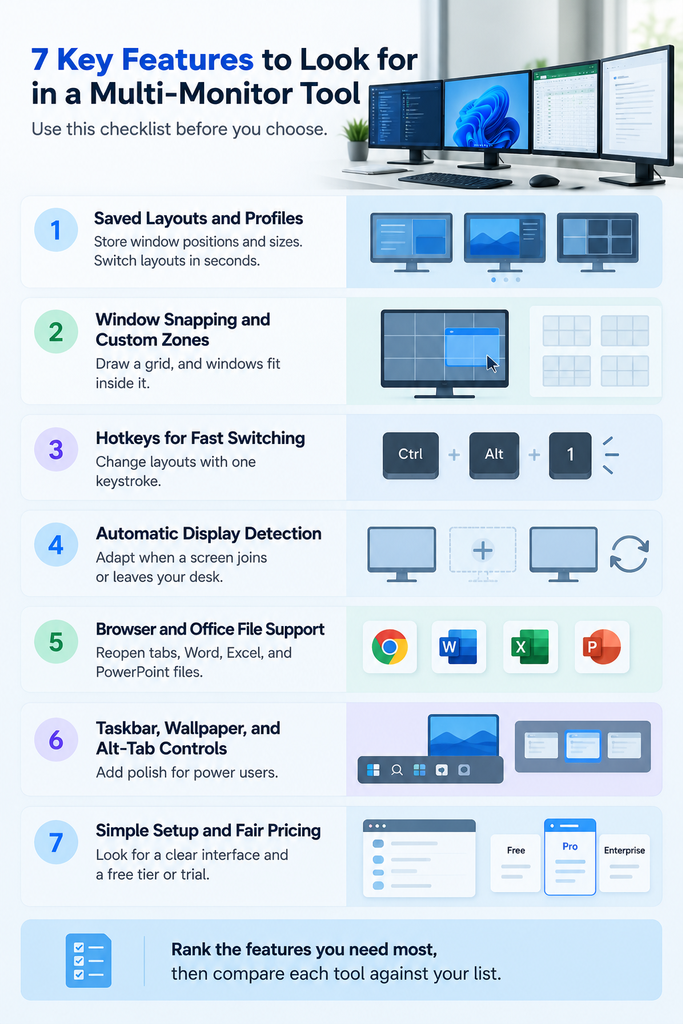
Features decide whether a tool fits your day. Review each point below and rank the ones you need most. This list also works as a checklist when you compare Multi-Monitor Software side by side.
Saved Layouts and Profiles
With a profile one can keep track of the apps in use as well as the size and placement of every window. It is best to find a multi-monitor solution that allows for the creation of multiple such profiles; this way, moving from a setup for writing over to one for a video call takes only a matter of seconds. There is also value in having an unlimited number of profiles for flexibility down the road.
Window Snapping and Custom Zones
For keeping windows in order, there is snapping. While standard Windows will handle the odd half or quarter, custom zones are more effective. You set the grid and the windows conform to it. Just be sure the tool you pick has zone support across all your screens.
Hotkeys for Fast Switching
With a hotkey, what would otherwise be a layout change is reduced to one keystroke. One should make use of the shortcuts available for assignment. This kind of speed in switching is of prime importance on days with a lot of context changes; an analyst or developer will find him or herself changing layouts numerous times in an hour.
Automatic Display Detection
Then there are those who work from a laptop and are frequently at a dock with monitors. A well-made multi-monitor tool will do the work of spotting new screens and making the necessary adjustments. In that way it preserves your layout as a display comes and goes from the desk, saving you from having to put in manual fixes each time you reconnect.
Browser and Office File Support
You will find browser tabs and documents in most workspaces, and a capable multi-monitor tool should be able to reopen them. It is worth verifying the browsers it is compatible with, as well as if it will pick up on Word, Excel or PowerPoint files. For researchers and those in the office, that kind of functionality is what saves the time.
Taskbar, Wallpaper, and Alt-Tab Controls
Then there are the add-ons: some software puts an Alt-Tab switcher at your disposal or extends the taskbar across all screens, while others let you set a different wallpaper for each one. Such polish is to the liking of power users; a novice might just consider them a nice extra.
Simple Setup and Fair Pricing
Beginners need a clear interface. Look for a short setup and a free tier or trial. Compare monthly, yearly, and lifetime prices before you commit. A fair price matches the features you will actually use.
How We Reviewed Each Multi-Monitor Tool
Our evaluation of the various multi-monitor tools was done with reference to public information. We put in the time to review vendor pages and Microsoft Learn documentation, as well as some independent roundups of software. Pricing was also examined for specifics on the plans offered.
From there we organized what we found according to what a beginner would be looking for in terms of browser support, hotkeys, saved layouts and how long setup takes.
You will not find any unverified claims in our list; every feature has been sourced from an official or published outlet. That said, prices and features are subject to change, so it is best to verify the particulars on the vendor’s own site before making a decision. It is a way of ensuring our recommendations remain straightforward and honest.
Beginner-Friendly Choices: Which Multi-Monitor Tool Fits You?
Several apps suit newcomers. Each one takes a different approach. Read the short profiles below, then match one to your routine.
Built-In Windows Settings
With Windows one gets access to display settings and Snap Layouts, making them a no-cost multi-monitor solution right out of the box. These built-in features are all that is needed for a light user as a good place to begin. One can put in hand the screen order and scaling or even designate a primary display.
Snap Layouts are there to sort out window placement on every screen. The only shortcoming is that Windows does not have much to offer by way of saving an entire workspace, but for the most part it serves its purpose well.
Microsoft PowerToys FancyZones
Microsoft has put out FancyZones at no charge. As one would read on Microsoft Learn, the program is for setting up zone locations to serve as window targets on the desktop; it will even let you have a single window span multiple zones. In effect, it is a no-cost multi monitor utility for custom grids.
But do not expect it to do everything: with an emphasis on snapping, the task of reopening your apps is left to you.
DisplayFusion
DisplayFusion targets power users. Review sites describe it as a Windows tool with hotkeys, window management, per-screen wallpapers, and taskbar controls. The depth of options rewards patient learners. Newcomers may need a little time to explore the menus. Choose this multi-monitor tool when you want fine control over every screen.
Actual Multiple Monitors
With Actual Multiple Monitors, extra screens are given their own taskbars, wallpapers, and desktop profiles, along with an Alt-Tab switcher. The vendor offers a 30-day trial to put it through its paces before committing, making this multi-monitor tool a good fit for those who appreciate the more traditional desktop extras.
SmartPanels
SmartPanels, from FiveRivers Technologies, focuses on saving and restoring a whole workspace. It stores window positions, browser tabs, and app layouts. Then it brings them back across up to six displays. It supports Chrome, Firefox, and Edge tabs. Paid plans also reopen Word, PowerPoint, Excel, and Project files.
The free Starter plan covers one profile and one display. Use it to try the basics on a single screen. Restored files reopen from their saved state, so save your work first. The app runs on Windows. It fits people who want a simple multi monitor app built around saving and restoring workspaces.
How to Set Up Your Multi-Monitor Tool in Five Steps
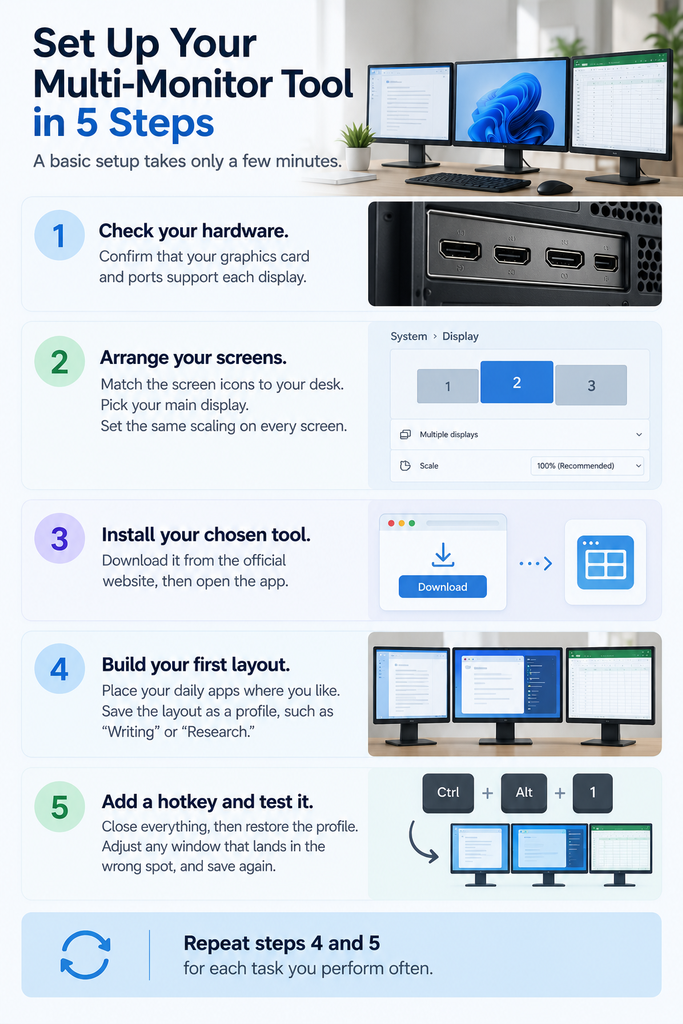
A basic Multi Monitor Setup takes only a few minutes of effort. Follow these steps in order to get your multi-monitor tool working smoothly.
- Check your hardware: Confirm that your graphics card and ports support each display. Plug in every monitor, and open Windows Display settings.
- Arrange your screens: Drag the screen icons to match your physical desk. Pick your main display. Then set scaling so text looks sharp. Microsoft notes that zones spanning monitors work best when every screen shares the same scaling.
- Install your chosen multi-monitor tool: Download it from the official website. Run the installer, then open the app.
- Build your first layout: Open your daily apps and place them where you like. Save the layout as a profile with a clear name, such as Writing or Research.
- Add a hotkey and test it: Close everything, then restore the profile. Adjust any window that lands in the wrong spot and save again.
Repeat steps four and five for each task you perform often. Over time, your profiles become a personal library of workspaces.
Match a Multi-Monitor Tool to Your Role
Your job shapes your best choice. Use these quick pairings as a starting point.
- Developers and engineers: Pick a multi-monitor tool with saved profiles, so code, terminals, and dashboards return together.
- Traders and analysts: Choose fast hotkeys and reliable display detection, so charts always land on the right screen.
- Video editors: Select a tool with per-screen layouts for timelines, previews, and file panels.
- Project managers and students: Favor simple profiles that reopen browsers and Office files for each project.
Common Mistakes When Choosing a Multi-Monitor Tool
Avoid these slips, and your decision gets easier.
- Paying for unused features: List your top three needs first. Then compare each multi-monitor tool against that list.
- Skipping the free option: Trials and free tiers let you test real habits before you pay.
- Overlooking scaling differences: Mixed screen sizes can shift window sizes. Match scaling values where possible.
- Forgetting browsers and files: Window positions alone leave half the work undone. Look for the tab and document restore.
- Ignoring system fit: Many tools run on Windows only. macOS users should confirm compatibility first.
Frequently Asked Questions About a Multi-Monitor Tool
- What is a multi-monitor tool?
With a multi-monitor tool, an application is at hand to handle the windows on your various screens. The kind of app will let you put windows in their zones, store a layout and bring it back when needed.
- Is a multi-monitor tool safe to install?
One should get the download from the vendor’s own site and have a look at the privacy policy. Any reputable vendor will be keeping its multi-monitor tools up to date and will have support pages that are easy to find.
- Does a multi-monitor tool work with a laptop and a dock?
A quality multi-monitor application will make short work of your docks. What to look for is automatic display detection so the layout adjusts on its own as you put in or take out a screen.
- Do I need a paid multi-monitor tool?
If you are after a no-cost solution, they do an adequate job with snapping. Then there are the paid versions that let you have saved workspaces and keep tabs on browser and Office files; it is a matter of deciding if you need them given how much you reconfigure your setup.
- Can a multi-monitor tool slow down my PC?
For the most part these programs are unobtrusive and light on resources. Still, one should review the system requirements from the vendor and not hesitate to do away with any tool that seems to be dragging.
Final Thoughts on Choosing a Multi-Monitor Tool
A good multi-monitor tool is a daily time saver. But to find the right one, you have to look at your own habits first.
Ask yourself whether a full workspace restore is what you are after or if simple snapping will do. From there, give some consideration to the features that count hotkeys, display detection, browser support and saved profiles. Put one or two of the more accessible options through their paces before making a commitment; the free tiers and trials are there for that purpose. Keep in mind each tool has its own merits, so pick the one that fits your routine.
Once you have decided, put together a profile today and tinker with it from week to week. You will see how small changes make a difference. There is no point in over researching when a little practice and some testing with your actual apps will tell you what you need to know. Your ideal layout is bound to evolve as your needs do, since every desk is unique. Trust your workflow and take your time. And if it is of any use, pass on your best setups to a friend.