SmartPanels vs DisplayFusion

SmartWindows vs DisplayFusion

SmartPanels vs DisplayFusion: In-Depth Comparison for a Smarter 2025

In 2025, managing multiple windows is no longer just about quantity; it’s about leveraging smart, efficient systems to optimize your workflow. It’s about more possibilities, more efficiency, and more intelligence in how we manage our digital worlds. SmartPanels takes desktop management to the next level with innovative automation, intuitive restoration features, and robust multi-monitor support. Gone are the days of just snapping windows into place or dealing with cumbersome setups. The future is here, and SmartPanels is leading the charge.

Now, let’s talk about DisplayFusion reliable, sure, but in a world where productivity isn’t just about doing more—it’s about doing it smarter—does DisplayFusion still hold up? While it offers foundational window management features like multi-monitor support and customizable hotkeys, these are features we’ve seen before. However, SmartPanels exceeds expectations by recognizing advanced automation and future-proof design, establishing itself as the best tool for the world in 2025 and beyond.

In this blog post, we will delve deeply into the SmartPanels vs DisplayFusion debate, analyzing each distinct features, performance, and benefits. Let’s explore how SmartPanels redefines productivity for 2025, while DisplayFusion is lagging behind due to its reliance on legacy features.

A Quick Overview – SmartPanels vs. DisplayFusion

SmartPanels offers a complete desktop management solution optimized for multi-monitor setups, browser integration, and advanced automation. It’s not just about organizing windows—it’s about transforming how you work. With SmartPanels, you gain access to new features designed to supercharge your productivity in 2025:

  • No more manually adjusting your workspace. SmartPanels remembers your windows, apps, and browser tabs, restoring them exactly as you left them.
  • Revolutionize your workflow with advanced text automation, allowing you to trigger text replacements and execute complex calculations with just a keystroke.
  • Streamline text editing and coding tasks by expanding shortcuts and performing computations in real time, saving you valuable time on repetitive tasks.
  • Take complete control over your workflow by creating custom hotkeys for common actions. Whether it’s automating multi-step tasks or triggering specific commands, SmartPanels makes it fast and efficient.
  • With support for up to 6 monitors, SmartPanels offers an intuitive experience that’s perfect for users with complex workflows, ensuring windows and tasks are arranged seamlessly across multiple screens.

DisplayFusion, on the other hand, is primarily a multi-monitor manager offering basic functionality like customizable hotkeys, taskbar extensions, and monitor splitting. While it covers the essentials, it lacks the advanced automation, seamless integration with modern apps, and forward-thinking design that SmartPanels brings to the table.

Feature-by-Feature Breakdown -SmartPanels vs DisplayFusion

FeatureSmartPanelsDisplayFusion
Auto-Arrange WindowsInstantly restores window layouts with one click, saving time in reconfiguring apps.Lacks automatic restoration of window layouts. Must be manually reconfigured.
Multi-Monitor SupportSupports up to 6 monitors with full workspace restoration, making it ideal for complex workflows.Offers multi-monitor support, but no automatic restoration of window layouts.
Multi-Profile SwitchingUnlimited workspace profiles for different tasks and work environments, offering unparalleled flexibility.Limited to a smaller number of profiles, making it less adaptable for diverse workflows.
Computational Text CommandAdvanced feature that allows custom hotkeys to trigger text replacements or calculations, boosting productivity.Lacks computational text support and advanced text automation.
Multi-Browser Tab RestorationRestores tabs across Chrome, Edge, and Firefox, enhancing workflow efficiency.No support for restoring browser tabs or advanced browser integrations.
Microsoft Office File RecoveryAutomatically restores Microsoft Office files (e.g., Word, Excel) and associated windows with one click.No native support for Office file restoration, requiring manual re-opening.
Custom HotkeysFully customizable hotkeys for automating complex workflows and multi-step tasks across apps.Customizable hotkeys available, but lacks advanced automation and integration with SmartText or other features.
User InterfaceModern, intuitive interface designed for ease of use and efficiency.Outdated interface that may feel less fluid, especially for users who prefer a seamless experience.

Why SmartPanels is the Smarter Choice for 2025?

1.    Boost Your Productivity with Custom Hotkeys

SmartPanels introduces Custom Hotkeys for a game-changing productivity boost. By mapping specific keystrokes to critical tasks, SmartPanels executes commands with near-zero latency. Whether you’re a content creator, developer, or project manager, Custom Hotkeys streamline repetitive tasks, automating everything from text entry to complex workflows. You can even automate multi-step actions, enhancing throughput while reducing errors.

Instant Command Execution: Execute key actions in real-time, minimizing delays.

Advanced SmartText Integration: Automate dynamic, context-sensitive text replacements.

Total Hotkey Flexibility: Tailor hotkeys to suit personal or team-specific needs across applications.

These hotkeys revolutionize how users manage their daily tasks, from writers automating text formatting to engineers compiling projects faster than ever.

2.    Instant Profile Sharing for Seamless Collaboration

Another standout feature of SmartPanels is Instant Profile Sharing. You can share your personalized workspace in a few clicks, whether you’re working solo or collaborating with a team. Profiles are synced in real-time, ensuring smooth collaboration and eliminating version mismatches. What’s more, these profiles are compatible across multiple devices, so you can take your optimized workspace anywhere, whether on desktop, laptop, or mobile.

Seamless Cross-Platform Compatibility: Sync your SmartPanels profile across all your devices for a unified experience.

Granular Profile Management: Share specific settings, tools, or files without compromising privacy.

This feature ensures that users and teams alike can maintain a consistent workflow across multiple platforms, improving both productivity and collaboration.

3.    SmartText App: Revolutionizing Text Processing

SmartPanels also integrates with the SmartText App, which takes text processing to the next level. It allows you to bind custom shortcuts for common text entries, formulas, and phrases, streamlining workflows that involve repetitive text entry. Plus, with Computational Text Commands, you can automate complex calculations or text replacements with a single keystroke.

Custom Text Expansion: Speed up data entry and content creation with personalized shortcuts.

Hotkey Automation: Trigger multi-step tasks with hotkeys to save time and avoid errors.

For professionals who constantly enter data or generate reports, SmartText eliminates the manual overhead, boosting efficiency.

4.    Scene Restoration for Effortless Workflow Management

One of the key features that set SmartPanels apart is Scene Restoration. This feature allows you to save entire workspace layouts, including window sizes, positions, and browser tabs. Whether you’re switching between tasks or resuming a project, SmartPanels brings back everything exactly where you left off.

For example:

Developers can quickly restore their IDE alongside multiple browser windows.

Designers can reopen their graphic design tools with all layers and windows in place.

Professionals in any industry can seamlessly pick up where they left off.

While DisplayFusion focuses on window snapping and basic organization, SmartPanels takes it a step further by offering full scene restoration that ensures your workspace is fully restored to exactly how you left it, without any manual adjustments.

5.    Future-Ready Design: Scalability and Adaptability

SmartPanels is built with the future in mind, featuring a scalable and adaptable design that supports everything from small home offices to large-scale enterprise environments. With support for up to 6 monitors, seamless integration with Windows 11, and the ability to adapt to new features as they emerge, SmartPanels ensures that users are always ahead of the curve.

Scalability: Whether you’re working with a single monitor or a six-monitor setup, SmartPanels grows with you.

Cross-Platform Potential: Although currently optimized for Windows, future updates could expand SmartPanels to other platforms, making it even more versatile.

SmartPanels

Restore Browser Tabs with SmartPanels. It maintains an active tab history and restores browser size as well as display position on one screen or many.

Conclusion:

SmartPanels represents the next generation of window management. Its innovative features, such as Custom Hotkeys, Scene Restoration, SmartText, and Instant Profile Sharing, make it a powerful tool that can supercharge productivity across industries. While DisplayFusion offers basic multi-monitor support, it lacks the smart automation, comprehensive app integrations, and forward-looking design that SmartPanels provides.

The difference is clear: SmartPanels is designed for a smarter, more efficient 2025—with automation, customization, and advanced integrations that make it the perfect choice for professionals looking to optimize their workflows.

Don’t let outdated systems hold you back—transform your workflow with cutting-edge automation and multi-monitor support.

For a more efficient, smarter 2025, SmartPanels is the clear choice. Take control of your workspace today with SmartPanels and experience productivity like never before.

So, here is the the all information you’re looking for about SmartPanels vs DisplayFusion.

Multi Web Browsing Tool – A Complete Guide for 2025

Multi Web Browsing Tool

As modern professionals juggle multiple projects, deadlines, and communications, keeping your digital workspace organized and efficient is more important than ever. With an increasing number of browser tabs, applications, and windows to manage, it’s easy for your workflow to become fragmented and chaotic—leading to wasted time and reduced productivity.

SmartPanels offers a sophisticated solution to this issue by enabling seamless management of multiple web browsers, applications, and windows. This all-in-one multi web browsing tool allows you to restore, organize, and arrange your workspace with just a few clicks, eliminating the stress of constantly switching between open tabs and programs. Whether you’re handling large-scale projects or daily tasks, SmartPanels ensures that your digital environment remains efficient, streamlined, and fully optimized for productivity.

In this article, we’ll explore how SmartPanels works as a powerful multi web browsing tool, its core features, and how it leverages IoT integration to enhance your overall productivity.

How SmartPanels Transforms Your Digital Workspace

At its core, SmartPanels acts as a tool that simplifies the way you manage your windows, apps, and browser tabs. By offering an organized, customizable, and efficient workspace, it eliminates the clutter of having too many browser windows open, multiple tabs to switch between, and the frustration of manually arranging everything.

It’s designed to provide an intuitive user experience for professionals, remote workers, and even casual users. Whether you’re working on a single monitor or multiple screens, SmartPanels adapts to your needs, ensuring your work is always accessible, organized, and efficient.

Key Features of SmartPanels as a Multi Web Browsing Tool

Auto-Arrange and Organize Your Windows:

A fundamental feature of SmartPanels is its ability to auto-arrange browser windows and apps. When you have multiple tabs open across different browsers, SmartPanels can quickly position and resize them on your screen or across multiple displays. No more manual resizing or shuffling through open windows—SmartPanels keeps everything organized and within easy reach.

Seamless Multi-Monitor Support:

Whether you’re working on a dual-monitor setup or even three or more displays, SmartPanels provides advanced multi-monitor support that boosts productivity. You can organize your workspace in a way that makes sense for your workflow, whether you’re handling data, content creation, or communication. Switch between monitors effortlessly and let SmartPanels remember your preferred layout and sessions for each screen.

Restore Your Multi-Web Sessions Instantly:

One of the most powerful features of SmartPanels as a multi web browsing tool is its ability to restore browser sessions. Imagine working on a project with several browser windows and tabs open, each containing valuable information. With SmartPanels , you can save these sessions and restore them with a single click. No more manually opening tabs or looking for that important document or webpage you had open hours ago. SmartPanels brings your entire browsing session back exactly how you left it.

Customizable Profiles for Different Workflows:

With SmartPanels, you can create customizable profiles tailored to different work environments or tasks. This means you can have separate work, entertainment, and personal profiles, each with its own set of open browser tabs, apps, and display settings. Whether you need to switch between work-related sessions or take a break to browse social media, it keeps everything organized and efficient. The ability to quickly toggle between profiles enhances productivity and reduces distractions.

Device Integration:

Task and Window Grouping Another notable feature is the ability to group and categorize windows and tabs. For instance, if you’re working on a project, SmartPanels can automatically group all related apps and browser tabs into a single cluster, making it easier to manage multiple tasks. Switching between work-related tasks or personal sessions is just a click away, and your workspace remains organized with minimal effort.

Synchronization Across Devices:

SmartPanels isn’t limited to just one computer. It also allows you to sync your workspace across multiple devices. Whether you’re switching from your desktop to a laptop, or using multiple screens throughout the day, SmartPanels ensures that your profiles, settings, and browser sessions are consistently maintained. This cross-device functionality makes it easy to work from anywhere while maintaining a consistent and organized environment.

Advanced Browser Management:

For power users, SmartPanels provides advanced browser management tools. You can create custom layouts that group multiple browser windows together, and when you switch between tasks, these layouts are restored automatically. This is especially useful for users who need to access several websites at once, such as digital marketers, developers, or content creators, without the chaos of having to manage countless browser tabs.

SmartPanels as the Ultimate Multi-Web Browsing Tool for Professionals

The true power of SmartPanels shines in its ability to optimize work across multiple platforms and environments. Professionals in a variety of fields can use it to organize their daily tasks and workflows with ease. Here are a few ways SmartPanels benefits specific professions:

  • Programmers and Developers: For those who need to switch between multiple coding platforms, documentation, and testing environments, SmartPanels offers a seamless way to organize and restore these sessions instantly. Keep your code editor, browser, and console open on separate screens, or group them into profiles for quick access.
  • Digital Marketers: Manage multiple ad campaigns, analyze website traffic, and monitor social media across different platforms—SmartPanels lets you create specific profiles for each task, keeping everything organized and easy to navigate.
  • Content Creators and Designers: Whether you’re working with multiple graphic design tools, writing content, or researching information for your next project, SmartPanels helps organize your digital workspace by grouping related windows and keeping your browser sessions restored.
  • Remote Workers and Teams: SmartPanels boosts team collaboration by enabling each team member to maintain separate profiles for different projects. This makes it easier to switch between tasks and monitor multiple projects at once.

Troubleshooting Tips:

Browsers are the gateway to the vast world of the internet. If you are facing any concern while using these multi web browsing tools, below are some tips to overcome such issues.

Browser Tabs Not Restoring Correctly

Check Session Settings: Ensure your browser session or profile is set to save tabs. SmartPanels relies on session data to restore your workspace.

Update Your Browser: Outdated browser versions may not support the restoration process fully

Verify Permissions: Confirm SmartPanels has the necessary permissions to access and restore browser tabs.

Performance Issues or Lag

Close Unnecessary Applications: Running too many applications can drain system resources, causing lag.

Adjust Browser Settings:

Limit extensions: or disable resource-heavy plugins.

Check Hardware Limitations: Ensure your system meets the recommended specifications for multi-web browsing.

Display Configuration Problems

Ensure Correct Monitor Setup: Verify that your monitors are properly connected and detected by your system.

Set Default Display Profiles: Use SmartPanels to save specific display layouts for quick restoration.

Update Graphics Drivers: Outdated drivers can cause display issues or inconsistent positioning.

Issues with Multi-Browser Support

Check Compatibility: Ensure SmartPanels supports the browsers you are using. It works best with mainstream browsers like Chrome, Edge, or Firefox.

Log Into Profiles: For workspaces tied to browser profiles, ensure you are logged into the correct account before restoring.

5. Unexpected Crashes

Clear Cache and Cookies: Overloaded browser caches can lead to crashes.

Reinstall the Tool: If the issue persists, reinstall SmartPanels or the browser to ensure a clean setup.

Monitor System Health: Check for hardware issues or malware that could interfere with system stability

SmartPanels

Restore Browser Tabs with SmartPanels. It maintains an active tab history and restores browser size as well as display position on one screen or many.

Wrapping Up!

In conclusion, when talking about the best multi web browsing tool, SmartPanels will streamline browsing experience while increasing productivity. It makes sure that your workspace is organized and optimized by restoring tabs across multiple browsers, managing multi-monitor setups and maintaining separate profiles for different tasks.

SmartPanels brings you everything into one connected ecosystem, improving efficiency, and dedication. It is one of the ultimate tools for those who want to work on multi web browsers. Google Chrome, Mozilla Firefox and Microsoft are the main multi web browsing tools we are using for SmartPanels. So, if you are looking to make your work smarter and more efficient download our app to access unique browser from just one application!

How Many Monitors Can My Laptop Support

How many Monitors can my Laptop Support

Ever found yourself staring at your laptop and wondering, ‘Can this little screen handle more?’ It’s a common question people ask themselves when trying to manage multiple tasks, keep track of several tabs, or just need more space to stay organized. The answer isn’t as simple as it sounds; it depends on the specs of your laptop, the applications you use, available ports, and the software you are working with. That’s where SmartPanels comes in!

Extra displays can make a big difference whether you’re an IT manager, someone who designs graphics, coder, or plays video games. SmartPanels enables you to work more efficiently by managing multiple devices from a single laptop. However, before you begin integrating additional screens, you need to be aware of your laptop’s hardware and system limitations to avoid system slowdowns or instability.

‘’Researched reference by the New York Times suggests that multiple displays can help users’ complete tasks up to 52% faster, potentially saving up to 2.5 hours daily.’’

In this blog post, we’ll go over how many monitors your laptop can support, what tools you’ll need, and how SmartPanels can make this process simpler. Also you can get more info from this blog –> How Many Monitors Can Windows 10 Support?

What Factors Determine How Many Monitors Your Laptop Can Support?

Before knowing how many monitors can my laptop support? It is important to understand the main factors impacting this:

1.       Graphics Card (GPU) 

The graphics card is one of the most significant considerations to keep in mind when deciding how many monitors are compatible with your laptop. Multiple displays are best supported by laptops with dedicated GPUs, which are mostly found in gaming or high-performance models. What you need to know is as follows:

Integrated Graphics 

  • Most laptops have integrated GPUs, which frequently support up to two displays, including the laptop screen.
  • These GPUs are designed for basic tasks such as web browsing and video streaming.

Dedicated Graphics

  • Found in high-performance laptops, these GPUs can support three or more monitors, depending on the model and ports available.
  • Designed for gaming, creative advertisements, and better multi-display layouts.

If you want to operate multiple high-resolution displays, you’ll need a powerful GPU that can cope with the added load. You can check your graphic card’s limit simply by reviewing its settings.

 2. Available Ports 

The number of physical ports on your laptop also restricts the number of monitors that can be linked directly. Most up-to-date laptops have a mix of the following ports.

  • HDMI 
  • USB-C/ Thunderbolt
  • DisplayPort/mini-DisplayPort
  • VGA (an older models)

Common Setup

  • I HDMI port typically allows 1 monitor. 
  • USB-C/Thunderbolt connectors are more adaptable, as they can connect to numerous monitors via a docking station. 
  •  Some laptops may require an adapter to convert a USB-C connection to HDMI or DisplayPort, letting you connect multiple screens. If your laptop has more than one HDMI or USB-C connector, you are in luck.

You’re in luck if your laptop includes multiple USB-C or HDMI ports. You’re in luck if your laptop has numerous USB-C or HDMI connectors. However, if your laptop just has one HDMI connector, you may require an adapter or docking station to manage multiple monitors.  

Smart Tip: Download SmartPanels to enhance your multi-monitor experience even if your laptop has limited ports.

3. Operating System OS Support 

 The operating system you use will also affect the number of monitors your laptop can support and how easy they are to manage.

Windows 10 and 11 both include built-in support for up to four monitors, though you might need to adjust the settings based on your GPU and connection type.

SmartPanels makes it simple to manage many displays on any operating system. By automatically restoring and rearranging your windows, the program helps you save time and money.

4. External Docking Stations and Adapters

If your laptop’s connections are limited, extra docking stations or adapters might help you widen your connectivity options. For example:

  • USB-C Docking Stations: HDMI and DisplayPort support multiple video outputs.
  • External GPUs, also known as eGPUs, can increase your laptop’s graphics processing power and enable more monitors.
  • Adapters convert one port type to another (for example, USB-C to HDMI).

5.  Refresh Rate or Resolution

The number of monitors you can use overall also depends on each one’s resolution and refresh rate. High resolutions (like 4K) or refresh rates (like 120Hz) require more GPU power, which may limit the number of monitors you can connect.

Advantages of Using SmartPanels for Laptop with Multi-Monitor Setup

When you’re curious how many monitors can my laptop support, the benefits of having multiple displays become undeniable. Having a multi-monitor system boosts worker efficiency, improves multitasking, and provides better flexibility in dealing with complex tasks.

1. Increased Multitasking Productivity

How many monitors can my laptop support? This question comes up when you’re tired of constantly zooming in and out of windows and you have short deadlines. Multiple monitors make it easy to switch between windows. With the proper settings, you can open a few side applications, email, spreadsheets, and communication tools to keep everything in order and avoid distractions. Get SmartPanels to carry out this setup efficiently.

2. Refined Data Analytics and Comparison

When analyzing massive data or processing large amounts of information, using numerous displays enables you to perceive all of the important elements at once. This layout speeds up the process of analyzing facts, tracking trends, and making wise decisions by reducing the need to continually navigate between tab windows. Experts in domains like analytics, technology, and finance need to be able to easily assess complicated data.

3.  Smoother Creative Workflows

Creative professionals benefit significantly from using multi-monitors with laptops to manage software tools and visual elements. For example, video editors or creative designers can dedicate one screen to the main project and use additional screens for timelines, references and toolbars. This reduces the need to toggle between windows and maintain a smoother, more focused creative process, which results in quality work and faster production times.

4.  Optimized Collaboration and Communication

Multi-display setups with your laptop are invaluable in collaborative environments. They let you keep video calls open on one screen while viewing documents or project management tools on another. With this configuration, communication flows without interruption, keeping everyone aligned without switching the tabs and apps. This becomes a game-changer for remote teams, where collaboration is necessary for reaching project goals.

5. Realistic Gaming and Entertainment Experience

For gamers, having numerous displays enhances the entire experience by expanding the field of view (FOV) resulting in a more vivid setting. A multi-screen arrangement provides an uninterrupted experience, whether you are playing games or watching entertainment. Moreover, it also helps content producers who need to concurrently oversee live streaming, keep an eye on gaming, and communicate with viewers without feeling constrained by a small screen.

Check Your Laptop’s Multi Monitor Compatibility in Just 3 Steps

Step 1: Identify Your Graphics Card

Right-click on the desktop > Display Settings > Advanced Display Settings

Step 2: Ports Availability

Look for HDMI, USB-C, or DisplayPort ports on the sides of your laptop.

Step 3: Verify Your Configuration

Connect one monitor at a time and see how your laptop handles the displays.

Smart Tip: Use tools like SmartPanels to easily manage and store your personal tastes.

Smart Ways to Optimize Your Multi-Monitor Setup!

Following these steps will give you a better grasp of how many monitors my laptop can support while making sure that everything runs properly.

  • Set up your monitors properly to reduce neck and eye strain. Keep the primary monitor at eye level and auxiliary screens at a comfortable tilt to the sides for a better view.
  • Use the SmartPanels auto-arranging function to swiftly manage your displays.

You’ll save time and maintain order in your workplace by doing this.

  • If your laptop has few ports, consider investing in a docking station to connect several monitors and other components.
  • Adjust the display settings (resolution, orientation, etc.) for each monitor to suit your requirements.

Troubleshooting Tips:

  • Make sure you’re using the proper cable for your monitors. Your laptop may have USB Type-C, DisplayPort, HDMI, or DVI connectors. Each cable is unique, so double-check that your monitor and laptop are compatible.
  • Cables are frequently plugged incorrectly, which causes trouble. Double-check that the cable is securely linked to your laptop and monitor. This helps you connect multiple displays to your laptop.
  • Always be sure that your monitor is turned on! Most monitors contain a little light to indicate they are powered up and ready.
  • If your laptop isn’t functioning properly, restarting it can be the best option. A quick reboot can fix small issues and let your laptop recognize the monitors correctly.
  • Using adapters? Check that everything is linked properly. Once set up, go to Display Settings and select Detect to test if your laptop detects the displays.

With SmartPanels , you can easily adjust this configuration and make sure every screen functions perfectly for your workflow.  

SmartPanels

Restore Browser Tabs with SmartPanels. It maintains an active tab history and restores browser size as well as display position on one screen or many.

Wrapping Up!

So, when it comes to how many monitors can my laptop support, it’s all about creating space to breathe and working smarter, not harder. More displays lead to less tab switching, fewer distractions, and a smoother workplace. The number of monitors your laptop can support varies depending on its graphics card, ports and the available connectivity options.

Once you’ve optimized your laptop for multiple displays, you’ll need to manage your screen space efficiently. SmartPanels bridges the gap by providing an advanced, user-friendly technique for saving and restoring window configurations, managing profiles, and increasing productivity on multiple displays. No matter if you’re coding, gaming, or analyzing data, SmartPanels can support up to 6 monitors to keep your workflow efficient and uninterrupted.

It’s time to get more out of your day, don’t you think? Download SmartPanels now to switch your laptop into the ultimate multi-screen workspace!

10 Must-Have Apps for 3 Monitors You Should Know About

Apps for 3 Monitors

For those who need to multi-task efficiently, a triple monitor setup can be a game-changer. Whether you’re a developer debugging complex code, a designer working with multiple assets, or a financial analyst tracking various datasets, an apps for 3 monitors broadens your digital workspace. Triple monitors remove the need for continual window switching by keeping multiple applications open at the same time, ultimately boosting proficiency.

A multimonitor setup has unquestionable benefits, but it can become burdensome if not maintained properly. Lacking the right tools to manage windows, taskbars, and app syncing across monitors can lead to disorganization. This in turn makes your setup less efficient and hinders productivity.

This is where the right apps for 3 monitors like SmartPanels come into play. In this blog post, we’ll introduce you to ten must-have applications for maximizing your three-monitor setup.

Why Do You Need Apps for 3 Monitors?

Window Management: Advanced algorithms provide intuitive window slamming, auto-positioning, and resizing over several displays, enabling fast navigation and window alignment without manual modifications.

Taskbar Synchronization: The taskbar can be extended across all connected monitors, maintaining similarity in the user interface while limiting the need for constant screen flipping.

Dynamic Profiles: Users may create custom screen configurations and switch between them dynamically based on various workflows, boosting productivity when working with multiple apps at one time.

Visual Desktop and Hotkey Customization: These features facilitate efficient multitasking by establishing automated processes and simplifying navigation using specified keystrokes.

Discover Top 10 Apps for 3 Monitors for Smarter Task Management

1.      SmartPanels

SmartPanels is the finest solution for IT managers and professionals wanting to optimize multi-monitor workloads. With features developed to optimize your multiple- or triple-monitor configuration, it increases productivity whether you’re managing electronic data processes or multitasking between apps. Restore sessions, manage numerous profiles with ease, and save time with smart layouts.

Features

  • Automatically arrange windows across multiple screens with a single click for smooth workspace management.
  • Restore preset display configurations and applications on Windows 10 and 11, including Snap layouts and desktop management.
  • Provide multi-browser session recovery and automatic restoration of Microsoft Office files (Word, Excel, PowerPoint, etc.).
  • Increase productivity with support for up to 6 monitors and easy profile switching for work, entertainment, or study environments.

2.      DisplayFusion

Display Fusion is an extensive application that enhances multi-monitor management. It provides advanced features for customers who need to maintain the accuracy of displays.  You may customize your taskbars, create window management profiles, and even add dynamic wallpaper to each screen. This tool’s customizable hotkey profiles facilitate the setup of multiple displays and allow users to switch between presentation, business, and entertainment settings with ease.

  • Each monitor has its own task bar with personalized shortcuts.
  • It’s simple to switch between monitors and arrange windows.
  • Several displays can be covered by a single image, or each screen might have a different backdrop image.
  • Create profiles for different workstations and change parameters for specific apps or tasks.

3.       Ultramon

Ultramon is a high-performance design intended for people who have many displays. It provides a wide range of monitor settings, window management, and advanced display features. The software includes powerful navigation windows, making it simple to traverse over numerous screens. The design also provides managed screen-specific display settings and multi-monitor taskbar control.

4.       Microsoft PowerToys

Microsoft PowerToys is a powerhouse for Windows users, and its FancyZones feature is especially useful for those with multiple monitors. FancyZones allows users to create custom layouts for Windows, ensuring that each screen fits perfectly. It also has the utility of managing multiple system objects and services, making it an important tool for users who need to perform multiple tasks simultaneously.

Features

  • A window manager that allows users to divide their screens into custom zones, making it easier to organize apps and windows.
  • Use customizable shortcuts to quickly navigate windows to preset locations.
  • Easily increases your ability to manage multiple applications and documents across multiple screens.

5.      Multiple Monitors

MultiMonitor app is a lightweight, and effective tool designed for basic multimonitor applications. Allows users to easily move windows between monitors, change display settings, and monitor usage while performing tasks. Ideal for users looking for an easy option to control monitor settings seamlessly in advanced applications.

Features

  •  Quickly move windows between screens with a simple click.
  • Easily specify the primary monitor and adjust its settings.
  • Disable or enable monitors according to your needs, which can be useful when switching between single-screen or multi-monitor settings.

5.  X-Mouse Button Control

X-Mouse Button Control is an exclusive application designed to boost mouse performance, particularly if deploying multiple displays. By modifying the mouse buttons to start specific screen activities, it offers greater flexibility and control over navigation. By assigning mouse buttons to carry out a range of tasks, like switching monitors or launching apps, this feature is very useful for users who want to optimize their productivity.

Features

  • Give the mouse button commands to do things like move around the screen, open certain applications, or change system options.
  • Simply glide the mouse pointer across the screen to quickly toggle between many monitors.
  • Create complex macros that execute repetitive tasks using simple mouse clicks.

6.Wallpaper Engine

This app for tri-monitors provides dynamic wallpapers that cover all three monitors, letting customers modify the visual attractiveness of their multimedia desktop. It offers moving, interactive backgrounds and immerses the user in a customized, immersive world that mimics the system’s design and appearance.

Features

  • Dynamic wallpapers are animated wallpapers that respond to system activity or user input.
  • The wallpaper extends over all connected monitors, resulting in a unified viewing experience.
  • Users can make or download wallpapers that reflect their personal style or brand.

7.  AquaSnap

In a multi-monitor setup, AquaSnap is a window manager that improves window snapping’s accuracy and efficacy. It enables users to drag windows into editable snap zones, making window management more flexible and convenient. AquaSnap is extremely handy for those who want to maximize screen space while maintaining design.

Features

  • Snaps the window into place on the screen, resizing it to fit predefined areas.
  • Shake all windows quickly, excluding the ones you’re focusing on.
  • Window Docking feature arranges windows on both edges of the screen to create a neat and elegant desktop.

9. Mouse Without Borders

Mouse Without Borders is an application that helps you control several computers with a single mouse and keyboard. This app allows users with multi-monitor settings on multiple devices to operate all systems without switching ports.

Features

  • Control up to four PCs with a single mouse and keyboard, making it ideal for those with complex workstations.
  • Shared clipboard lets you copy and paste content between systems, dropping the need to manually relocate files.
  •  With drag-and-drop features, you can easily transfer files across devices.

10.  SpaceDesk

SpaceDesk is a flexible way to turn your primary desktop into a separate monitor that can be used on a variety of devices, including tablets and smartphones. This feature is useful for users who need more display area for various projects, analyses, or presentations.

  • It works with a wide range of devices, allowing smartphones and tablets to serve as administrative assistants with greater screen sizes.
  • Efficiently expands the size of your primary desktop secondary screen, giving you the most space for many apps or exacting project management.
  • By fully enabling multi-touch capabilities, touch devices can operate as dynamic input sources, giving them more flexibility and control.

Benefits of Using Apps for 3 Monitors in Your Daily Tasks

Better Output

You can configure windows, assign specific screen tasks, and move between them with ease using Monitor 3 viewing apps. With better control over multiple windows, you can focus on the task at hand, greatly reducing distractions and increasing productivity across all three monitors.

Excellent Window Management

Snapping and placing windows is made easier using apps for 3 monitors, such as DisplayFusion and SmartPanels. This creates an orderly workplace for effective multitasking by making it simple to work on numerous applications at once with a jumble of overlapping windows.

Flexible Workspace

Apps for 3 monitors with SmartPanels and UltraMon allow you to customize your workspace to suit specific tasks. Create different window layouts or profiles for different tasks so that you can easily change layouts. This individual flexibility can save time and reduce the cognitive load of managing tasks on three monitors.

Efficiently Navigate Between Screens

Apps like SmartPanels make switching between monitor and computer simpler, hence enhancing workflow. You can save time and effort by controlling several devices or screens with a single peripheral or by switching between mouse buttons. 

SmartPanels

Restore Browser Tabs with SmartPanels. It maintains an active tab history and restores browser size as well as display position on one screen or many.

Conclusion

Managing a triple-monitor system is a great way to increase productivity, but attaining its maximum efficiency requires the proper tools. SmartPanels helps you manage your workspace, boost profitability, and easily switch between work.

These apps for 3 monitors can customize your workspace with these tools. Adding applications to your system’s three displays could help you work more productively, stay organized, and accomplish tasks faster. Turn your multi-monitor setup into a creative force by leveraging its formidable functionality.

How to Access and Manage the AppData Folder in Windows 10 and 11

It is not uncommon to come across a folder with the name “AppData” on your PC and be left to wonder at its contents. In fact, most Windows users tend to give that hidden folder a wide berth, but it is doing some important work in the background. The AppData folder is where all the settings are kept ensuring your applications run without a hitch; your browser bookmarks and game files you have put in are just some of the preferences it has stashed away for you in one spot. Learning how to access the AppData folder brings real benefits.  

To start with, we will set out what the folder is and the way Windows maps it. From there we demonstrate a few expeditious means of opening it under Windows 10 or 11. We also get into the nitty gritty of modern trends and safe cleanup, as well as how SmartPanels might figure into your routine.  

What Is the AppData Folder? 

Every Windows user account contains an AppData folder (for Application Data). Think of it as a kind of private storeroom for your programs. The apps put their settings, caches, profiles, and the like in there, along with any temporary files. That is how your software can recall your preferences when you go to use it. 

So, what is AppData folder activity about behind the scenes? Per-user data is kept apart and in order. On a PC that is shared, every account has its own copy of the files so that your settings remain just yours. 

Windows will have the folder hidden as a matter of course; there is a sound reason for it, to stop any unintended alterations to the kind of files your applications rely on. That does not mean you cannot get at it, however. Should you need to make a backup or do some troubleshooting, the option is there. 

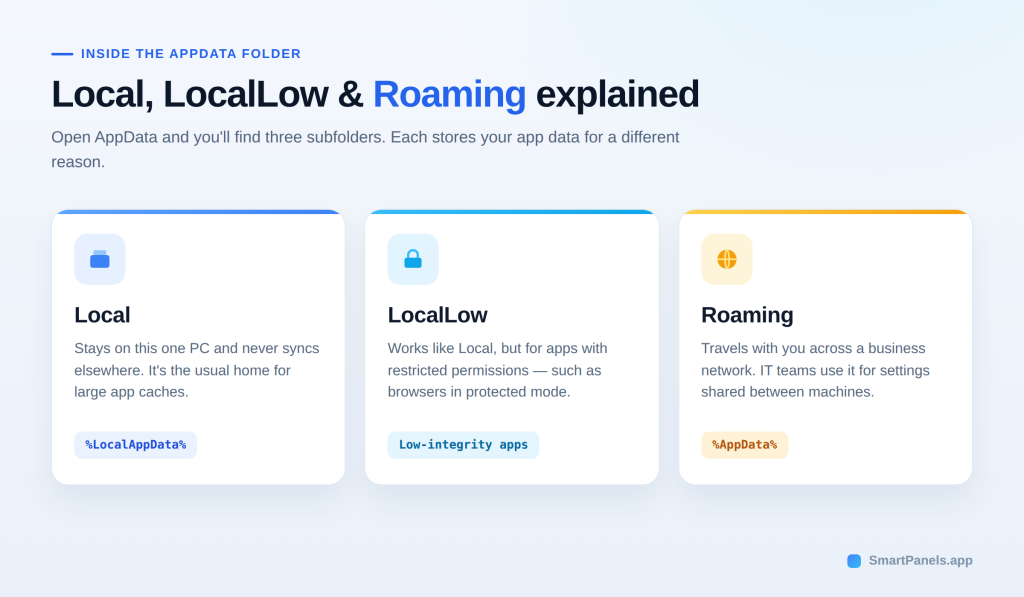
Local, LocalLow, and Roaming Explained 

Inside, you will find three subfolders. Here is a quick breakdown: 

  1. Data in the Local folder is confined to a single PC and will not be synced to other devices; it is a common spot for apps to put their sizeable caches. 
  2. Then there is LocalLow, which is much the same as Local in operation but is for applications with restricted security permissions, such as certain browsers running in a protected mode. 
  3. Roaming is where you will find data designed to travel with you on a business network, so IT departments tend to use it for shared settings on the accounts they manage. 

      How Windows Maps AppData Behind the Scenes 

      To find these folders, Windows makes use of environment variables. You can think of a variable as a shorthand for the full path; %AppData% is the one for the Roaming folder and %LocalAppData% for the Local.  

      Underneath are what are known as official markers or “known folders,” which developers put in place to ensure their software will navigate to the proper directory on any machine. The upshot is that even an account rename will not cause an app to fail. 

      It is also the reason for a frequent point of confusion: running %AppData% will take you to Roaming rather than the root. If one wants to see for oneself, it only takes a few seconds. Fire up a Command Prompt and enter “echo %AppData%”, and Windows will display the precise Roaming location. Do the same with `echo %LocalAppData%`, and the Local path comes up. Such a quick verification is useful when a reference gives nothing more than the variable. 

      How to Access the AppData Folder Quickly 

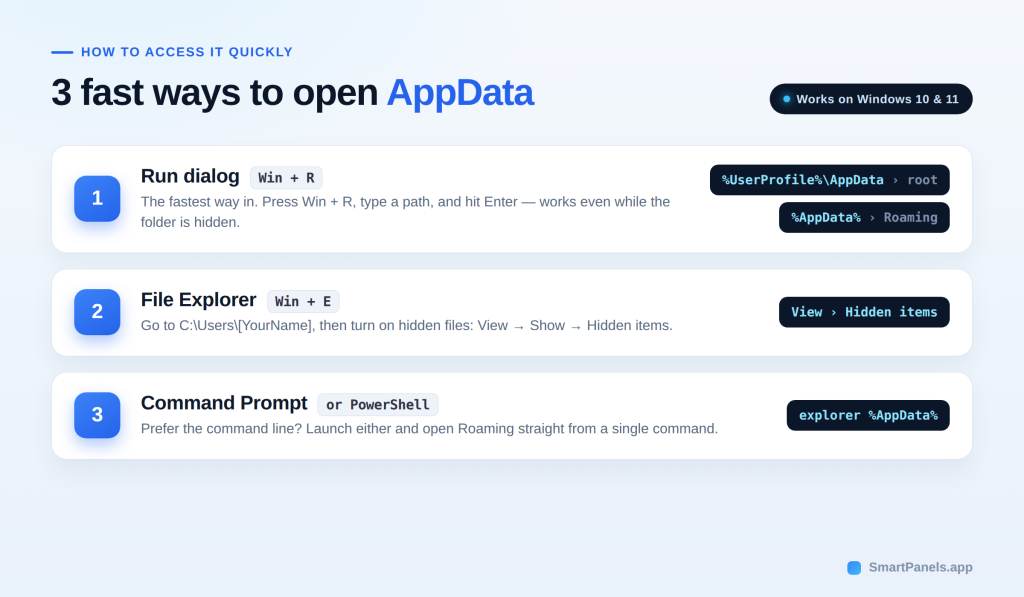
      Now for the practical part. These steps show you how to access the AppData folder on any PC. Below, we cover the fastest options first. Each method works on both Windows 10 and 11. 

      Method 1: Use the Run Dialog 

      For the fastest way in, use the Run box. Hold down the Windows key and hit R, enter a command of your choosing, and you can press Enter. To get to the top level, put in %UserProfile%\AppData; that will bring up the main folder and its three subfolders. If one wants to go directly to Roaming, %AppData% does the job, as does %LocalAppData% for the Local folder. 

      There is a point to be made about the %AppData% entry: it takes you to Roaming rather than the root. Should you need to step up a level, a click on “AppData” in the address bar will do it. The nice thing is this works regardless of the folder being hidden. 

      Method 2: Show Hidden Files in File Explorer 

      For those who would rather do a manual search, you can use File Explorer to get to the AppData files. Start by hitting Windows and E to bring up a window and make your way to C:\Users\[YourUsername]. You will have to unhide some items depending on which version is in use. 

      If running Windows 11, select Hidden items from the Show option under View. With Windows 10, it is a matter of going to the View tab and putting a check in the box for Hidden items. The folder will then be visible in the user directory, albeit with a fainter look. A double click is all it takes to see what is inside. 

      Method 3: Use the Address Bar, Command Prompt, or PowerShell 

      If File Explorer is up and running, one can simply click on the address bar and put in %UserProfile%\AppData before hitting Enter. The bar will take %AppData% or %LocalAppData% as well. 

      For those who prefer the Command Prompt, there is an alternative: open it and enter explorer %AppData% to have the Roaming folder appear. PowerShell will handle the command in much the same way. Windows has no shortage of ways to accommodate how you like to work. 

      Where Microsoft Store Apps Hide Their Data 

      Data is not stored in a uniform fashion by all applications. Take the modern offerings from the Microsoft Store, for instance; they are built on an MSIX format and operate within a light container to enhance security. Windows will divert any AppData writes from such an app to a private spot, which one can locate in the Packages subfolder of Local (C:\Users\[YourUsername]\AppData\Local\Packages). There, every app has a folder bearing its package family name. 

      Within that you will see a LocalCache containing the Roaming and Local data that has been redirected. The point of this setup is to ensure isolation so that an app has no access to the files of another. It also means uninstalling a Store app is a tidy process, with Windows erasing the folder in question. Should you need to track down a particular package, a quick Get-AppxPackage command in PowerShell will give you the package family names. 

      The same principle applies to the registry. A packaged app is given its own virtual view of it, meaning its activity seldom affects the system at large. This approach minimizes clutter and conflict when the time comes to remove the software. In the end, these newer apps are much better at cleaning up after themselves. 

      Why Managing the AppData Folder Matters

      Opening the folder is only half the story. Knowing how to access the AppData folder is a great start, yet managing it well matters more. A well-run system is a matter of good management, one that safeguards your storage and data alike. You will find that applications have a way of accumulating caches and logs in this folder over time, and before long it can become quite sizable. There are programs that will unobtrusively put down several gigabytes of detritus. While a routine check is necessary to ensure the system runs without a hitch, it is not just about cleaning house; how you handle things with care is of equal import. 

      • Back Up Your App Data Safely 

      Should your PC give out, a backup is what will safeguard your settings. There is no need to make a copy of the whole system; concentrate instead on the folders that matter. Browser profiles, game saves, and the like are good candidates for this.  

      To do it, open the folder in question by one of the means described above and copy over the subfolders you want. From there, put them on an external hard drive or in the cloud. It would be wise to put a reminder in your calendar to do so every few weeks or so; that way you can be sure of having an up-to-date version at hand. 

      • Clean Up Without Breaking Things 

      There is value in a good cleanup, but it is the exercise of caution that will keep your applications in good standing. Do not go about deleting the whole of the AppData folder; both Windows and the software you run have a need for it. The better course of action is to let the Disk Cleanup utility do its work on any temporary files that are safe to discard, or to clear out what is in the Temp folder under Local. You might also want to get rid of any folders left behind by programs you have uninstalled. 

      • Move Bloated Folders the Safe Way 

      It is not uncommon for one cache folder to bloat to several gigabytes. An advanced user might elect to relocate it to a different drive to keep the apps running as they should. The way to do it is with a junction, a sort of special link from one folder to another. Start by copying the folder in question over to your other drive. Next, put in place a junction via the mklink /J command that Windows provides; this will let the application continue to reference the old path. But be sure to make a backup and take your time. And under no circumstances should you try to move the entire folder in this manner, as Windows has a need for it. 

      Where SmartPanels Fits into Your Workspace 

      Think of it this way: the AppData folder and SmartPanels are at odds with one another in their function. The former is where Windows 11 keeps your app’s insides—settings, caches, and tokens. For those who have upgraded from Windows 10, you will find the new AppData folder in its usual place. 

      SmartPanels is concerned with the arrangement of things. It is what puts your browser tabs and window positions back in order, restoring them in a matter of seconds and one click. If you are working on multiple screens, the software can accommodate as many as six displays. There is also support for hotkeys to get to a workspace without delay, and should you wish to pass a profile along to a colleague over email, that is an option as well. 

      In short, let AppData look after the data while SmartPanels takes care of your workflow. Tired of having to put your desktop back together each morning? Put in for a free trial over at SmartPanels.app and have your workspace up and running right away. 

      Final Thoughts 

      Managing your files does not have to feel confusing. Once you know how to access the AppData folder, you gain real control over your Windows experience.  

      Consider an upgrade to be the right time for a bit of housekeeping. Clear out the old caches to free up space and back up your important settings. You should be cautious with the folder, though, as the apps depend on it. In most cases you will want to back up subfolders individually rather than the whole directory. 

      Organization is another thing to attend to. While AppData is concerned with app settings, SmartPanels gives you a view of the larger workspace layout that the other cannot. It can put your monitors, tabs, and windows where they belong in seconds, sparing you the chore of putting everything in order every day.  

      For those who prefer to work smarter, there is a 14-day trial available at no charge from SmartPanels. A good way to get a firm grip on both your data and your desktop. 2

      Windows Security Tips: How To Protect Your Data And Privacy

      Windows Security Tips

      Worried about hackers and viruses? You’re not alone. Our guide gives you tools and tips to keep your Windows computer safe. Learn how to guard your private info. Start now!

      Essential Windows Security Settings

      Windows has a built-in firewall that always works to protect your computer. This means it stops strangers from getting into your system. You must also sign in or make a Microsoft account, which helps with security.

      Another big step is turning on automatic updates not just for Windows but also for Microsoft Office and all other programs you use.

      Antivirus software comes already set up on Windows devices, known as Windows Defender. It looks out for bad software trying to harm your computer. Also, picking strong passwords is key—they should be like secret codes only you can understand.

      Finally, stay away from illegal downloads since they can bring trouble to your device.

      Next up—how to keep your files safe right where you are.

      Protecting Your Data Locally

      Backing up your data is essential. Establish a routine to duplicate files to an external hard drive or cloud service like OneDrive frequently. This method ensures you won’t lose everything if your computer fails.

      For extra protection, apply encryption tools on confidential files. Encryption obscures the data so only individuals with the correct keys can interpret it.

      Exercise caution with what connects to your computer too. USB drives from friends could carry viruses unbeknownst to them. Consistently scan these with anti-virus software prior to accessing any files.

      Similarly, control visibility by setting up distinct user accounts for family members on shared computers. Following this, we explore online security measures to maintain your safety on the internet.

      Online Security Measures

      For online safety, use trusted browsers like Microsoft Edge. This helps you stay away from harmful sites and keeps your browsing safe. Always check for “https://” in the web address.

      It means the site is secure. Avoid using public Wi-Fi for private stuff, like shopping or banking.

      Keep an eye out for phishing scams. These are fake emails trying to steal your info. Don’t click on strange links or download unknown attachments. Share personal details only on secure sites you trust.

      Read their privacy policies first to know how they protect your data.

      Using Antivirus and Anti-Malware Solutions

      Windows Security detects and stops malware in real time. It makes sure your data is safe from harmful programs. Microsoft Defender, built into Windows 10 and 11, checks for threats often.

      You can use it without adding any other software.

      There’s also Microsoft Defender Offline for deeper checks. Use it to find malware that is hard to catch when Windows is running. This helps keep hackers away and prevents them from stealing or harming your files.

      Always choose real content over pirated versions to reduce the risk of getting malware.

      Advanced Windows 10 Privacy Features

      After setting up antivirus and anti-malware tools, it’s vital to dive deeper into privacy features. Windows 10 offers several ways to keep your information safe. You can stop ad tracking, which stops companies from watching what you do online.

      Go to Settings, click on Privacy, then General to turn this off. If you don’t want your location known, you can stop that too in the Privacy menu under Location.

      Switching from a Microsoft account to a local one gives more control over personal data.

      You should also consider managing how Windows 10 keeps track of your activities. Turn off Timeline by going into the Privacy settings and hitting Activity history. This stops Windows from saving a record of files and apps you’ve opened.

      For even tighter control over what gets shared, use Microsoft’s Privacy Dashboard online—it shows more about what Microsoft knows about you and lets you delete it if needed.

      Protecting Privacy on Different Windows Versions

      Different Windows versions need different privacy steps. For Windows 10, switch to a local account from a Microsoft account for more privacy. This stops Microsoft from getting your data like browsing history and location.

      Turn off diagnostic data sharing too. In Windows 7 and 8.1, focus on controlling which apps can see your personal info like photos or documents.

      Always update your operating system, whether it’s Windows 7, 8.1, or 10. Updates fix security risks that could leak private information online. Use built-in tools like File Explorer to check app permissions and make sure only safe apps can access important stuff.

      Next, we’ll talk about how you can avoid threats like phishing scams and secure your home network for even better protection.

      Safe Computing Practices

      Safe computing means staying alert online. Avoid tricks from scammers and make sure your Wi-Fi is locked down tight.

      Avoid Phishing Scams and Suspicious Links

      Phishing scams trick you into giving away personal info. They often use fake emails or websites.

      1. Check email sender addresses closely. Phishers use addresses that look like they’re from real companies but have small mistakes.
      2. Look for spelling and grammar errors in emails or messages. Real companies rarely send out messages with mistakes.
      3. Be wary of emails asking for personal or financial information. Banks or credit card companies usually don’t ask for this info via email.
      4. Notice if the message creates a sense of urgency, like saying your account will be closed unless you act quickly. This is a common trick in phishing attacks.
      5. Use anti-malware programs to block phishing attempts and malicious websites.
      6. Turn on two-step verification for extra security on your accounts. This makes it harder for identity thieves to access your info.
      7. Don’t click on links in suspicious emails or messages, especially those claiming to be from social networks, online stores, or banks.
      8. Always check the web address before entering sensitive information to make sure it starts with “https,” which means it’s secure.
      9. Keep your computer and mobile devices updated with the latest security patches and updates.

      Next, we’ll discuss how to secure your home network to keep your data safe.

      Secure Your Home Network

      Securing your home network is crucial to protect your data. It keeps hackers out and your information safe. Here’s how:

      1. Change the default username and password on your router. Hackers know these defaults, making it easier to break in.
      2. Use a strong password for your Wi-Fi network. Combine letters, numbers, and symbols.
      3. Enable network encryption. WPA2 or WPA3 provides strong protection.
      4. Keep your router’s firmware up to date. This fixes security loopholes.
      5. Turn off Wi-Fi Protected Setup (WPS). It has vulnerabilities that can be exploited.
      6. Disable remote management of your router over the internet. This prevents outsiders from accessing your router’s settings.
      7. Create a guest network for visitors. This keeps your main network more secure.
      8. Use a virtual private network (VPN) on all devices when online shopping or banking.
      9. Regularly check for unknown devices connected to your network.

      Next, let’s talk about avoiding phishing scams and suspicious links to keep safe online.

      Data Protection Strategies

      Keeping your data safe is key. Back up often and choose cloud storage carefully.

      Backup Your Data Regularly

      Backing up your data saves you from losing it all. It keeps your files safe if something goes wrong.

      1. Choose the right tool like FileVault for a full system backup.
      2. Set up auto backups weekly through Windows Update settings.
      3. Keep copies of important files on a flash drive as well.
      4. Use cloud services like OneDrive, but understand how to manage privacy settings.
      5. Make sure to encrypt your backup with secure passwords or decryption keys.
      6. Always check that backups work by restoring a small file.

      Next, learn how to safely use external devices.

      Use Cloud Services Wisely

      After backing up data, choosing cloud services smartly is key. Cloud platforms like Google Drive and Dropbox offer space for files and photos. But, be careful. These services access a lot of info.

      For better safety, pick services with strong encryption methods like SSL certificates or openPGP. This keeps data safe during transfers.

      Also, read their privacy policies to know how they handle your information. Avoid storing sensitive details such as credit card numbers on these clouds unless necessary. By doing this, you reduce risks of identity theft and data breaches that happen online.

      SmartPanels

      Restore Browser Tabs with SmartPanels. It maintains an active tab history and restores browser size as well as display position on one screen or many.

      Conclusion

      Keep your computer safe. Use the built-in firewall. Always update Windows and apps. Install antivirus software for extra protection against bad software. Make strong passwords to keep hackers away.

      Turn off ad tracking and manage location settings for more privacy. Back up your data often, just in case something goes wrong. Follow these tips to protect your information and stay secure online.

      How to Use Hotkeys to Keep a Window Always on Top in Windows 11?

      Keep A Window Always On Top in Windows 10

      Ever been in the middle of working on a project and wished you could keep one window always visible, no matter what else you’re doing? That’s where the “always on top” feature comes in handy. This little trick keeps your chosen window right where you need it, staying on top of everything else. So, here you would know about “windows hotkey keep window open windows 11”.

      So, why should you bother with this feature? For starters, it’s a real game-changer for multitasking. Imagine you’re on a video call and need to keep an eye on your to-do list at the same time. When a window is configured to be “always on top,” you may stop constantly navigating between them. It’s all about streamlining and optimizing your process. It also keeps crucial information visible and out of the way of other windows. Although it’s a basic function, the way you use your screen space may be greatly affected by it.

      Let’s see how you can use hotkeys to keep your Windows always on top in Windows 11!

      Related Blog: https://smartpanels.app/blog/how-to-keep-a-window-always-on-top-in-windows-10/

      Using Built-In Windows 11 Features

      Windows 11 doesn’t have a built-in feature specifically for keeping Windows always on top, but there are some native options and workarounds you can use to achieve a similar effect.

      Snap Layouts

      While not the same as “always on top,” Windows 11’s Snap Layouts can help you organize your windows more effectively. You may easily organize open windows into pre-defined sections of your screen by using Snap Layouts. Here’s how to use them:

      • Open the windows you want to arrange.
      • Press Win + Z or hover your cursor over the maximize button located in the upper-right corner of a window.
      • From the options that show, choose a layout. This will snap the window into place, making it easier to keep multiple windows visible.

      Virtual Desktops

      Another built-in feature is Virtual Desktops, which can help manage multiple windows more efficiently, even though it doesn’t always keep a window on top. This is how virtual desktops are used:

      • On your taskbar, click the Task View icon (or hit Win + Tab).
      • To launch another virtual desktop, select “New desktop.”
      • Task View allows you to move windows across desktops.

      Focus Assis

      Focus Assist can help you stay focused on one window by minimizing distractions. You can set it up to suppress notifications and alerts that might distract you from your important window.

      • Go to Settings (press Win + I).
      • Go to System > Focus Assist.
      • Choose your preferred focus settings to limit interruptions.

      Using Keyboard Shortcuts

      If you’re a fan of keyboard shortcuts and want to keep a window always on top, you’re in luck! While Windows 11 doesn’t have a built-in hotkey for this feature, you can use some handy shortcuts or tools to achieve a similar effect.

      Common Hotkeys

      One popular hotkey to keep a window always on top is Win + Shift + T. This shortcut isn’t built into Windows 11 by default, but you can create a custom hotkey to make it work. Here’s a quick look at how this works with third-party tools:

      • OnTopReplica: This free tool allows you to pin a window on top of others. Once installed, you can use its interface to set a specific window as always on top. The hotkey for this might vary based on the tool, so check its settings.

      Creating and Customizing Hotkeys

      You’ll need a third-party tool to set up or customize hotkeys since Windows 11 doesn’t provide this feature out of the box. Here’s a general guide using tools like AutoHotkey:

      Create a New Script:

      • On your desktop, right-click and choose New > AutoHotkey Script.
      • Name something memorable in your script file, like “AlwaysOnTop.ahk.”

      Edit the Script:

      • Right-click the script file and choose Edit Script.
      • Add the following code to the script

      ^SPACE::  ; Ctrl + Space hotkey

      Winset, AlwaysOnTop, , A

      return

      • This script sets the currently active window to always stay on top when you press Ctrl + Space.
      • To execute the script, double-click after saving it.
      • Use the hotkey you’ve defined (e.g., Ctrl + Space) to toggle the always-on-top feature for your active window.

      Using Third-Party Tools

      If you want to keep a window always on top and built-in options aren’t cutting it, third-party tools are your best bet. These tools offer more flexibility and features to help you manage your windows effectively. Here’s a quick look at some popular options and how to use them:

      Popular Third-Party Tools

      • DeskSoft’s “Always On Top” is a straightforward tool that does exactly what it says, it keeps any selected window on top. It is simple to use and requires little setup.
      • OnTopReplica: This tool allows you to create a resizable, always-on-top replica of any window. It’s handy for monitoring applications or content while working on other tasks.

      How to Set Up and Use These Tools

      DeskSoft’s “Always On Top”:

      • Download and install the software from DeskSoft’s official site.
      • Upon launching the tool, a little icon will appear in the system tray.
      • Right-click the tray icon and choose the appropriate option to select the window you want to keep on top. The selected window will now remain on top of all others.

      “OnTopReplica”:

      • OnTopReplica’s official website offers a download and installation option.
      • Run the application. You’ll see a window with options to select which window you want to replicate.
      • Choose the target window from the list or by using the window selector tool within OnTopReplica.
      • Adjust the replica as needed by resizing or moving it around. All other windows will continue to be layered over the imitation window.

      Troubleshooting

      When attempting to keep a window always on top, you may encounter some difficulties even with the appropriate tools and shortcuts. Here’s a rundown of common issues and practical tips to resolve them:

      Hotkeys Not Working

      If your hotkeys aren’t doing their job, it could be due to several reasons:

      • Conflicting Shortcuts: Other programs or system functions might use the same hotkeys. Check your tool’s settings to ensure there are no conflicts.
      • Script Issues: If you’re using a tool like AutoHotkey, ensure your script runs correctly. Verify the script again for any mistakes or typos.
      • Administrative Permissions: Some tools or scripts need administrative rights to function properly. Try running your tool or script as an administrator.

      Solution:

      • Check for Conflicts: Go into your tool’s settings and look for any conflicting shortcuts. Adjust as necessary.
      • Verify Script: Open your script file and review the code for errors. You might find an easy fix if there’s a mistake.
      • Run as Administrator: Right-click your tool or script and select “Run as administrator” to ensure it has the permissions it needs.

      Tool Not Responding

      Sometimes, the tool itself may not respond as expected:

      • Outdated Software: Your tool might need an update to work correctly with the latest Windows version.
      • Compatibility Issues: It’s possible that the program won’t work perfectly with Windows 11 or the most recent versions.

      Solution:

      • Update the Tool: Check the tool’s website or settings and install any available updates.
      • Reinstall: Try removing and then reinstalling the tool if updating doesn’t work. This can fix problems with corruption or compatibility.

      Window Not Staying On Top

      If the window you want to keep on top isn’t staying put:

      • Application-Specific Issues: Some applications may override the always-on-top setting due to their design or settings.
      • System Settings: Occasionally, system settings or other software might interfere with your tool.

      Solution:

      • Look into the application settings you’re trying to manage. There might be options related to window behavior.
      • Make sure that the operation of your tool is not hampered by any system utilities or other applications.

      SmartPanels

      Restore Browser Tabs with SmartPanels. It maintains an active tab history and restores browser size as well as display position on one screen or many.

      How Can You Use SmartPanels to Keep Your Window on Top?

      SmartPanels has got you covered if you want a simple way to keep certain windows on top. Using only a few clicks, you can preserve your window preferences using this useful utility. You can make and store numerous profiles using SmartPanels, each having a top-level window of its own. Whether you’re switching from work to study or moving into entertainment mode, SmartPanels makes it easy to jump between your favorite setups quickly. Keeping your workspace organized and efficient is key to maximizing time and effort savings.

      Why and How to Display Browser Extensions Using Command Line Tools?

      Display Browser Extensions

      Browser extensions are handy tools that let you customize your web browsing experience. Whether you’re blocking ads, saving passwords, or improving productivity, these small programs can make your browser do more for you. But with many extensions comes the need to manage them effectively, especially if you’re concerned about security or just want to keep things running smoothly. 

      That’s where command line tools come in. If you’re unfamiliar with command line tools, you can control your computer by typing text commands instead of clicking through menus. This can be a faster and more powerful way to get things done, and it’s not just for tech experts, anyone can learn to use them to save time and effort. 

      So, why should you care about using command-line tools to manage browser extensions? It’s all about gaining better control and doing things more efficiently. With command line tools, you can quickly see what extensions are installed, manage them easily, and even automate tasks to save time. 

      In this blog, we’ll explain why using command-line tools to display your browser extensions is a smart move. So, let’s get started!

      Why Display Browser Extensions Using Command Line Tools? 

      Managing browser extensions through the usual browser interface works just fine for most people. But if you value efficiency, control, and security, using command-line tools can take your extension management to the next level. Let’s explore why. 

      Efficiency 

      Using command line tools is all about speed and simplicity. Instead of clicking through multiple menus to see or manage your extensions, you can get the job done with just a few commands. Whether you’re listing all installed extensions or disabling one that’s causing issues, command line tools let you perform these tasks in seconds. 

      Automation 

      One of the biggest advantages of command-line tools is their ability to automate tasks. Automation can be a game-changer if you manage extensions across several browsers or devices. You can create scripts that handle routine tasks like enabling or disabling extensions, updating them, or even uninstalling ones you no longer need. This way, what might take minutes or even hours manually can be done instantly. Command line tools are a powerful ally for those who like to streamline their workflows. 

      Detailed Information 

      Sometimes, the browser’s user interface doesn’t give you all the details you need about your extensions. With command line tools, you can access more in-depth information, such as specific extension IDs, version numbers, and even each extension’s exact permissions. This level of detail can help you better understand what each extension is doing and whether it’s safe to keep it installed.  

      Security 

      Regarding security, command line tools can help you closely monitor what’s going on in your browser. Regularly listing and reviewing your extensions through the command line lets you quickly spot any that you don’t recognize or didn’t install. This is crucial for preventing unauthorized extensions from compromising your security or privacy. In environments where security is a priority, such as in IT departments or businesses, using command-line tools to audit extensions can provide peace of mind. 

      What are Command Line Tools 

      Command Line Interfaces (CLI) might sound a bit technical, but they’re quite simple and incredibly useful once you get the hang of them. Instead of clicking through menus and options with a mouse, a CLI allows you to type commands directly into a terminal or command prompt. These commands tell your computer exactly what to do, often more quickly and efficiently than using a traditional graphical user interface (GUI). 

      Basics of Command Line Interfaces (CLI) 

      If you’re new to the command line, think of it as having a direct conversation with your computer. You type a command and press enter, and the computer responds by performing that command. While it may seem intimidating initially, using the command line becomes second nature with a little practice. Also, it’s a skill that can save you a lot of time, especially for repetitive tasks. 

      Popular CLI Tools for Browsers 

      Different web browsers have specific command line tools that allow you to manage extensions. Let’s take a look at some of the most popular ones: 

      Chrome-cli for Google Chrome 

      If you’re a Chrome user, chrome-cli is a tool that opens up a world of possibilities. It lets you control your browser directly from the command line. With chrome-cli, you can list all your installed extensions, enable or disable them, and even open or close tabs and windows. 

      Web-ext for Firefox 

      For Firefox users, web-ext is the go-to CLI tool. Originally developed to help extension developers, it’s also incredibly useful for everyday users who want to manage their extensions more effectively. With web-ext, you can list all your installed extensions, run them in a test environment, and even automate installing or updating them.  

      Edge-CLI for Microsoft Edge 

      Microsoft Edge has its own CLI tool, Edge-CLI, which provides similar capabilities. With Edge-CLI, you can manage your extensions, tabs, and browser settings without ever leaving the terminal. Whether you’re looking to streamline your browsing experience or need to manage multiple instances of Edge, this tool can be a huge time-saver. 

      Step-by-Step Guide to Displaying Browser Extensions 

      Let’s see the steps for Google Chrome, Firefox, and Microsoft Edge, so you can follow along no matter which browser you use. 

      Using `chrome-cli` for Google Chrome 

      Installation and Setup 

      • Install Homebrew (Mac users only): If you’re on a Mac, the easiest way to install `chrome-cli` is via Homebrew. If you don’t have Homebrew installed, open your terminal and enter: 
      • Install `chrome-cli`: Once Homebrew is set up, you can install `chrome-cli` by running: 
      •  For other operating systems, you may need to build from source, which you can find on the official `chrome-cli` GitHub page. 

      Commands to List and Manage Extensions 

      • List Installed Extensions: To see all the extensions currently installed in your Chrome browser, use the command: chrome-cli list extensions 
      • Enable/Disable Extensions: To enable or disable an extension, you first need its ID, which you can get from the list command.  

      Using `web-ext` for Firefox 

      Installation and Setup 

      • Install Node.js: If you don’t have Node.js installed, download and install it from the official [Node.js website](https://nodejs.org/). 
      • Install `web-ext: With Node.js installed, you can install `web-ext`. 

      Commands to List and Manage Extensions 

      • List Installed Extensions: To display all extensions installed in Firefox, use: web-ext list 
      • Enable/Disable Extensions: Similar to Chrome, you can enable or disable extensions by first listing them to get their IDs: 
        • web-ext enable <extension_id> 
        •  web-ext disable <extension_id>
      • Run Extensions in a Test Environment: If you’re developing or testing extensions, you can run them in a test environment without affecting your main browser profile. 

      Using `Edge-CLI` for Microsoft Edge 

      Installation and Setup 

      • Install `Edge-CLI`: Microsoft Edge’s command line tool isn’t as widely supported as Chrome and Firefox, but it’s still very useful. You can install `Edge-CLI` by following the instructions on the [official repository](https://github.com/microsoft/edge-cli). 

      Commands to List and Manage Extensions 

      • List Installed Extensions: To see all installed extensions in Edge, use: edge-cli extensions list 
      • Enable/Disable Extensions: To enable or disable an extension, first list them to find their IDs, then use:
        • edge-cli extensions enable <extension_id> 
        • edge-cli extensions disable <extension_id> 

      SmartPanels

      Restore Browser Tabs with SmartPanels. It maintains an active tab history and restores browser size as well as display position on one screen or many.

      Conclusion  

      Using command line tools to manage your browser extensions is a fast and effective way to keep your browsing environment organized and secure. It simplifies tasks, provides detailed information, and enhances your control over your extensions. Give these tools a try and see how they can make managing your extensions easier. 

      How to Save and Restore Your Workspace Layout in Windows 11?

      Every morning, you have to spend time and focus putting your screen back together. You will open the browser of choice, move it over to its usual spot, then size up the email window and put a document next to it. But one restart or a Windows crash can scatter the whole arrangement, forcing you to repeat the process. 

      Windows 11 comes with some helpful tools to restore your screens, and you can do it in a few clicks. There are the snap functions, virtual desktops, and the like. Yet for the most part they are designed for a single session rather than a workspace you come back to day after day.  

      We set out to show how to save workspace layout windows 11, where it falls short, and how SmartPanels is the answer. With this approach, you can have your precise configuration back in seconds, no matter how many of the six displays you use. 

      Why a Saved Workspace Layout Matters 

      Consider the part your setup plays in how you work. Put it this way: a writer has his notes to one side and a draft to the other; a support agent is monitoring a live chat with the ticket queue at hand; a trader will have dashboards arrayed over two or three monitors.  

      The value lies in the arrangement as much as in the applications, so resetting the layout comes at a cost. One’s place is lost, windows have to be found, and time is wasted. That is why having a workspace on file is about more than tidiness; it is a safeguard for your concentration.  

      Ultimately, the quicker you can get back to your configuration, the faster you are back in focus. 

      Native Tools to Save Workspace Layout Windows 11 

      Windows 11 includes several features that arrange and recall windows. Each one solves a slightly different problem. Therefore, it helps to know what they do first.  

      Below, we break down the main options and how they behave. 

      Snap Layouts: Instant Window Grids 

      With Snap Layouts, you have a set of preset grids at your disposal to arrange your open windows. They are easily accessed by putting the cursor over the maximize button on any window, or one can use the Windows key + Z shortcut. This brings up a little picker with a selection of numbered layouts from which to pick halves, thirds, quarters, or something more mixed. 

      Once the first window is in position, Snap Assist will prompt you with other apps for the remaining space. The options are also designed to be responsive to your display scaling and orientation as well as resolution; on an ultrawide or wide monitor, for instance, Windows 11 will present more zones. If the top edge of a window is dragged, the Snap bar will be revealed. 

      As a result, snap layouts windows 11 shows more zones on wide and ultrawide monitors. For full keyboard control, press the Windows key + Z, then a layout number, then a zone number. To adjust the behavior, open Settings, then System, and then Multitasking. 

      Snap Groups: Return to a Full Arrangement 

      When several apps are put together, Windows will consider them to be a single unit and commit the arrangement to memory. This means the entire set can be brought up with a single action. A simple hover over one of the grouped applications on the taskbar is enough to bring up a preview; from there, a click restores the layout in its original form.  

      Such groups are also found in Task View and the Alt + Tab function, the latter being an addition in Windows 22H2. For those in the middle of a work session, it is a convenient way to switch context in no time. 

      However, snap groups windows 11 stores this data during your current session. Shut down or restart, and the grouping disappears. 

      Virtual Desktops: Separate Spaces per Project 

      Virtual desktops give each project its own screen space. For example, keep client work on one and personal tasks on another. To open Task View, press Windows key + Tab. To add a desktop, press Windows key + Ctrl + D. To switch desktops, press Windows key + Ctrl + Left or Right. You can also drag an app between desktops inside Task View. Naming each desktop keeps your projects clear.   

      Technically, windows 11 multiple desktops run as lightweight, session-based containers. Each one uses a small amount of memory. Yet Windows does not record which app belongs on which desktop. Therefore, after a restart, your apps reopen on the primary desktop. 

      Window Positions and Size: What Windows Remembers 

      Beyond snapping, many people search for how windows save window positions and size by default. Windows 11 will generally put every window back where you left it during a session.  

      The system remembers your monitor topology as well, so an external display you plug in will have the appropriate windows appear on it. Then there are certain programs that have their own session restore and will open on their own accord.  

      But do not mistake this for a saved profile. Reboot the machine or unplug it for a while, and you will find that the positions can start to wander, especially when dealing with monitors of varying scale. If you depend on a particular arrangement from day to day, any such discrepancy is all too apparent. 

      Where Windows 11 Falls Short 

      While the tools in question are adequate for a given work session, problems arise once that session ends. A restart will see your Snap groups disappear and virtual desktops consolidate your applications back onto one.  

      Then there is the matter of the browser; even if the layout is restored, it will not be with the same tabs you had open. Windows does not let you put a name to a full configuration and save it as a profile either.  

      You are left to put things together by hand when moving from one arrangement to another, say from a design to a writing setup, since they have nothing in common. With several projects on the go and regular restarts, this process amounts to a good deal of rework. 

      Clearly, to save workspace layout Windows 11 builds and keep it after a reboot, you need a dedicated tool. 

      Save Your Entire Setup Automatically with SmartPanels 

      SmartPanels runs on Microsoft Windows and does the one thing native tools skip. It shows how to save workspace layout profiles and restore them in seconds.  

      What happens behind the scenes is that it logs the app, its size and position on the monitor for every window. It will also pick up your browser tabs in Chrome, Firefox or Edge before reopening them and putting them right where they were. The process is straightforward: 

      1. Install SmartPanels. Then open it beside the apps you use most. 
      2. Arrange your windows exactly how you like them. Spread apps across monitors and open your usual tabs. 
      3. Save the arrangement as a profile. SmartPanels captures the full layout. In one move, you save and restore your display settings and app positioning with a single click. 
      4. Assign a hotkey for instant access. Your saved Workspaces with Custom Hotkeys launch with one keypress. 
      5. Restore any profile whenever you need it. One click brings back your windows, apps, and tabs. 

              There is no need to worry about a restart clearing out your work zone since the profile retains the whole configuration. You can keep multiple profiles on hand as well, meaning your client, personal and meeting setups are all just a click away from being restored. 

              Make SmartPanels Fit Your Workflow 

              With SmartPanels, the software is as flexible as your desk. One can make multi-monitor productivity a simple matter on as many as six screens, whether in a home office or a trading setup.  

              Need to coordinate with a colleague? A profile can be sent along by way of email through our Seamless Profile Sharing; they will have the identical layout open with just a couple of clicks. It is equally well suited for an agency to maintain distinct client accounts, or for a researcher to put browsers and papers side by side. Even a teacher can move from one set of lesson plans to another in seconds.  

              In the end, it is a consistent process: put the pieces where you want them, save the arrangement and SmartPanels will do the rest. 

              Learn how SmartPanels Save & Restore Your Workspace Instantly 

              Frequently Asked Questions 

              Does Windows 11 save my workspace layout after a restart? 

              The answer is no, not entirely. When you save workspace layout windows 11, after a shutdown will cause any virtual desktop assignments and Snap groups to be reset, with your applications resuming on the primary desktop. While the monitors tend to fall back into place, you will not have the complete setup as before. 

              What is the difference between Snap Layouts and Snap Groups? 

              As for Snap Layouts, those are the preset grids for tiling. A Snap Group is what you get when you put a set of windows together. Windows will keep track of that group for the duration of your session to let you get it back up and running in short order. 

              Can I use SmartPanels across more than one monitor? 

              That is correct. SmartPanels will handle as many as six displays, remembering the position of every window on them so your multi-monitor arrangement is preserved in one profile. 

              Will SmartPanels restore my browser tabs? 

              As for browser compatibility, it is fully functional with Chrome, Firefox, and Edge; any tabs you have open will be restored along with the rest of your layout. 

              Do I need to pay to try SmartPanels? 

              There is no charge to begin with. The trial runs at zero cost, giving you the chance to put the hotkeys and profiles to the test before planning. 

              Bring Your Workspace Back in Seconds 

              With Windows 11, one has a solid foundation to work from. Snap functions put your windows in order in an instant, and virtual desktops are there to segregate your projects. The problem is that such conveniences are lost on a restart, forcing you to put the same configuration back together over and over.  

              SmartPanels is designed to put an end to that kind of tedium. 

              Simply create a profile for your apps, tabs, and windows, and with a hotkey or single click, you have the entire arrangement restored. This holds true even if you are running six monitors. What might have been a ten-minute chore in the morning is now done in two seconds, making it easy to move from one project to the next. Over 2,000 others have switched from managing their workspace by hand; there is no cost to start the trial so you can do the same. Put in your layout once and let SmartPanels take care of it. 

              Want to save workspace layout windows 11? 
               
              [Get Started] 

              What is the Startup Folder in Windows 10? 

              Startup Folder in Windows 10

              When you power on your computer, various programs and processes begin to load, some of which are necessary, while others may not be as crucial.  

              These programs are managed through the Startup Folder, a vital component in ensuring a smooth and efficient startup experience. This blog will delve into the intricacies of the Startup Folder in Windows 10, including its location, how to modify its contents, and troubleshooting tips to fix common issues. 

              What is the Startup Folder? 

              The Startup Folder in Windows is a special directory where shortcuts to programs are placed, allowing them to launch automatically when your computer boots up. This feature is designed to save users time and enhance productivity by ensuring that essential applications and services are ready to use immediately upon startup. 

              The Startup Folder can include various types of software, such as: 

              • Antivirus programs to ensure your computer is protected right from the start. 
              • Cloud storage services like OneDrive or Google Drive to keep your files synced. 
              • Communication tools like Skype or Microsoft Teams for instant connectivity. 

              However, not all programs that load during startup are beneficial. An excessive number of starting apps might cause your computer to run slowly, take longer to load up, and use up system resources. Therefore, keeping your system operating at its best requires that you understand and take care of the Startup Folder. 

              Where is the Startup Folder in Windows 10? 

              Finding the Startup Folder in Windows 10 can be somewhat elusive if you’re not familiar with the system’s structure. Windows 10 has two primary Startup Folders: 

              • The User-Specific Startup Folder: This folder contains programs that start only for the currently logged-in user. 
              • Path: C:\Users\[Username]\AppData\Roaming\Microsoft\Windows\Start Menu\Programs\Startup 
              • The System-Wide Startup Folder: This folder includes programs that start for all users on the computer. 
              • Path: C:\ProgramData\Windows\Microsoft\Start Menu\Programs\beginning  

              You may use the Run dialog box to access these folders:  

              • Utilize Windows + R to initiate the Run dialog box. 
              • Type shell:startup for the user-specific folder or shell:common startup for the system-wide folder. 
              • Press Enter, and the respective Startup Folder will open. 

              How to Change Programs in the Startup Folder in Windows 10? 

              Managing the programs in your Startup Folder involves adding or removing program shortcuts. Here’s a step-by-step guide: 

              Adding Programs to the Startup Folder 

              Locate the program you want to add: Find the executable file (.exe) of the program or its shortcut. 

              Create a shortcut: Create a shortcut may be selected by right clicking the executable file or its shortcut. 

              Move the shortcut: Copy and paste this shortcut into the appropriate Startup Folder (user-specific or system-wide). 

              Removing Programs from the Startup Folder 

              Open the Startup Folder: Use the Run dialog as described above to navigate to the user-specific or system-wide Startup Folder. 

              Delete the unwanted shortcuts: Locate the shortcut of the program you wish to remove, right-click it, and select Delete. 

              Using Task Manager to Manage Startup Programs 

              Windows 10 also allows users to manage startup programs through the Task Manager: 

              Open Task Manager: Press Ctrl + Shift + Esc or right-click the taskbar and select Task Manager. 

              Navigate to the Startup tab: A list of the applications that launch on your computer may be found here. 

              Enable or disable programs: To enable or disable a software, right-click on it and choose. 

              How to Fix Windows 10 Startup Folder? 

              Sometimes, issues with the Startup Folder can arise, causing certain programs not to launch correctly or the system to experience delays. Here are some common problems and their solutions: 

              Missing Startup Folder 

              If the Startup Folder is missing or inaccessible, it could be due to file corruption or incorrect settings. 

              Check for hidden files: Go to the File Explorer Options > View tab > Show hidden files, folders, and drives to make sure hidden files and folders are visible. 

              Restore the default folder path: If the folder is still missing, you might need to recreate it manually at the default path. 

              Startup Programs Not Launching 

              If certain programs are not launching at startup, consider the following: 

              Check the shortcut path: Ensure the shortcuts in the Startup Folder point to the correct executable files. 

              Run as administrator: Some programs require administrative privileges to run. Set the shortcut attributes so that the administrator is always run. 

              Compatibility issues: Check for compatibility issues with Windows 10. Sometimes, older software may need compatibility mode enabled. 

              Slow Startup Times 

              Excessive programs in the Startup Folder can slow down boot times.  

              Disable unused applications: To disable unused starting programs, use Task Manager.  

              Conduct a system scan: Use the built-in utilities DISM and sfc /scannow to examine and fix system files. 

              Conclusion 

              The Startup Folder in Windows 10 is a powerful tool for enhancing productivity and ensuring essential programs are ready to use immediately upon booting up your computer. By understanding its location, how to manage its contents, and troubleshooting common issues, you can maintain a fast and efficient system startup. 

              You can keep your computer running at its best by keeping your startup folder organized and optimized. Recall that although setting up some apps to launch automatically might be handy, you should balance them to prevent using your system’s resources too much. 

              By following the guidelines provided in this blog, you’ll be well-equipped to manage your Windows 10 Startup Folder effectively, ensuring a seamless and productive computing experience.